xXDavidCXx
Autocross Champion
- Location
- AZ
- Car(s)
- 2017 GTI SE DSG
Uguduggus has worked for me for a number of years and installs.
Ha. I did the same thing. Not on purpose but through trying to wiggle it out the top just snapped back.but I did break the evap canister clip. That thing is literally impossible to get to. I just zip tied it back and secured it with the lower bolt as it was.
Ha. I did the same thing. Not on purpose but through trying to wiggle it out the top just snapped back.

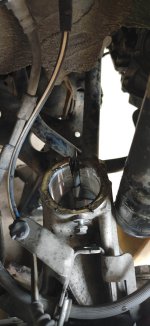
Apologies for the double post but I finished up my fronts today. I tried this tool but it just snapped internally before getting anywhere close to a wide enough gap to pull the factory strut out... Just a word of warning to anyone else considering it.Just wrapped up my front strut install. While i don’t want to get too caught up in waxing poetically about a piece of metal from china, the tool that Maiden69 posted made the job nice and easy. Very minimal effort installing the new koni struts. I did lube it with some motor oil laying around but I did not need to sand paint. I was able to seat the passenger side in 75% by hand and very minimal lifting control arm with the jack there after. The OEM struts basically fell out of the knuckle. Bear in mind, I did take the axle out of the hub rather than 2x4 method but it really wasn’t bad at all.
Most frustrating part was having impact guns I couldn’t use because all my deep impact sockets were sizes suited to Japanese cars so I basically had to do the job by hand. Otherwise no real hiccups to speak of. Thanks to all contributors to the thread!
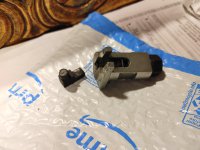
Below is a picture of the difference in how much wider the other style tool spreads compared to one of the socket bits (not easy to see in pic but significantly wider).
View attachment 277853
Apologies for the double post but I finished up my fronts today. I tried this tool but it just snapped internally before getting anywhere close to a wide enough gap to pull the factory strut out... Just a word of warning to anyone else considering it.
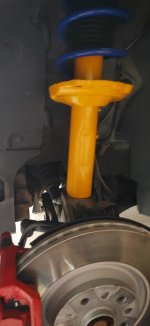
I went out and bought a chisel as a few users mentioned in this thread and it worked extremely well. So well that I'm tempted to throw my traditional socket spreader-tool in the trash. I was able to get my Koni yellows to slide right in without any paint damage, and no grease needed. I am running the Koni's with DG springs, which is a combo I could not find a single review on. After a 15 minute test drive on some particularly rough roads, I am really impressed with the balance of comfort and handling. I will update as I get more miles on the setup. For now I am off to bed after a long day of wrenching.
That’s a bummer. I guess I was lucky or you were unlucky. I planned to use chisels as a backup if the tool didn’t work. Glad you got the job done either way.Apologies for the double post but I finished up my fronts today. I tried this tool but it just snapped internally before getting anywhere close to a wide enough gap to pull the factory strut out... Just a word of warning to anyone else considering it.
I went out and bought a chisel as a few users mentioned in this thread and it worked extremely well. So well that I'm tempted to throw my traditional socket spreader-tool in the trash. I was able to get my Koni yellows to slide right in without any paint damage, and no grease needed. I am running the Koni's with DG springs, which is a combo I could not find a single review on. After a 15 minute test drive on some particularly rough roads, I am really impressed with the balance of comfort and handling. I will update as I get more miles on the setup. For now I am off to bed after a long day of wrenching.
Unless you're installing konis. Ask me how I know.I think they should limit the travel of that tool... I can't see it breaking unless the user tries to over extend it. I also have one of those oblong strut spreader tools I used swapping my wife'a SQ5 springs and the amount you need to pry to allow the strut to separate is minimal.
I'm doing that soon I hope, if I have to sand down the paint so be it. Don't you think that maybe the fact that most people do the 2x4 method may have something to do with it? I think it was super easy on the SQ5 because the lower strut wishbone separates from the control arm allowing it to slide out.Unless you're installing konis. Ask me how I know.
Yes, seen this one before. The mechanic that did the alignment at the dealership for the SQ5 said that those break as well, and that the first copies out were prone to breakage. The one I posted about is supposed to be the revision with a moving pin.to be fair those are Chinese knock offs of the original Hazet Germany 4912-5 which is the current factory VW/Audi spreader tool VAS751003.
https://vw.snapon.com/FileServerRoo...S/VWTools/Brochures/VAS751003_User_Manual.PDF
View attachment 283090View attachment 283091
I'm doing that soon I hope, if I have to sand down the paint so be it. Don't you think that maybe the fact that most people do the 2x4 method may have something to do with it? I think it was super easy on the SQ5 because the lower strut wishbone separates from the control arm allowing it to slide out.
Yes, seen this one before. The mechanic that did the alignment at the dealership for the SQ5 said that those break as well, and that the first copies out were prone to breakage. The one I posted about is supposed to be the revision with a moving pin.
Best of luck, like I said that tool couldn't even get the knuckle spread enough to remove the factory Sachs unit. I'm sure the official Hazet one is better quality, though!I have both, not the originals though...
This I used with the SQ5 last weekend, no complaints, did what it was supposed to and stayed in place all the time,
https://www.amazon.com/gp/product/B08M6GHM93/ref=ppx_yo_dt_b_search_asin_title?ie=UTF8&psc=1
this one has a beefier center section. This I bought for the Koni install... more to follow.
https://www.amazon.com/gp/product/B0BHQ5DYDD/ref=ppx_yo_dt_b_search_asin_title?ie=UTF8&psc=1