ReadTheBook
Autocross Newbie
- Location
- Bay Area Smoke Hell
- Car(s)
- DVP Spektrm, MK4 R32
UPDATE 4/8/18 Had my windshield replaced and the guy sliced my USB wire. I have now removed the cigarette lighter/usb car charger apparatus in favor of an all-in-one hardwire kit with inline 5v converter. There are a few kits out there but this one worked well and is nice and inexpensive. Also pictured are auto headlight wires and HomeLink mirror wiring. This is the hardwire kit I purchased. https://www.amazon.com/gp/product/B078T5T21G/ref=oh_aui_detailpage_o01_s00?ie=UTF8&psc=1

____________ORIGINAL CONTENT______________
So many of you have probably seen SomethingNew71's guide on these forums. It's a good guide and I followed the same general procedures. Running the power cable across the front of head-liner where it meets the windshield, across the a-pillar, and down the weather stripping to the fuse box. That guide is located here: http://www.golfmk7.com/forums/showthread.php?t=10375&highlight=dash+cam
However thought I would outline a few tweaks/tricks on the install. In case anyone wants to know, I used the a119 camera sold here on Amazon. Best bang for the buck around $100. https://www.amazon.com/SpyTec-A119-...8&qid=1484627196&sr=8-1&keywords=spy+tec+a119
Here is a link for the fuse box PDF of our NAR MK7 GTIs - https://www.dropbox.com/s/7m7wc8rdjxjhutf/2016 MK7 GTI Fuse Panel Guide.pdf?dl=0
Alternatively, you can remove the a-pillar trim, run the cable down the wiring harness and zip tie in place. This is what I eventually did when I fixed my a-pillar rattle and had it off anyway. That DIY is here: http://www.golfmk7.com/forums/showthread.php?p=480175
1. I did not run the wire across the air bag in the a-pillar.
I think this is a bad idea and I've seen many people post that they did it. I ran it behind the airbag in order to cross the a-pillar at the top right where it meets the windshield.
• I popped open the top of the a-pillar and put enough pressure on it until the top clip popped out to the security catch it has. This was enough room to do what I needed to do.
• I shimmied a trim tool behind the airbag, between the car body and the airbag, and then put SLIGHT pressure on the airbag. I observed that I could easily fish the USB power cable up through and to the headliner where it meets the a-pillar. I believe this is a much better/safer solution than running across the airbag.

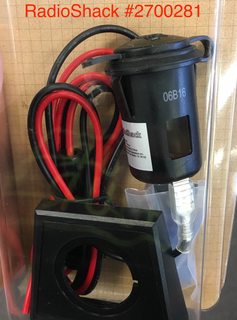
2. I bought a much better 12v plug for about the same price. Surprisingly, at RadioShack. The connections on it are far more robust and safe and it looks and feels like a legit product. It also has a rubber cap if you decide to uninstall the dash cam and want to leave the plug there. https://www.radioshack.com/products/radioshack-12vdc-car-power-accessory-outlet
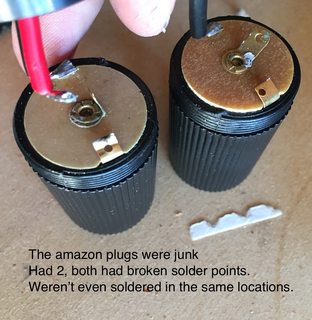
The 12v plug from Amazon outlined in the other DIY was absolute junk. I was appalled. I ordered 2 and both were defective, and almost fell completely apart on me when I was wiring them up. I don't think these are safe products and I will never put them in my cars.
3. I wired in to switched power at the fuse box using an ATO size Add-A-Circuit. I got that part here: https://www.amazon.com/gp/product/B013JU4K76/ref=oh_aui_detailpage_o03_s00?ie=UTF8&psc=1
The cam will power on when I put the car into accessory mode or start it. For dash cams that have parking mode this won't work. I chose not to utilize parking mode at this time. I have outlined how to switch the fuse to always-on power in the image in the event you need that.

4. Grounding: Ground to the large bolt visible from the side panel, I believe it was 14mm.
Link to Scosche dual USB charger. https://www.amazon.com/Scosche-USBC...484626998&sr=8-3&keywords=scosche+car+charger
Anker and Aukey also make well reviewed, and great, thoroughly tested products. I used this Scosche one because its a top rated product and was also thoroughly reviewed on The Wirecutter, who found it to be one of the best they tested.

____________ORIGINAL CONTENT______________
So many of you have probably seen SomethingNew71's guide on these forums. It's a good guide and I followed the same general procedures. Running the power cable across the front of head-liner where it meets the windshield, across the a-pillar, and down the weather stripping to the fuse box. That guide is located here: http://www.golfmk7.com/forums/showthread.php?t=10375&highlight=dash+cam
However thought I would outline a few tweaks/tricks on the install. In case anyone wants to know, I used the a119 camera sold here on Amazon. Best bang for the buck around $100. https://www.amazon.com/SpyTec-A119-...8&qid=1484627196&sr=8-1&keywords=spy+tec+a119
Here is a link for the fuse box PDF of our NAR MK7 GTIs - https://www.dropbox.com/s/7m7wc8rdjxjhutf/2016 MK7 GTI Fuse Panel Guide.pdf?dl=0
Alternatively, you can remove the a-pillar trim, run the cable down the wiring harness and zip tie in place. This is what I eventually did when I fixed my a-pillar rattle and had it off anyway. That DIY is here: http://www.golfmk7.com/forums/showthread.php?p=480175
1. I did not run the wire across the air bag in the a-pillar.
I think this is a bad idea and I've seen many people post that they did it. I ran it behind the airbag in order to cross the a-pillar at the top right where it meets the windshield.
• I popped open the top of the a-pillar and put enough pressure on it until the top clip popped out to the security catch it has. This was enough room to do what I needed to do.
• I shimmied a trim tool behind the airbag, between the car body and the airbag, and then put SLIGHT pressure on the airbag. I observed that I could easily fish the USB power cable up through and to the headliner where it meets the a-pillar. I believe this is a much better/safer solution than running across the airbag.
2. I bought a much better 12v plug for about the same price. Surprisingly, at RadioShack. The connections on it are far more robust and safe and it looks and feels like a legit product. It also has a rubber cap if you decide to uninstall the dash cam and want to leave the plug there. https://www.radioshack.com/products/radioshack-12vdc-car-power-accessory-outlet
The 12v plug from Amazon outlined in the other DIY was absolute junk. I was appalled. I ordered 2 and both were defective, and almost fell completely apart on me when I was wiring them up. I don't think these are safe products and I will never put them in my cars.
3. I wired in to switched power at the fuse box using an ATO size Add-A-Circuit. I got that part here: https://www.amazon.com/gp/product/B013JU4K76/ref=oh_aui_detailpage_o03_s00?ie=UTF8&psc=1
The cam will power on when I put the car into accessory mode or start it. For dash cams that have parking mode this won't work. I chose not to utilize parking mode at this time. I have outlined how to switch the fuse to always-on power in the image in the event you need that.
4. Grounding: Ground to the large bolt visible from the side panel, I believe it was 14mm.
Link to Scosche dual USB charger. https://www.amazon.com/Scosche-USBC...484626998&sr=8-3&keywords=scosche+car+charger
Anker and Aukey also make well reviewed, and great, thoroughly tested products. I used this Scosche one because its a top rated product and was also thoroughly reviewed on The Wirecutter, who found it to be one of the best they tested.
Last edited:
")
