GOLFMK8
GOLFMK7
GOLFMK6
GOLFMKV

DerHase's 2019 GTI Rabbit Edition: HPDE shenanigans

DerHase

Autocross Champion
Location
Hampton Roads, VA
Car(s)
2019 GTI Rabbit
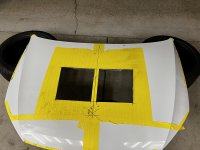
That's some serious commitment, excited to see the results!

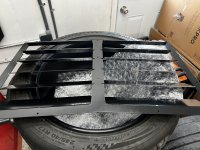
The car should also look MEAN with the hood vents 😅

Yeah, I'm still not sure if I'm going to pick up a spare hood or not. It's tempting since a new OEM one is $300 from a local dealer.

This one while overall nice does have a few hail dents in it, and I think I'd rather not have to store a stock hood to try and preserve it. I'll probably just kick the can down to road if I ever do decide to sell the car and buy a replacement hood and have it painted at that point (if it ever comes).
 

DerHase

Autocross Champion
Location
Hampton Roads, VA
Car(s)
2019 GTI Rabbit
Watching your track videos really makes me want to get to VIR! How long have you been doing track days with your GTI?

Since February of 2022. I had a Mazda2 that I autocrossed since ~2013, and then had been tracking 2-3 weekends per year since 2016. I was at VIR with it once in 2021 (my first time there). Ran a 2:38, a much faster buddy ran a 2:35 in it. The GTI is quite a bit faster 🤣 For reference stock the GTI did 2:26 on all seasons with just DS2500 pads. Realistically I think where *I'm at as a driver* currently, in that same form I could probably extract a 2:23 out of it now.
 

DerHase

Autocross Champion
Location
Hampton Roads, VA
Car(s)
2019 GTI Rabbit
So I've been playing with ABS "adaptations" under threshold braking conditions. I have my DS2500 pads back on since their friction mu is far more consistent at varying temperatures I can actually reach on the street.

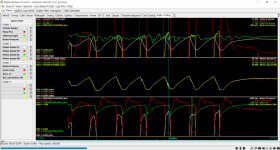
"Brake Booster" absolutely affects how much heat gets put into the front brakes. It does NOT have to do with overall brake vacuum boost as others think. Because I can log the vacuum in the booster, I have these overlaid. You can see vacuum builds VERY slowly. I think people who perceive a difference at idle at just pumping the pedal a ton and depleting vacuum so it feels stiffer:

1686848578555.png


That said, testing under HARD threshold braking found some differences:

Lower numbers *seem* to put more force forward. Rear rotor temps remained constant when checked through the 3 tests where Brake Booster was changed. Not publishing any specific numbers yet because honestly I think my very first "control" test (BB 5, HBB 8) was flawed. It was first and showed much lower front rotor temps than BB settings both higher and lower, I think it just needs to be tested again in the middle or end of other tests. Also I was an idiot and did 6 stops on 2 of the other 3 tests. There is a definite difference in feel between 0 and 8 "brake booster" with no other differences under threshold braking.

I also did one test with "Hydraulic Brake Booster" which affect rear bias as others have alluded to.

I found a modeled "brake overheating" PID and interestingly enough... it does some goofy stuff on one log (not the abrupt pressure drop, and accompanying longitudal Gs).. and nothing (or basically nothing) on another.


This was BB 0 (stock 5), and HBB 8 (stock). You can see the yellow vertical line where the brake overheating goes from 0 to 1.

1686848340212.png


BB 8, HBB 8 (stock). Brake overheating happened at the very end as I got off the brake. Nothing conclusive from that here.

1686848370131.png


BB 5 (stock), HBB 0 (stock is 8) - you can see the rear wheels locking up here. Interestingly the "brake overheating" flipped from false to true (0 to 1), with no real notable change in pressure.

1686848401165.png

So this will require a bit of fiddling with on track, I suspect with the DS3.12/1.11 combo I'll try BB 4 or 5 and HBB 6 as a starting point next time.


I suspect the corresponding change in pedal "feel" may be the ABS internally absorbing some pressure to keep in reserve or something to that effect. Perhaps the 0-10 numbers are % based "factors" to decrease pressure on the individual F/R wheel circuits?

Continental has a still-active patent that might shed some light on how the ABS internal valves work:
https://patents.google.com/patent/US8751129

The brake system shown 10 is capable of performing active brake interventions, i.e. of building up brake pressure independent of the driver's operation of the brake pedal. The ECU 50 for the brake system 10 monitors the various sensors 52, 54 to determine the actual brake system 10 response for the vehicle 11. Likewise the ECU 50 determines the predicted brake system 10 response for the vehicle 11 based upon the actual brake pressure (BP) within the brake system 10 and the control algorithms.
By comparing a predicted braking effectiveness to an actual braking effectiveness the ECU 50 can determine if there is degradation of the brake system 10 decreasing the braking effectiveness of the vehicle 11. An adjustment factor for the brake system 10 response can be determined based upon the comparison and the brake system 10 response can accordingly be adjusted.
The adjustment factor may be an increase in braking pressure (BP) for the brake system 10. Therefore, an original braking pressure may be a braking pressure (BP) at a given time for the brake system 10 prior to application of the adjustment factor. Accordingly, a modified braking pressure may be a braking pressure (BP) at a given time for the brake system 10 after application of the adjustment factor. The adjustment factor may be dependent on the original braking pressure such that, as the original braking pressure increases the adjustment factor also increases.
In one embodiment a predicted braking effectiveness is the predicted stopping distance of the vehicle 11 and an actual braking effectiveness is the actual stopping distance of the vehicle 11. The ECU 50 compares the actual stopping distance to the predicted stopping distance to determine the adjustment factor for the brake system 10 response. The ECU 50 accordingly adjusts the brake system 10 response based on the determined adjustment factor.
By comparing the predicted braking effectiveness to the actual braking effectiveness the ECU 50 can determine if there is degradation of the brake system 10 decreasing the braking effectiveness of the vehicle 11. The predicted braking effectiveness to the actual braking effectiveness of the vehicle 11 can be compared over multiple braking operations to provide accurate information, e.g. for the last five brake operations. Additionally, the ECU 50 may be reset to take into account a sudden shift in the comparison that would indicate wheel brake 15, 16 repair or replacement. Braking maneuvers which require an active braking operation, e.g. as a result of wheel slip, may be factored out of the comparison by the ECU 50 to maintain accurate data.
FIG. 2 shows another embodiment of determining braking effectiveness by comparing the original braking pressure (BP) measured at the master cylinder 2 to the deceleration of the vehicle 11. The example comparison between an original braking pressure (BP) and a predicted vehicle 11 deceleration illustrates a predicted braking effectiveness. The comparison of the original braking pressure (BP) and an actual vehicle deceleration for the vehicle 11 illustrates the actual braking effectiveness. In the embodiment shown, the actual deceleration of the vehicle 10 is lower than the predicted deceleration of the vehicle showing a decrease in braking effectiveness.
The braking effectiveness map, as shown in FIG. 2, can be input in the ECU 50. Comparison of the predicted braking effectiveness and the actual braking effectiveness is used to determine the adjustment factor for the brake system 10 response. The adjustment factor is dependent on the actual braking pressure in the brake system 10. That is, the value of the adjustment factor to the brake system 10 varies according to the original braking pressure (BP). The brake system 10 response may be adjusted by modifying the braking pressure (BP) within the brake system 10 by the adjustment factor, i.e. the braking pressure amount indicated by the braking effectiveness map, shown in FIG. 2. Thus, the adjustment factor for the brake system is the increase in braking pressure (BP) required to increase the actual vehicle deceleration to the predicted vehicle deceleration. The brake system 10 adjusts the braking pressure (BP) to a modified braking pressure.
The ECU 50 can utilize the control algorithms to adjust the overall braking pressure (BP) within the brake system 10 to compensate for the decreased effectiveness and maintain optimal stopping distance for the vehicle 10. The adjusted operation of the brake system 10 can be taken into account when the ECU 50 performs other active braking interventions. Similarly, other active braking interventions may be factored out of the consideration for braking performance, such that environmental conditions leading to decreased stopping distance of the vehicle 11 are not factored into the braking effectiveness of the brake system 10.

There are also some other adaptations worth looking into that nobody really has played with... the full list is here (for my car at least):

IDE00001-Production mode,not active ,3
IDE00252-Brake system vacuum pump,5 ,1 <-- I have played with this one with no observable changes in measured vacuum, I suspect it may point to type of vacuum pump installed?
IDE00820-Activating and deactivating all development messages,0 ,1 <--- Maybe play with and see if it gives diagnostic info on the dash or radio, just maybe?
IDE02332-Deactivate production mode,Deactivating ,3
IDE03659-Roller test bench mode,Manual activation: possible ,1
IDE04456-Brake disk drying,Medium ,1
IDE04508-Hydraulic brake booster,8 ,1
IDE04643-Overboost in brake system,activated ,1
IDE04774-Vehicle and trailer stabilization,not activated ,1
IDE04939-Tire Pressure Monitoring System (TPMS),2 ,1
IDE04949-Engine drag torque control,activated ,1
IDE04951-Brake Boost,5 ,1
IDE04952-Braking torque boost for distance regulation,3 ,1
IDE05055-Hydraulic brake assistant,normal ,1
IDE05057-Brake prefill,activated ,1
IDE05161-Straight ahead brake stabilization,not activated ,1
IDE05286-Expanded electronic differential lock,Weak ,1 <--- This proved to help as it is for disabling the brake murdering stability control. It is actually currently "off".
IDE06425-Dynamometer mode: functional,not activated ,1
IDE07006-Tire pressure monitoring display: tire selection,2 ,1
IDE07292-Brake pre-filling,not completed successfully ,1
IDE07565-ABS in lower speed range,activated ,1 ????? Might be worth playing with
IDE07848-Thresholds for brake performance,activated ,1 <--- This I've not heard of anyone screwing with, and may be worth testing? Maybe hopeful that it removes the "brake overheating" flag?
IDE12030-Rough road optimization,activated ,1 <--- People swear this has to do with traction control. It doesn't. It is logic used to determine if the car is driving over a bumpy road or not so that the ECU doesn't detect false misfires. Leave it activated.
MAS00122-Electronic Stability Program,not activated ,1
MAS00970-Running manufacturer number,activated ,1
MAS01299-Offroad,0 ,1
MAS02080-XCP calibration protocol,not activated ,1
MAS02138-Hill-start assistant,normal ,1
ENG130301-Developer_Function_121,not activated ,1
 

gboticus

Autocross Champion
Location
Vancouver, BC
Car(s)
2019 R DSG
So I've been playing with ABS "adaptations" under threshold braking conditions. I have my DS2500 pads back on since their friction mu is far more consistent at varying temperatures I can actually reach on the street.

"Brake Booster" absolutely affects how much heat gets put into the front brakes. It does NOT have to do with overall brake vacuum boost as others think. Because I can log the vacuum in the booster, I have these overlaid. You can see vacuum builds VERY slowly. I think people who perceive a difference at idle at just pumping the pedal a ton and depleting vacuum so it feels stiffer:

View attachment 283826

That said, testing under HARD threshold braking found some differences:

Lower numbers *seem* to put more force forward. Rear rotor temps remained constant when checked through the 3 tests where Brake Booster was changed. Not publishing any specific numbers yet because honestly I think my very first "control" test (BB 5, HBB 8) was flawed. It was first and showed much lower front rotor temps than BB settings both higher and lower, I think it just needs to be tested again in the middle or end of other tests. Also I was an idiot and did 6 stops on 2 of the other 3 tests. There is a definite difference in feel between 0 and 8 "brake booster" with no other differences under threshold braking.

I also did one test with "Hydraulic Brake Booster" which affect rear bias as others have alluded to.

I found a modeled "brake overheating" PID and interestingly enough... it does some goofy stuff on one log (not the abrupt pressure drop, and accompanying longitudal Gs).. and nothing (or basically nothing) on another.


This was BB 0 (stock 5), and HBB 8 (stock). You can see the yellow vertical line where the brake overheating goes from 0 to 1.

View attachment 283823

BB 8, HBB 8 (stock). Brake overheating happened at the very end as I got off the brake. Nothing conclusive from that here.

View attachment 283824

BB 5 (stock), HBB 0 (stock is 8) - you can see the rear wheels locking up here. Interestingly the "brake overheating" flipped from false to true (0 to 1), with no real notable change in pressure.

View attachment 283825

So this will require a bit of fiddling with on track, I suspect with the DS3.12/1.11 combo I'll try BB 4 or 5 and HBB 6 as a starting point next time.


I suspect the corresponding change in pedal "feel" may be the ABS internally absorbing some pressure to keep in reserve or something to that effect. Perhaps the 0-10 numbers are % based "factors" to decrease pressure on the individual F/R wheel circuits?

Continental has a still-active patent that might shed some light on how the ABS internal valves work:
https://patents.google.com/patent/US8751129


There are also some other adaptations worth looking into that nobody really has played with... the full list is here (for my car at least):

IDE00001-Production mode,not active ,3
IDE00252-Brake system vacuum pump,5 ,1 <-- I have played with this one with no observable changes in measured vacuum, I suspect it may point to type of vacuum pump installed?
IDE00820-Activating and deactivating all development messages,0 ,1 <--- Maybe play with and see if it gives diagnostic info on the dash or radio, just maybe?
IDE02332-Deactivate production mode,Deactivating ,3
IDE03659-Roller test bench mode,Manual activation: possible ,1
IDE04456-Brake disk drying,Medium ,1
IDE04508-Hydraulic brake booster,8 ,1
IDE04643-Overboost in brake system,activated ,1
IDE04774-Vehicle and trailer stabilization,not activated ,1
IDE04939-Tire Pressure Monitoring System (TPMS),2 ,1
IDE04949-Engine drag torque control,activated ,1
IDE04951-Brake Boost,5 ,1
IDE04952-Braking torque boost for distance regulation,3 ,1
IDE05055-Hydraulic brake assistant,normal ,1
IDE05057-Brake prefill,activated ,1
IDE05161-Straight ahead brake stabilization,not activated ,1
IDE05286-Expanded electronic differential lock,Weak ,1 <--- This proved to help as it is for disabling the brake murdering stability control. It is actually currently "off".
IDE06425-Dynamometer mode: functional,not activated ,1
IDE07006-Tire pressure monitoring display: tire selection,2 ,1
IDE07292-Brake pre-filling,not completed successfully ,1
IDE07565-ABS in lower speed range,activated ,1 ????? Might be worth playing with
IDE07848-Thresholds for brake performance,activated ,1 <--- This I've not heard of anyone screwing with, and may be worth testing? Maybe hopeful that it removes the "brake overheating" flag?
IDE12030-Rough road optimization,activated ,1 <--- People swear this has to do with traction control. It doesn't. It is logic used to determine if the car is driving over a bumpy road or not so that the ECU doesn't detect false misfires. Leave it activated.
MAS00122-Electronic Stability Program,not activated ,1
MAS00970-Running manufacturer number,activated ,1
MAS01299-Offroad,0 ,1
MAS02080-XCP calibration protocol,not activated ,1
MAS02138-Hill-start assistant,normal ,1
ENG130301-Developer_Function_121,not activated ,1
Have to give you a huge thanks for all this logging and investigations into the adaptations. Finding a way to bias the braking more rearward to save overheating fronts are something both myself and a friend are fighting with when pushing in the advanced groups. Their cars show much less front wear and more rear wear indicating a better brake balance than ours (both very high front wear, and little rear).

I had seen other people mention these adaptations but when I ask real questions they ghost me. This is amazing work.
 

DerHase

Autocross Champion
Location
Hampton Roads, VA
Car(s)
2019 GTI Rabbit
This ought to do nicely. Have an autocross event tomorrow, then will get to cutting some time during the week barring disaster.

I've been off and on fiddling with adaptations. Haven't noticed any perceivable differences in these two but here are security codes if someone else wants to try:

IDE04643-Overboost in brake system,activated ,1 (use 11966) - didn't notice anything with it deactivated. And nothing notable logging.

IDE07848-Thresholds for brake performance,activated ,1 (use S12345) - nothing noticed on this also.


I need to dedicate like a full damn day to testing these things. But initial checks found no real differences.

Reading some VCDS live data, I suspect the overheating flag is specifically for XDS operation. Realistically on track it may not matter what your settings for it are 😂

I did play with long coding to set my front brakes as 370mm option to potentially help. I haven't driven yet but suspect this will push the overheat flag back some, and or maybe affect balance to some degree. RS3 LMS that are ABS equipped are coded with 370/310 brakes, even though they run 272 rears and 378 fronts with AP calipers F/R.

What I need to do is learn Arduino shit so I can build some IR temp sensor logger for all 4 wheels.
 

Attachments

  • IMG_5090.jpeg
    IMG_5090.jpeg
    2.9 MB · Views: 63
  • IMG_5093.jpeg
    IMG_5093.jpeg
    3.3 MB · Views: 55

gboticus

Autocross Champion
Location
Vancouver, BC
Car(s)
2019 R DSG
I did play with long coding to set my front brakes as 370mm option to potentially help. I haven't driven yet but suspect this will push the overheat flag back some, and or maybe affect balance to some degree. RS3 LMS that are ABS equipped are coded with 370/310 brakes, even though they run 272 rears and 378 fronts with AP calipers F/R.
Where did you set this? Can you up the rear as well? Guess this all requires VAGCom?
What I need to do is learn Arduino shit so I can build some IR temp sensor logger for all 4 wheels.
I know this is for tires but I found this open source project for tire temps monitoring: https://github.com/MagnusThome/RejsaRubberTrac

Could potentially be adapted.
 

ironicbadger

Ready to race!
Location
Raleigh NC
Car(s)
19 MK7.5 R EQT Stg1
Yeah, I'm still not sure if I'm going to pick up a spare hood or not. It's tempting since a new OEM one is $300 from a local dealer.

This one while overall nice does have a few hail dents in it, and I think I'd rather not have to store a stock hood to try and preserve it. I'll probably just kick the can down to road if I ever do decide to sell the car and buy a replacement hood and have it painted at that point (if it ever comes).
$300? Tbh you’d be daft not to at that price.
 

scrllock

Autocross Champion
Location
MI
This ought to do nicely. Have an autocross event tomorrow, then will get to cutting some time during the week barring disaster.

I've been off and on fiddling with adaptations. Haven't noticed any perceivable differences in these two but here are security codes if someone else wants to try:

IDE04643-Overboost in brake system,activated ,1 (use 11966) - didn't notice anything with it deactivated. And nothing notable logging.

IDE07848-Thresholds for brake performance,activated ,1 (use S12345) - nothing noticed on this also.


I need to dedicate like a full damn day to testing these things. But initial checks found no real differences.

Reading some VCDS live data, I suspect the overheating flag is specifically for XDS operation. Realistically on track it may not matter what your settings for it are 😂

I did play with long coding to set my front brakes as 370mm option to potentially help. I haven't driven yet but suspect this will push the overheat flag back some, and or maybe affect balance to some degree. RS3 LMS that are ABS equipped are coded with 370/310 brakes, even though they run 272 rears and 378 fronts with AP calipers F/R.

What I need to do is learn Arduino shit so I can build some IR temp sensor logger for all 4 wheels.
what's the long coding for 370mm brakes? should probably look at this if I put my 370's back on.
 

DerHase

Autocross Champion
Location
Hampton Roads, VA
Car(s)
2019 GTI Rabbit
Where did you set this? Can you up the rear as well? Guess this all requires VAGCom?

I know this is for tires but I found this open source project for tire temps monitoring: https://github.com/MagnusThome/RejsaRubberTrac

Could potentially be adapted.

My original ABS coding for reference:

01FA6BA15021216F807C020460CB6880D60A84014006167610415051D0864B0B0000000012121212B835351919323200

Changed to:

01FA6BA1C421216F807C020460CB6880D62384014006167610415051D0864B0B0000000012121212B835351919323200

Based on info/the spreadsheet linked from this thread:
https://forums.ross-tech.com/index.php?threads/17417/

Direct link to spreadsheet itself for reference:
https://docs.google.com/spreadsheets/d/1V-OKyWGNWASIKmDf_YrTnT22BEh8ocQ1V1qpXOTBX84/edit?usp=sharing

Snips of the important parts:
1687059300961.png


Byte 17 that gets modified is a checksum mirror of byte 4. I did the hex to binary and back conversion and came up with the above which the controller took without issue.
1687059357591.png


I also played around a bit with this ABS decoding site:
https://www.vdveer-engineering.nl/e...g-mk100-abs-coding-30-byte-3q0-5q0-abs-models

I have a buddy who works at the dealer so I'm going to have him pull all the option code info for my particular car just to have for reference.

Also that link is awesome, thank you!

$300? Tbh you’d be daft not to at that price.

Meh, it's more about the pain in the ass of having to safely store yet another large ass part when I am already short on space.

what's the long coding for 370mm brakes? should probably look at this if I put my 370's back on.

See above.
 

DerHase

Autocross Champion
Location
Hampton Roads, VA
Car(s)
2019 GTI Rabbit
My fastest run yesterday:

My codriver's fastest run yesterday:

Car felt good. We settled on 35psi up front, 33psi out back (I think I could tolerate a bit higher out back, but my codriver was complaining of it being too loose).

I definitely drove a lot... angrier than usual. 🤣 The car seemed to like being handled like that, unfortunately I got way behind right before the u-turn on the far end of the course but still managed fastest STH, 2nd in our ST* PAX class overall. I missed #1 by 0.101. The car was definitely capable, I just drove like ass.

We got 6 runs in total, so 12 were put on the car. We had to start spraying the front tires after my 4th run (probably should have done it after the 3rd runs).

Need to figure out what I'm going to do classing wise for auto-x. Best bet might be to just codrive other peoples' cars. Perhaps find another ST* ride for the rest of the year. Some of the most fun I had autocrossing in 2017-2018 was driving a different car at every event :D
 
Last edited:

DerHase

Autocross Champion
Location
Hampton Roads, VA
Car(s)
2019 GTI Rabbit
Got a bunch of goodies on the way to tap directly into the powertrain bus and log stuff from the ABS module directly (since not everything is available relayed through ST... what I really want is individual wheel pressures but I think that is only modeled on the MK100, BUT there are tons of other things that could be of use). Might be a few weeks before that happens as I'm kind of learning as I go with that as well.

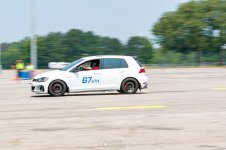
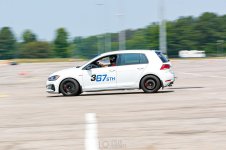
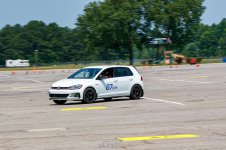
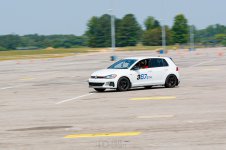
In the meantime here are some photos from the autocross event, I was #67, my codriver Ben was #367.

23-06-18 GTI.jpg 23-06-18 GTI-1.jpg 23-06-18 GTI-2.jpg 23-06-18 GTI-3.jpg
 

DerHase

Autocross Champion
Location
Hampton Roads, VA
Car(s)
2019 GTI Rabbit
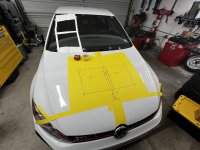
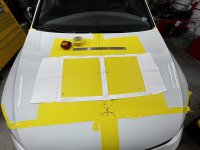
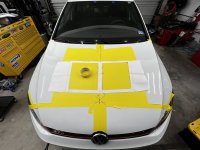
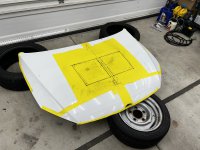
Not a whole lot done recently aside from laying down tape and marking centerline for cutting hopefully this weekend:

1688007992188.png


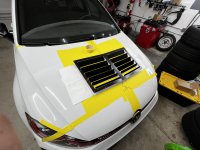
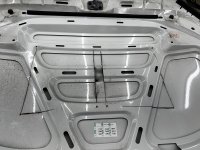
The long piece going across the headlights is a reference for where the radiator/cooling fan area are. You want the front edge of the vent about 2-4in behind that per Race Louvers instructions.

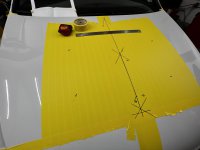
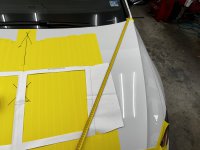
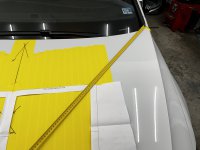
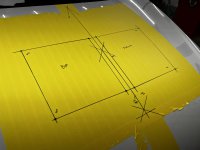
To find centerline I just put a bit of tape in the upper corner edges of the hood and used my tape measure to make reference points a set distance away at the top and bottom areas of the hood, used a straight edge to connect the two dots, repeated the same from the opposite side with an identical reference measurement (top was 770mm IIRC as an example), then connect the dots again and you have an "X" on centerline. Recheck against the corners again to verify, and check against somewhere else if possible and then repeat at the opposite end, then connect the two Xs and you have a perfect centerline.

1688008350232.png


1688008437690.png
 
Last edited:

DerHase

Autocross Champion
Location
Hampton Roads, VA
Car(s)
2019 GTI Rabbit
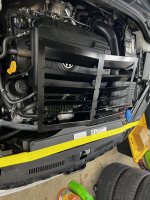
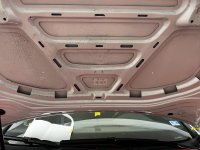
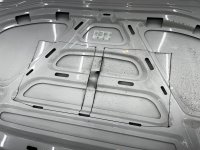
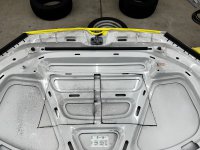
Some photos of the rough measuring process and where the vent should end up relative to stuff under hood.

Measure 14 times and hopefully cut once 🫣
 

Attachments

  • IMG_5188.jpeg
    IMG_5188.jpeg
    2 MB · Views: 27
  • IMG_5195.jpeg
    IMG_5195.jpeg
    2.9 MB · Views: 31
  • IMG_5194.jpeg
    IMG_5194.jpeg
    2.4 MB · Views: 36
  • IMG_5193.jpeg
    IMG_5193.jpeg
    2.7 MB · Views: 30
  • IMG_5192.jpeg
    IMG_5192.jpeg
    3 MB · Views: 34
  • IMG_5191.jpeg
    IMG_5191.jpeg
    2.5 MB · Views: 28
  • IMG_5190.jpeg
    IMG_5190.jpeg
    2.4 MB · Views: 28
  • IMG_5189.jpeg
    IMG_5189.jpeg
    2.9 MB · Views: 29

DerHase

Autocross Champion
Location
Hampton Roads, VA
Car(s)
2019 GTI Rabbit
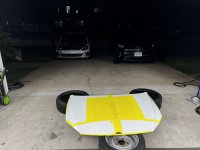
Some pics of the process. Going to hopefully wrap it up tomorrow morning/early afternoon.

I cut just a bit too narrow towards the top (always easier to remove more than add material back in though) for the louvers that protrude into the engine bay to stick through, but another 1/8in should do the trick.

Then sand and touch up paint all the bare edges, place the louvers, mark for rivets, and rivet it all in for good.
 

Attachments

  • IMG_5203.jpeg
    IMG_5203.jpeg
    2.3 MB · Views: 31
  • IMG_5204.jpeg
    IMG_5204.jpeg
    3.5 MB · Views: 27
  • IMG_5206.jpeg
    IMG_5206.jpeg
    2.5 MB · Views: 34
  • IMG_5207.jpeg
    IMG_5207.jpeg
    2.9 MB · Views: 34
  • IMG_5208.jpeg
    IMG_5208.jpeg
    3.4 MB · Views: 28
  • IMG_5209.jpeg
    IMG_5209.jpeg
    3.4 MB · Views: 25
  • IMG_5210.jpeg
    IMG_5210.jpeg
    3.3 MB · Views: 33
  • IMG_5211.jpeg
    IMG_5211.jpeg
    3.2 MB · Views: 32
Top