GOLFMK8
GOLFMK7
GOLFMK6
GOLFMKV

Walnut blast valves 2016 mk7 lots of pictures

7umberjackZac

Go Kart Newbie
Location
Pittsburgh, PA
Car(s)
Gti
Why walnut blast intake valves?


Exhaust gas recirculation (EGR is mandatory on all vehicles nowadays) sends oil vapor back through intake and carbon builds up on valves. Port injection vehicles dissolve this with detergent in the fuel flowing over the valves. Direct ignition engines without dual injection Do not. (Port and direct) This can cause ticking, rough idle, block airflow and eventually become a big issue. Some have it, some don't. Meth users certainly do not. The only way to remove it is by disassembly and hard work.
Don't let this happen to your nice car. Just because you ignore doesn't make it go away.


Here's 43k since last blasting (83k)

To


You will need (*optional for those that want to make life very difficult)
DEALER or ONLINE
- 4 sets of fuel injector rebuild kits. $45 dealer
*- 1 new intake gasket $45 if yours is damaged after removing. Unlikely but you're SOL if you need it and don't have it. VW says to reuse existing.

TOOLS
*- 1/4 drive ratchet
- 3/8 drive rachet
*- 1/2 drive rachet
*- 1in 1/4 socket - to remove oil filter cover
- 7mm socket - intake piping clamps
- 10mm socket
- 13mm socket
- 13mm wrench
- 17mm wrench
- 17mm Crowfoot socket
- #10 triple square
- T20 T25 T30 bits
- sparkplug socket
*- 1/4 extensions
- 3/8 extensions
*- injector removal and service kit VW/Audi
- flathead screwdriver
*- drill driver extension
*- cordless drill
- pliers
- various size vice grips
- pick set
- duct tape
- shop rags
- extending magnet wand
*- magnet dish
*- 1 bottle Techron fuel injector $5
*- 1 bottle of degreaser or wipes
- gloves
*- boroscope camera

BLASTING APPROACH
- Media blaster with gun
- Walnut shells. 25lb larger is easier to get out.
- Air compressor 5Gal or larger.
- Shop vac
- Air gun with extension. ( Long enough to reach down sparkplug holes.)
- protective goggles. Walnut shells in your eye :(
- protective gloves
- plastic sheeting

SCRAPING APPROACH
- Techron
- Toothbrush ( cut it down with scissors to about 3/8 inch)
- curved picks for big chunks
- shop vac

I will make addendum to this as I go
 
Last edited:

7umberjackZac

Go Kart Newbie
Location
Pittsburgh, PA
Car(s)
Gti
Finished post. As good as it gets boys

You're going to need your car up in the air for several reasons. I have harbor freight ramps. $50 Turning over the engine by Hand as well as trying to find, reach, and get to the triple square holding on the manifold. I've heard removing the radiator fans makes it easier to get the bolt, I did not.


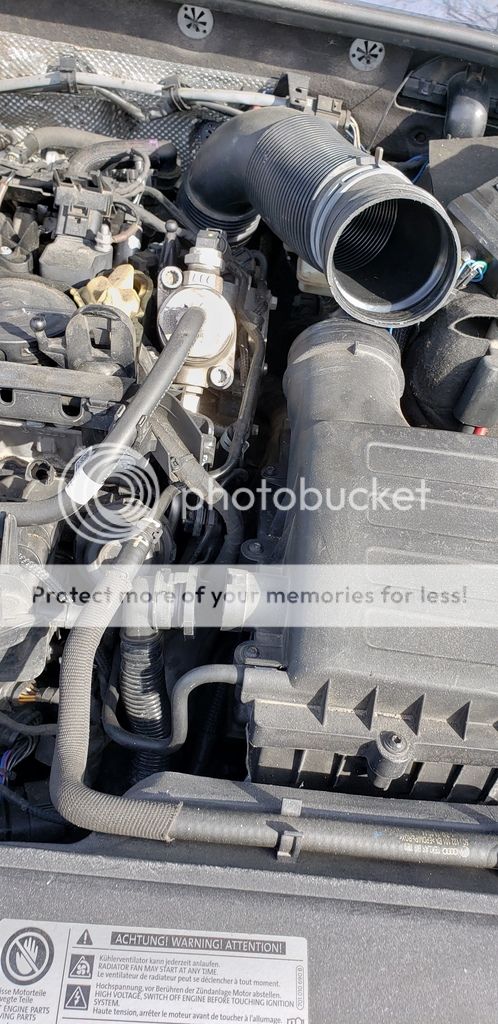
First, you need to remove the airbox then battery.

1

2


Get the SAS hose detached by squeezing both sides and pulling. careful to remove the vacuum hose without breaking anything. 5 seconds versus $150

3


Wobble airbox up and out. Rubber grommets hold it down


I use a pick to get vacuum lines to release with breaking anything


10mm bolts holding battery on. Don't be stupid


13mm bolt holds battery retainer brace
(3) 10mm holding battery tray down

4

5


10mm nuts holding on spark plugs grounds and 10mm studs to remove.


Push connectors in before trying to pull back on them. Makes it way easier so they won't break. They're brittle. Remove all the ignition coil connectors


Basically two types of connectors on the car. This type where you pull on a tab. You don't want to break any connectors, repinning and replacing one connector will set you A LOT of time and $35+


Or this type where a locking tab slides out and then you squeeze down and it pulls apart.


You can do as little or as much as you want but my goal here is to remove the entire wiring harness from the being in the way of intake. Also only moving coolant lines from out of the way.

6


First, break loose the 17mm compression fitting SLOWLY with a rag to release any fuel pressure (high-pressure fuel line gets up 2600psi, it can spray hard enough to make it into your bloodstream - blood poisoning) You can remove high-pressure fuel pump or just the clamp to remove the rubber fuel line. It's a triple square #10. I removed it carefully to check cam follower roller bearing. You have to loosen the bolts a little bit at a time and same with putting it back in because of very tight clearances.


Light lines showing. I'll look at replacing further down the road.


Remove connector on top of the intake, mine looks different because of JB4


Most Torx bolts are T30. I'm removing the air dam as well as the wiring harness and engine cover mounts.


There are 3 connections under the intake on the right side. Again I have JB4 yours will be right there


Remove pretty much every connector you see. It's a lot easier to maneuver the engine when you can pull the entire wiring harness off towards the driver's side


I'm unbolting the coolant line so it will move a bit


unbolt the charge pipe and bracket assembly so you can reach the other 17mm fuel compression fitting


This evap thing needs to be moved. I used pliers to get the little spring clamps open enough to get the hose off the barb ends.


I'm sure I'm missing things here but if you've come this far you can figure it out.


Again I'm removing this to get the wiring harness and these accessory brackets out of the way.


Another connector


There are 3 connectors down between engine at the crank side of the intake that need to come off. As well as the two cam sensor connectors up top


Getting this vacuum line off so as not to break anything


another torx holding this coolant line down


And another


And another


There are two of these clips that you can just use your fingernail to pull open.


Here I'm separating the metal bracket from an indent that connects to the wiring harness plastic


T30s hold the intake manifold to the block. You need to unscrew them the retrieve them with a magnet. Here's where extensions come in handy. There are 10mm on each side of the manifold.


Nice magnet tool


Here is where the sensor will stop the manifold from clearing and coming out. I used a right angle wrench with a t30


The dreaded triple square mounts a bracket to the block that is attached to the manifold. Remove the radiator fan if you have big arms. You can't just remove the nut holding the manifold to the bracket it's a countersunk bolt and it won't clear it.


This is the best angle for your arm to reach and crank on the tripplesquare bolt


You're getting close, the oil filter is now in the way. Remove that and cover with a rag then quickly remove oil filter after manifold comes out. You don't want walnuts in there.... Ask me how


Hooray! You have removed the manifold. One last vacuum line underneath.


Last line to remove.


Go ahead and rotate the engine from the main crank. The big pulley wheel on the passenger side of car. A large socket fits, I'm sorry don't remember. You need the valves to be completely closed on #1. Get a friend to watch and help. Tape off the other intake runners.


Here is rebuilding the fuel injectors


You have to get these seals stretched to fit on. Cut the old ones off carefully


Mechanical pencil tip trick. Save that money


Do not worry it will crush down when you refit the injector into the block. I had zero gas leaks


The actual walnut blasting is pretty much just go at it. I managed to get walnuts in every cylinder even the 2nd time I did this. So use a vacuum and airgun to blast and suck them out. But honestly they will burn off and be no harm to the engine because they are too soft

Best of luck with tackling this. Most time is spent on disassembly and reassembly. You just saved $600-800 by doing it yourself. It may have cost you all weekend and many bruises, cut up hands, swearing and tears but be proud of yourself.
 
Last edited:

The Fed

Old Guys Rule
Location
Florida
Quite a lot of detailed photos. Looking forward to seeing before and after ones of the valves, and how long it took you. How many miles? Tuned? Number and type of chickens? :)
 

7umberjackZac

Go Kart Newbie
Location
Pittsburgh, PA
Car(s)
Gti
Yeah well Verizon forced my phone to update to android Pie after many times deferring it and it corrupted my phone. it wouldn't boot up so I was at serious risk of losing all my information. Took time to get them to fix it. Still working on uploading everything and instructions. My laptop wifi drops out every 60 seconds to 5 minutes because of some awful setting I can't figure out... It takes time bruh
 

MonkeyMD

Autocross Champion
Looks like I'll be paying someone to do this.

Great detailed pics and instructions, but damn, too much work.
 

zero10

Ready to race!
Yeah well Verizon forced my phone to update to android Pie after many times deferring it and it corrupted my phone. it wouldn't boot up so I was at serious risk of losing all my information. Took time to get them to fix it. Still working on uploading everything and instructions. My laptop wifi drops out every 60 seconds to 5 minutes because of some awful setting I can't figure out... It takes time bruh

Thanks so much for posting this VERY detailed and informative guide. I'm not willing to pay a shop to do this work so when the time comes I'll be leaning heavily on this guide. Take the time you need but please don't forget to come back and finish posting whatever else you think would be helpful!

Do you have any suggestions on how to tell when it's time to blast the valves? Judging from your pictures it would be pretty tough to get in there just to check the condition of them.
 

7umberjackZac

Go Kart Newbie
Location
Pittsburgh, PA
Car(s)
Gti
Post complete. Be brave men

Sent from my SM-N960U using Tapatalk
 

7umberjackZac

Go Kart Newbie
Location
Pittsburgh, PA
Car(s)
Gti
Thanks so much for posting this VERY detailed and informative guide. I'm not willing to pay a shop to do this work so when the time comes I'll be leaning heavily on this guide. Take the time you need but please don't forget to come back and finish posting whatever else you think would be helpful!


Do you have any suggestions on how to tell when it's time to blast the valves? Judging from your pictures it would be pretty tough to get in there just to check the condition of them.

Your idle starts to skip a little bit. Gas milage drops a little bit. Really I would say at 60k you probably would benefit.
Other than trying to fish a boroscope camera in between where piping meets the throttle (underneath the manifold) and into the runners there's no way of checking.

Sent from my SM-N960U using Tapatalk
 
Top