GOLFMK8
GOLFMK7
GOLFMK6
GOLFMKV

VW Golf MK7 Estate, GT spec, Tungsten Silver, 1.4TSI

southpawboston

Drag Racing Champion
Location
Somerville, MA
Thorough write-up!

When I had all my door panels (cards UK) off for various OEM retrofits and soundproofing projects, I ran a bead of clear silicone caulk around the speaker frames where they meet the door, after reading about the OEM foam seal failures. I also replaced all four door checks with Jetta checks (3-stage, IIRC). That was actually one of my favorite "upgrades" of all, as I benefit from it every time I open the door on my sloped driveway. I couldn't stand the stock non-indexed checks and never had a car with those before. Note that the Jetta rears have slightly less travel, so if you decide to retrofit them, the rear doors won't open quite as wide, but that hasn't been an issue for anyone getting in or out the back.

With the panels off, I also made a point of augmenting the OEM harnesses (looms UK) with more Tessa tape to cover up areas where they skimped at the factory, to prevent any potential buzzes and rattles from wires contacting the panel. I also ran a bead of silicone caulk around the front door plastic access panel, which is only press-fit in place. Both of mine were loose straight from the factory-- more potential for rattles and buzz.
 

golfdave

Autocross Champion
Location
Scotland (U.K.)
Car(s)
Mk7 Golf GT Estate
Thorough write-up!

When I had all my door panels (cards UK) off for various OEM retrofits and soundproofing projects, I ran a bead of clear silicone caulk around the speaker frames where they meet the door, after reading about the OEM foam seal failures. I also replaced all four door checks with Jetta checks (3-stage, IIRC). That was actually one of my favorite "upgrades" of all, as I benefit from it every time I open the door on my sloped driveway. I couldn't stand the stock non-indexed checks and never had a car with those before. Note that the Jetta rears have slightly less travel, so if you decide to retrofit them, the rear doors won't open quite as wide, but that hasn't been an issue for anyone getting in or out the back.

With the panels off, I also made a point of augmenting the OEM harnesses (looms UK) with more Tessa tape to cover up areas where they skimped at the factory, to prevent any potential buzzes and rattles from wires contacting the panel. I also ran a bead of silicone caulk around the front door plastic access panel, which is only press-fit in place. Both of mine were loose straight from the factory-- more potential for rattles and buzz.

My previous 2001yr VAG car suffered the same speaker seal problem that the MK7 has. All due to the same stupid design (factory speed of install) flaw,.... I knew this car would have the same problem!! So far its not leaked, but as I have to remove the inner door cards to remove & fit the fault door seal, I might as well sort the speakers out!

Re the Jetta door check straps, I remember when the mod became known & have bookmarked it since as I hate the single stop which is at the wrong point for me!. I might not do the rear door check straps then if they you can't open it as far as I need that...!!


I'll have to dig out the info on the part numbers for the fronts as those defo need doing!!
 

Daner

Go Kart Newbie
Location
Stockholm
Amazing attention to detail, Dave!
If I fly you up to Stockholm, will you do all of that for my Red Wagon? :)
It now has over 132000 km on it, and it is still running well. Averaging 6.4 liters/100km (36.65 mpg US / 44 mpg UK).
 

golfdave

Autocross Champion
Location
Scotland (U.K.)
Car(s)
Mk7 Golf GT Estate
Amazing attention to detail, Dave!
If I fly you up to Stockholm, will you do all of that for my Red Wagon? :)
It now has over 132000 km on it, and it is still running well. Averaging 6.4 liters/100km (36.65 mpg US / 44 mpg UK).

That would be good.....if I had the time...:cool:

I have enough work on my list of jobs to do....besides the car I have two old stone-built properties to look after & maintain!!!!!

The reason I went into so much detail is many of the older cars are now on their second or third owners, & most owners will want to do the servicing themselves. By going into the details as to why I chose certain products over others, etc., etc. the info becomes a reference guide, which I hope will help other people.
 

Daner

Go Kart Newbie
Location
Stockholm
That would be good.....if I had the time...:cool:

I have enough work on my list of jobs to do....besides the car I have two old stone-built properties to look after & maintain!!!!!

The reason I went into so much detail is many of the older cars are now on their second or third owners, & most owners will want to do the servicing themselves. By going into the details as to why I chose certain products over others, etc., etc. the info becomes a reference guide, which I hope will help other people.
The detail is always appreciated, but it does make me feel guilty for not doing more for my own car. That is all on me!
 

golfdave

Autocross Champion
Location
Scotland (U.K.)
Car(s)
Mk7 Golf GT Estate
The detail is always appreciated, but it does make me feel guilty for not doing more for my own car. That is all on me!

The saying about me, by people that know me in person, is the following:-

"There's the normal way, & then there's Dave's way!"


🤷‍♂️ :ROFLMAO:
 

neoupa2002

Passed Driver's Ed
Location
Canada
Car(s)
2019 Golf Wagon
October 2022,

The Main Service.
Part 2

Regrease of the turbo wastegate actuator pivot:-

Again, every year as preventative maintenance, I remove the electronic servo actuator for the turbo wastegate. (Charge Pressure Positioner V465). This to enable a through clean & re-grease (use either VAG Hot Bolt paste, or Loctite LB8009 heavy duty grease) of the pivot pin in the linkage between its rod/arm & the turbo wastegate arm. This is a known problem where it seizes up & then the actuator fails! On refit the actuator requires a “initialise” with VCDS to move the actuator several times between its upper & lower stops. Logging the results whilst it does this shows that I was well within spec!

I was reading this, by any chance you can do a write up or even take some pictures the next time you do this? I'm curious as to the procedure as I've heard wastegate actuators seizing is something that comes up on older vehicles
 

golfdave

Autocross Champion
Location
Scotland (U.K.)
Car(s)
Mk7 Golf GT Estate
I was reading this, by any chance you can do a write up or even take some pictures the next time you do this? I'm curious as to the procedure as I've heard wastegate actuators seizing is something that comes up on older vehicles

If you click on the "All of my "How-to" Guides:- Click Here" in my signature in this post...it will take to the post with the big list of ALL my guides..& in that you will see listed this one:-

https://www.golfmk7.com/forums/inde...e-on-the-mk7-golf-1-4lt-tsi-140-150ps.340805/
 

HuangMoney

Go Kart Newbie
Location
Central NJ
Hey Dave,

I left the forums for a bit as I sold my gti that I retrofitted the undertrays you discovered. Came back (sort of) as I purchased a TDI as a daily driver. I live in the US so we only had 2015 golf tdis.

I was reading this post to see if anything new popped up you found as the TDI has torsion beam rear suspension so I ended up only reusing the center exhaust tunnel panel.


Anyway, I noticed a while ago you said something about MIB2.5/Discover pro. I wanted to let you know that the magical european MIB coders have figured out how to reuse the mib1 amp for mib2 (and I believe 2.5). my 2015 SEL had mib1 w/nav and fender audio, and I sourced a glass 8” screen and purchased an unlocked navigation mib2 brain from a man in poland who I also paid ~30 euros to remote in to my laptop and code everything. Parts and coding cost me around 750 USD.

I purchased an MIB2 amp but never used it.

Also, I added several ounces of polyfill to my oem subwoofer and it sounds a bit punchier. Not sure if you believe in that but I feel like it makes a difference after seeing someone post about it. Just some easy mod ideas.


Scott
 

Cuzoe

Autocross Champion
Location
Los Angeles
Last edited:

golfdave

Autocross Champion
Location
Scotland (U.K.)
Car(s)
Mk7 Golf GT Estate
Hey Dave,

I left the forums for a bit as I sold my gti that I retrofitted the undertrays you discovered. Came back (sort of) as I purchased a TDI as a daily driver. I live in the US so we only had 2015 golf tdis.

I was reading this post to see if anything new popped up you found as the TDI has torsion beam rear suspension so I ended up only reusing the center exhaust tunnel panel.


Anyway, I noticed a while ago you said something about MIB2.5/Discover pro. I wanted to let you know that the magical european MIB coders have figured out how to reuse the mib1 amp for mib2 (and I believe 2.5). my 2015 SEL had mib1 w/nav and fender audio, and I sourced a glass 8” screen and purchased an unlocked navigation mib2 brain from a man in poland who I also paid ~30 euros to remote in to my laptop and code everything. Parts and coding cost me around 750 USD.

I purchased an MIB2 amp but never used it.

Also, I added several ounces of polyfill to my oem subwoofer and it sounds a bit punchier. Not sure if you believe in that but I feel like it makes a difference after seeing someone post about it. Just some easy mod ideas.


Scott


As mentioned above by @Cuzoe there are some "aero" parts for the car actually they are more the "Rough road package", but they do provide some smoothing of air flow...for the Torsion beam...there is a bloke on this forum...who is based in Denmark or Nederland's, who has a Seat estate who did the mod....you have to hack the covers as at the factory the plastic insert for the bottom the spring is different, he cable tied it & worked ok...


As for my MIB1 & Dynaudio amp...here in the UK to get a good set up its remove the amp, screen & glovebox & replace....yes the underseat amp can be hacked, but I still need remote access to take care of the security protocols...& my internet to get it in the garage where the car is, is a real PITA.....so I've given up on the idea!!..."IF" I need to replace it, it will most likely be an Alpine "custom fit for MK7 Golf" head unit (X903D-G7R) I will get...
 
Last edited:

HuangMoney

Go Kart Newbie
Location
Central NJ
@HuangMoney All that info is in the MIB II DIY thread, including the coding to make the amp work with MIB II. MIB 1 amp does not work with MIB 2.5 though.

And there are torsion beam aero pieces mentioned in @golfdave's thread... https://www.golfmk7.com/forums/inde...nder-trays-stone-guards-to-a-mk7-golf.320687/
Check Part III. More info elsewhere in the thread too if you don't mind reading/searching.
As mentioned above by @Cuzoe ther are some "areo" parts for the actually they are more the "Rough road package", but they do provide some smoothing of air flow...for the Torsion beam...there is abloke on this forum...who is based in Denmark or Nederlands, who has a Seat estate who did the mod....you have to hack the covers as at the factorty the plastic inser for the bottom the spring is differnt...he cable tied it & worked ok...


As for my MIB1 & Dynaudio amp...here in UK to get a good set up its remove the amp, screen & glovebox& replace....yes the underseat amp can be hacked, but I still need remote access to take care of the security protocols...& my internet to get it in the garage where the car is is a real PITA.....so I've given up on the idea!!...if I need to replace it is most likely an Alpine "custom fit for MK7 Golf" head unit (X903D-G7R) I will get...

Ah, I missed it completely somehow when I skimmed. I definitely will get up to date on the thread and see what everyone with torsion beam is up to, my car has 180k miles on it and I drive it everywhere so rough road covers are definitely beneficial as well.

Good choice on the alpine- the fit and finish is quite nice. I sold the gti to get a project mk4 supra and I am between an alpine and sony head unit.
 

golfdave

Autocross Champion
Location
Scotland (U.K.)
Car(s)
Mk7 Golf GT Estate
October 2023,
Part 1,

The Main Service.
For starters the car’s 9yrs old now!! ...😲....How time flies!!

The timings of every 2, 4, or 5 years means this year was only a minor oil service! However, & did a variety of other “service” items, numerous T.S.B.s (Technical Service Bulletins), other known preventative maintenance, correcting old mistakes, & some modifications!!

Engine Oil:-
I decided to get the same engine oil as I have previously been using, Castrol Edge Titanium FST 0W40, which is VW502 00 approved. I change the oil every year which means I'm on a "Fixed" service so can use a VW "502 00" spec oil instead of a "504 00" flexible service specification oil which is usually a 5w30 grade! OEM oil filter & sump plug washer from the dealers parts dept. were also used. I went on a nice “hot” drive before doing the oil change, so the engine oil was showing circa 93C on the MFD, making it easier to drain!

Cabin Air Filter:-
The mid-grade Mann “Activated carbon” cabin filter that I fitted last year I took out & gave it a vacuum & it looked all okas I tend to replace these every 2yrs due to the lack of mileage!

Brake checks/stripdown:-
Last year the MOT showed up a 16% imbalance on the front axle with my driver side (UK) caliper sticking slightly, so I knew I had extra work to do! This involved cracking open the bleed nipple & using the piston wind-back tool to push the piston fully back & then close the bleed nipple. On re-assembly of the caliper/pads press the brake pedal fully down several times. By pushing the piston fully back & the forward again causes the inner seal to unstick & hopefully I’ll get some more time before I have to rebuild the caliper!

As per usual I removed the calipers & pads, cleaned the discs & all the contact points between the pads/calipers. Then regreased the caliper slide pins with the correct TRW PFG110 grease, & then the pad/caliper contact points with Loctite LB8009 heavy duty grease. As I have an electric parking brake I again need to use VCDS to wind back the motors on the rear calipers!

Re-grease of the turbo wastegate actuator pivot:-
Again, every year as preventative maintenance, I removed the electronic servo actuator for the turbo wastegate. (Charge Pressure Positioner V465). This to enable a thorough clean & re-grease using Loctite LB8009 heavy duty grease on the pivot pin in the linkage between its rod/arm & the turbo wastegate arm. This is a known problem where it seizes up & then the actuator fails! On refit the actuator requires a “initialise” with VCDS to move the actuator several times between its upper & lower stops. Logging the results whilst it does this shows that I was well within spec!

“Problems” with the electronic actuator for the turbo wastegate?:-
I tend to look at the “Drive2.com” forum quite a bit. One of the recurring “problems” I see that affects the EA211 engine is that the electronic actuator for the turbo wastegate seizes up internally, & not just from the well-known known seizing of the pivot pin!

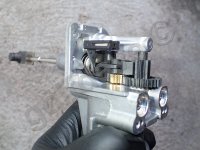
So, whilst I had to remove the actuator from the engine to re-grease the pivot, I decided to remove its black cover...... & internally it was as clean as the day it was made!! According to the forums some people lubricate/grease the gears etc., but as there was none, & no trace of any residue I decided not to lubricate/grease the gears etc.. (I have not found any manufacturers info to state “lubricate”).

On closer inspection the black gears are a waxy plastic that tends to be self-lubricating. There is also the brass or bronze gear, again self-lubricating. I just used a clean old paint brush to remove any dust etc. & manually moved the gears & everything was ok. I used some Autoglym vinyl/rubber conditioner on the weather/waterproofing rubber seals around the bolt holes & the plastic cover & then re-assembled & refitted the actuator. I also did a “recalibration” of the actuator using VCDS.

PB053472---reduced.jpg

Electrical checks:-
I did the usual full electric function check of windows up & down, lights, switches, headlights, indicators, horn, etc, etc., & a complete VCDS scan, with the only faults being generated by removing door speakers & rear taillight units for some of the preventative maintenance!

Cleaning:-
Also, I carried out a full clean outside & the G-techniq crystal black serum ceramic coating is holding up well for 9yrs of age (besides a few stones chips to sort out!). I carried out a light clean of the inside as its kept clean anyway, along with application of rubber/trim stuff to all the door rubber seals, & window seals!!
 
Last edited:

golfdave

Autocross Champion
Location
Scotland (U.K.)
Car(s)
Mk7 Golf GT Estate
October 2023,
Part 2,

Annual UK MOT.
The car passed the MOT with flying colours...of course! The results are the best ever!!!

The emissions results:-
Fast idle test (2500-3000rpm)
CO = 0.00% (0.20% Max. allowed) (0.00% last year)
HC = 0ppm (200ppm Max. allowed) (2ppm last year)
Lambda = 1.00 (0.97 - 1.03 allowed) (1.01 last year)
Natural idle test (450 - 1500rpm)
CO = 0.00% (0.30% Max. allowed) (same as last year)

The fact that since I got the car remapped in September 2020, the Hydrocarbon (HC) content has dropped from 21ppm (October 2019 MOT) down to 4ppm (October 2020 MOT) & now 0ppm, running on the same fuel as before, proves the mapping is resulting in a more complete burn of the fuel!! This being better for the environment & more green/eco!!

Maha-brake test results:-
(Left / right)
Front axle on winter tyres 2023:- 291kg / 337kg, 13.6% diff
Front axle on summer tyres 2022:- 402kg / 337kg, 16% diff (25% max allowed)

Rear axle on winter tyres 2023:- 232kg / 258kg, 10% diff
Rear axle on summer tyres 2022:- 252kg / 256kg, 2% diff (25% max allowed)

Parking brake on winter tyres 2023:- 159kg / 161kg, 2% diff
Parking brake on summer tyres 2022:- 210kg / 196kg, 7% diff (50% max allowed)

Car total weight
Winter tyres (1/4 tank of fuel) 2023 = 1153kg
Summer tyres (half tank of fuel) 2022 = 1333Kg

(VW state in the sales brochure that the “unladen weight” for my car is 1354kg which included the fuel tank 90% full, driver of 68kg, & 7kg of luggage. So, remove 68kg, 7kg, & (45lts fuel @0.8kg/lt=36kg) = 1,243kg)

Pushing the piston back on the seems to have worked as the imbalance is less on the front axle! However, the overall braking force generated on both axles is down, with the rear axle being worse compared to last year! This could be attributed to the fact that the rear has circa 20kg less fuel in the tank, & that the car is on the winter tyres, which grip less on the metal rollers compared to the summer tyres (from what I can find out).

One other odd fact is that the car is 180kg lighter compared to last year!? That weight difference alone would alter the grip factor of the car, reducing the total braking force generated, but I haven’t removed anything compared to last year!! So, besides the weight of the MOT person & the 1/4tank of fuel I have no idea!!
 
Last edited:
Top