GOLFMK8
GOLFMK7
GOLFMK6
GOLFMKV

Power Liftgate mod recommendation ?

Nuje

Go Kart Champion
Location
Island near Vancouver
Car(s)
2015 Sportwagen TDI
View attachment 294902


did you make these connections?
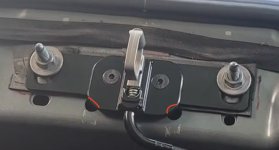
Purple one I am sure I did not connect. It's just hanging loose in the trunk. I honestly can't remember on the yellow one (she must mean the "A" pillar), but I don't remember leaving a yellow wire un-used up front there.

Don't worry about it too much. Provided you have power and ground on the proper wires, I don't think there's too much that one could break by having the wires connected or not connected. For me, I just installed everything, hooked up everything best I could figure out, then tried it out and saw what worked and what didn't (and it all pretty much worked :D ). Worst thing was that it seemed unreliable at first - like it wouldn't close all the way sometimes. But when I went back the next day, it was totally reliable to close/suction/lock. And it's been like that ever since. The only thing that's unreliable now is the "kick to open" add-on that I'd purchased separately. Takes 3-6 kicks to open (sometimes), so I don't even bother - I just push in the VW badge and let it open.
 

Lori87Mi

Passed Driver's Ed
Location
Italy
Car(s)
MK7
Hello and thanks for your explanations.
I found a video of an installation on VW Atlas, the kit looks exactly the same.
At minute 13:40 you see the CANBUS connection cable to the air conditioning and you see the yellow cable splitting coming from CANBUS extension cord, but he doesn't connect it in the video either, the cable is left free on the ground and he doesn't talk about it.
I think if that yellowe cable had to be connected he would have talked about it in the video. Vera explains that i need to look for where to connect it with a multimeter, it's an operation that should be explained and remembered because of how complicated it is.... :D

VW Atlas Installation Video


----

Another difference of this kit is that the connector/splitter for the original VW tailgate button is not present. The only splitter is for the lock latch but not behind the button. Can it still open by flipping the VW button logo?
 
Last edited:

Nuje

Go Kart Champion
Location
Island near Vancouver
Car(s)
2015 Sportwagen TDI
Yep - that's how I open the hatch 90% of the time (kick sensor is wholly unreliable and the key fob requires me holding down the trunk unlock for 3-4sec...and it's usually buried in my pocket anyway because I have KESSY).
 

Nuje

Go Kart Champion
Location
Island near Vancouver
Car(s)
2015 Sportwagen TDI
I just noticed on that video that he put the power strut wire outlet against the body of the car (?!). Pretty sure the instructions I had were to put that end on the hatch, and then run the wires into the hatch through the "bumper" plug that's adjacent to the hatch's ball attachment. That's the way I did it and it works for me. Maybe the Atlas instructions are different...for a reason....?
 

Lori87Mi

Passed Driver's Ed
Location
Italy
Car(s)
MK7
I think the procedure for the VW Atlas is different as it doesn't have the same rubber tubes for the cable passage.

However, it seems that there is no connector behind the VW button on the tailgate and the yellow cable and the purple cable are not needed.

Now I will have to find the time to disassembly everything and install it and at the same time I have to retrofit the rear view camera.
 

Lori87Mi

Passed Driver's Ed
Location
Italy
Car(s)
MK7
@Nuje hi man,
I'm running the installation. Everything seems to work except the tailgate never closes completely. not even if i pushing it by hand.
What can it be? I passed the rubber hose as in the photo. I also tightened it with a zip tie to take up less space.
Did you also have these operating problems at the beginning?

20231202_155811.jpg
20231202_155839.jpg
20231202_155855.jpg


i'have done a video


Thank you
 
Last edited:

Lori87Mi

Passed Driver's Ed
Location
Italy
Car(s)
MK7
@Nuje
I tried in every way but it doesn't close. yet the seller is sure that the kit is fine for my car.

It seems to me that the strut tube is too fat to close, in fact if I force it to close with my hands I can hear a contact noise between the strut tube and the car body metal.. and it created some scratches on car metal.

Are you able to take some more photos of your pipes and how they work?
and maybe even photos of ballheads installed ?

https://youtube.com/shorts/IuOid_crq5M?feature=share

Thank you :)
 
Last edited:

Nuje

Go Kart Champion
Location
Island near Vancouver
Car(s)
2015 Sportwagen TDI
Argh - sorry I missed your post; golfmk7.com is really sporadic with getting notifications to me.

Anyway...mine was indeed a little hesitant to fully close when I first installed it, but it was at least very close...and it worked sometimes.
Yours is getting nowhere close and seems to be hitting something, as you suggest.

Just to rule out some obvious things, is the latch able to reach and "grab" the "power suction" thing that's bolted to the body of the car?
Maybe take a similar video from inside of yours trying to close and see what is happening with that part. The "beep" at the end is the sound it makes when it is fully closed. It closes perfectly fine for me now almost all of the time. I don't know why it was intermittently not fully closing (but again, it was just like maybe 2-3mm away from fully closing - if I just hit the hatch with my hip, it would then close/lock).

One thing I notice with yours is that the "suction" device is mounted as close to the back of the car as possible; I had to mount mine as close to the FRONT of the car as possible (even had to grind down the corners of the metal plate a little as well - represented by the red lines - but that was just to get the plastic trim piece to fit back in).


This is the model number and how my strut is mounted in my car.
Power.hatch.strut.jpg


Oh - and looking at yours, the last five digits of the part number of the strut are different. 🤔
I took out some calipers and the diameter of my strut (around where the part number is showing) is 32.5mm; the diameter of the narrower portion closer to the hinge of the hatch is 29.0mm.
 

Attachments

  • Power.Hatch.suction.jpg
    Power.Hatch.suction.jpg
    112.8 KB · Views: 14
Last edited:

Lori87Mi

Passed Driver's Ed
Location
Italy
Car(s)
MK7
thanks for the details, I really tried every way... I'll try again. do you happen to have a photo of the ballhead on thebcar body? because in my opinion it is too close and it strikes... The next attempts I make I want to put spacers (another metal gasket ring)
20231202_155811.jpg
 

Nuje

Go Kart Champion
Location
Island near Vancouver
Car(s)
2015 Sportwagen TDI
Here are the ball attachments:
Near the hinge:
Power.hatch.strut.ball.1.jpg


And at the bottom of the tailgate:
Power.hatch.strut.ball.2.jpg


If I recall, one of the ball things they provide is taller than the other (or maybe that was in the first kit I tried(?)).
 

Lori87Mi

Passed Driver's Ed
Location
Italy
Car(s)
MK7
Thanks for the measurements you provided. I'll check them.
Plus , I see that you have a rubber gasket ring behind the metal ones. It was not provided to me in my kit... I'll add something for depth spacers...
 

Nuje

Go Kart Champion
Location
Island near Vancouver
Car(s)
2015 Sportwagen TDI
Yeah - I added those so that I didn't have metal sitting on metal and wearing away the paint and creating a place for corrosion to get started.

If I recall correctly, the kit came with a "sheet" (like maybe 10x5cm(?)) of some rubber-like gasket material that I think was mostly meant to go under the plate at the "suction lock". I cut out some of that to use under the metal washers ("spacers") and still had enough to put under the suction lock.
 

Lori87Mi

Passed Driver's Ed
Location
Italy
Car(s)
MK7
@Nuje
another information. How did you manage to keep the cable rubber gathered and short? Mine remains stretched out and if I shorten it and stick it in the hole anyway then the cable goes back and the rubber extends again (probably this is what doesn't allow it to close completely)
Thank you
 
Last edited:

Nuje

Go Kart Champion
Location
Island near Vancouver
Car(s)
2015 Sportwagen TDI
From what I remember with that one (previous one I actually cut ~8-10cm off of the rubber boot), I pulled the WIRES more tightly inside the hatch so that they traveled a shorter distance, taped them down temporarily so they wouldn't retract, and that made the "accordion" of the rubber boot compress more so that it was the shorter distance that you see.

You can see how tightly the "ribs" of the boot are bunched together here compared to yours.
 
Top