ajvorse
Passed Driver's Ed
- Location
- Oxford, MS and Warner Robins, GA
- Car(s)
- MK7.5
Novustech.com OEM Roof Rack Lowering Kit - Review & Install
I was looking for a more “flush” look for my Inno Wedge 660 roof box because I hated how high it sat and came across this kit made by a small company in Canada called Novustech costing $328 with shipping. I gave it a shot and placed a pre-order for it with an expected ship date of August. Surprisingly they made it and shipped well ahead of time and received it in early May!

It was packaged extremely well and the hardware felt very solid. Unfortunately the kit was missing a few mounting fasteners so I had to run to Home Depot and pick up some replacements. The kit comes with:
(4) lowering brackets
(4) threaded inserts
(8) M6x1.0 fasteners
(8) M8x1.25 fasteners
Installation
Tools required:
Drill
6mm Drill Bit
8mm Drill Bit
Allen Key
Rubber Mallet
WD40 (lubricant spray)
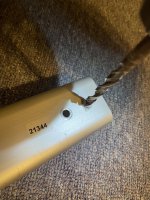
Start off by obviously removing the roof racks from your car and finding a place you won’t mind getting lots of metal shavings (I opted to use the downstairs living room naturally). Work on one roof rack at a time as the front and rear brackets are different and you don’t want to accidentally mismatch the OEM side mounts. On the bottom of your OEM bars, you will see 2 black metal rivets on either side. Using a 6mm drill bit, start “milling” the heads of the rivets off like so:

Eventually you should be able to drill through the entire head of the rivet allowing you to access the mounting holes as well as slide the side brackets out of the bar. (Note: if you are unable to remove the side brackets, take a smaller drill bit and drill out any remaining portion of the rivet from the mounting hole.)
After this, you should be able to remove the side brackets. Looking at them from the side you’ll notice that the top of the rivets are still in place not allowing you to slide the threaded inserts in.

To solve this issue I took a 1/4 drill bit and enlarged the holes on the top of the bracket allowing the rivets enough room to fall out. I would also recommend taking some sandpaper if you have some and clean up the holes to allow a smoother surface for the lowering bracket to slide over

Next take your favorite lubricant and apply it to the top of your OEM side brackets. It’s a VERY tight squeeze and will assist the lowering brackets to slide into place. Be careful with the two plastic guide holes on your OEM brackets as I broke mine off on accident attempting this on the first one. To mitigate this I flipped the metal brackets that mount to the car upwards like so (this will also help give you some leverage to push them down into place):

If you’re having trouble getting them to fully seat (like me) I used a rubber mallet and tapped them into place.
After you’ve gotten them to fully seat, take the supplied threaded inserts and slide them into place through the top of the OEM side brackets. Then take the supplied 6mm fasteners and thread them through the bottom and tighten using an allen key. (I chose to apply some loctite as well)

Almost done now onto the last step! Take your 8mm drill and OEM roof bars and enlarge the holes on the bottom of the bars to allow your 8mm fasteners to fit.

Slide your roof bar onto the bottom of the lowering bracket, thread and tighten using an allen key. (I found the some of the holes to be slightly out of line not allowing me to insert the fasteners and had to drill out the hole a little more to get them to line up). Now just repeat this for the remaining 3 sides and you’re done!
I was looking for a more “flush” look for my Inno Wedge 660 roof box because I hated how high it sat and came across this kit made by a small company in Canada called Novustech costing $328 with shipping. I gave it a shot and placed a pre-order for it with an expected ship date of August. Surprisingly they made it and shipped well ahead of time and received it in early May!
It was packaged extremely well and the hardware felt very solid. Unfortunately the kit was missing a few mounting fasteners so I had to run to Home Depot and pick up some replacements. The kit comes with:
(4) lowering brackets
(4) threaded inserts
(8) M6x1.0 fasteners
(8) M8x1.25 fasteners
Installation
Tools required:
Drill
6mm Drill Bit
8mm Drill Bit
Allen Key
Rubber Mallet
WD40 (lubricant spray)
Start off by obviously removing the roof racks from your car and finding a place you won’t mind getting lots of metal shavings (I opted to use the downstairs living room naturally). Work on one roof rack at a time as the front and rear brackets are different and you don’t want to accidentally mismatch the OEM side mounts. On the bottom of your OEM bars, you will see 2 black metal rivets on either side. Using a 6mm drill bit, start “milling” the heads of the rivets off like so:
Eventually you should be able to drill through the entire head of the rivet allowing you to access the mounting holes as well as slide the side brackets out of the bar. (Note: if you are unable to remove the side brackets, take a smaller drill bit and drill out any remaining portion of the rivet from the mounting hole.)
After this, you should be able to remove the side brackets. Looking at them from the side you’ll notice that the top of the rivets are still in place not allowing you to slide the threaded inserts in.
To solve this issue I took a 1/4 drill bit and enlarged the holes on the top of the bracket allowing the rivets enough room to fall out. I would also recommend taking some sandpaper if you have some and clean up the holes to allow a smoother surface for the lowering bracket to slide over
Next take your favorite lubricant and apply it to the top of your OEM side brackets. It’s a VERY tight squeeze and will assist the lowering brackets to slide into place. Be careful with the two plastic guide holes on your OEM brackets as I broke mine off on accident attempting this on the first one. To mitigate this I flipped the metal brackets that mount to the car upwards like so (this will also help give you some leverage to push them down into place):
If you’re having trouble getting them to fully seat (like me) I used a rubber mallet and tapped them into place.
After you’ve gotten them to fully seat, take the supplied threaded inserts and slide them into place through the top of the OEM side brackets. Then take the supplied 6mm fasteners and thread them through the bottom and tighten using an allen key. (I chose to apply some loctite as well)
Almost done now onto the last step! Take your 8mm drill and OEM roof bars and enlarge the holes on the bottom of the bars to allow your 8mm fasteners to fit.
Slide your roof bar onto the bottom of the lowering bracket, thread and tighten using an allen key. (I found the some of the holes to be slightly out of line not allowing me to insert the fasteners and had to drill out the hole a little more to get them to line up). Now just repeat this for the remaining 3 sides and you’re done!
Attachments
-
 B38384AE-5D02-4EB2-B373-4831DA657AF9.jpeg1.9 MB · Views: 54
Last edited:
