daujin_mk7
Go Kart Champion
- Location
- PA
- Car(s)
- 2016 GTI DSG
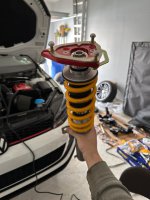
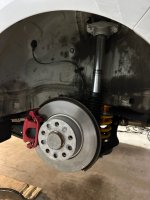
I took two days off work and the weekend to install my new suspension and some other parts I had collected up. I was not sure how long it would take for me to remove the old suspension and install the Ohlins R&T as it was the first time working on my suspension. Happy to say it only took me two days. In the days leading up to the project, I printed out the torque specs from the factory manual and read through multiple suspension threads (a huge thank you to all in the community). I took my time and had a few extra hands helping me along the way. I used the 2x4 method. The videos I saw of the method made it look simple. Compress the strut, couple of taps on the rotor, and the strut assembly should pop out. That was not my case. Maybe because it was the first time the suspension was being worked on in five+ years. I'm not sure but it took some wrestling, compressing, and PB blaster to get it out.
I ran into some other issues along the way.
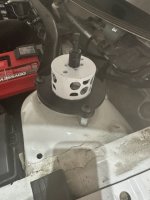
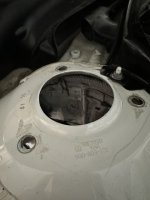
Problem 1: On my driver side 034 street density strut mount, one of the nuts holding the bolt broke/spun freely. We decided to try a sawzall to cut the head of the bolt. That was a terrible choice. It was a tight spot and vital components nearby. We ended up doing some damage to the Eurocode front chassis brace strut mount brace. I do not think we damaged it enough to effect it structurally so it was reused after using flat black spray paint to match.
Problem 2: Pushing in the Racingline lower engine mount proved to be a PITA. Granted, I am stupid and should have not rushed the process. After reading through some MK6 threads, I placed the lower engine mount in the freezer overnight. This was a mistake! Wait longer. Placing it two days straight in the freezer really allowed the metal to shrink and be easily pushed into the subframe. Back to the issue. I could not press it in after only placing it overnight in the freezer. I attempted to use hand tools (block of wood and hammer) to press it in. That didn't work so I called a buddy of mine up with a 15 ton hydraulic press. We got it in easy. As we pulled it out of the hydraulic press, we realized we made a huge mistake. We weren't able to apply even pressure on one of the lower engine mounts as it has a "bump" for the bolt to thread in. As a result when pressed against a flat surface, the mount failed and cracked. Soooo... that was a ~$300 mistake. Called a bunch of places to see if they could overnight the part or had it available for local pickup. No overnighting available and the local shop had just sold their last one in stock earlier that day. Fortunate for me, an email from UroTuning was offering me 5% back on every part I purchased. I purchased a new Racingline lower engine mount since FL to PA wouldn't take more than a week. It arrived in three business days. While I was shopping, I purchased a R600 intake because I couldn't resist. Subframe, LCA, and deadset kit to be installed later.
Problem 3: I was not able to install my SuperPro rear trailing arm bushing. My rear handbrake brackets do not want to come out. I cannot get the pin out of the rivet. Despite using multiple punches and different size hammers, it will not budge. I am thinking of drilling the pin out, popping the rivet out, then using a zip tie to secure both handbrake brackets to the trailing arm.
I ran into some other issues along the way.
Problem 1: On my driver side 034 street density strut mount, one of the nuts holding the bolt broke/spun freely. We decided to try a sawzall to cut the head of the bolt. That was a terrible choice. It was a tight spot and vital components nearby. We ended up doing some damage to the Eurocode front chassis brace strut mount brace. I do not think we damaged it enough to effect it structurally so it was reused after using flat black spray paint to match.
Problem 2: Pushing in the Racingline lower engine mount proved to be a PITA. Granted, I am stupid and should have not rushed the process. After reading through some MK6 threads, I placed the lower engine mount in the freezer overnight. This was a mistake! Wait longer. Placing it two days straight in the freezer really allowed the metal to shrink and be easily pushed into the subframe. Back to the issue. I could not press it in after only placing it overnight in the freezer. I attempted to use hand tools (block of wood and hammer) to press it in. That didn't work so I called a buddy of mine up with a 15 ton hydraulic press. We got it in easy. As we pulled it out of the hydraulic press, we realized we made a huge mistake. We weren't able to apply even pressure on one of the lower engine mounts as it has a "bump" for the bolt to thread in. As a result when pressed against a flat surface, the mount failed and cracked. Soooo... that was a ~$300 mistake. Called a bunch of places to see if they could overnight the part or had it available for local pickup. No overnighting available and the local shop had just sold their last one in stock earlier that day. Fortunate for me, an email from UroTuning was offering me 5% back on every part I purchased. I purchased a new Racingline lower engine mount since FL to PA wouldn't take more than a week. It arrived in three business days. While I was shopping, I purchased a R600 intake because I couldn't resist. Subframe, LCA, and deadset kit to be installed later.
Problem 3: I was not able to install my SuperPro rear trailing arm bushing. My rear handbrake brackets do not want to come out. I cannot get the pin out of the rivet. Despite using multiple punches and different size hammers, it will not budge. I am thinking of drilling the pin out, popping the rivet out, then using a zip tie to secure both handbrake brackets to the trailing arm.
Attachments
-
 64C269E3-1CC4-4EBF-AEC6-A5322F467073.jpeg72.3 KB · Views: 36
 -
 57C5B2C4-6B7B-42BF-902F-783B72CF0182.jpeg85.2 KB · Views: 39
 -
 7BBED2B7-EA31-4A23-BCC1-E6FE2030E94A.jpeg102.4 KB · Views: 40
 -
 D2082E1F-D5A0-43E1-BA9F-4D0DF7A1F66B.jpeg99 KB · Views: 38
 -
 D9ADE8DC-E352-4EDD-9614-590D7878FE0E.jpeg84.4 KB · Views: 41
 -
 5CEB1522-3533-4FCA-AD8F-24191855321E.jpeg63.6 KB · Views: 42
 -
 F30D1375-23DA-4B13-82E8-B691D63A512E.jpeg81.1 KB · Views: 42
Last edited: