Phillip.Triplett
Passed Driver's Ed
- Location
- Chattanooga, TN
EDIT: I originally made this post using Photobucket to be the portal for the photos. Since they have updated and require payment for services I had to remove the photos and attach them via the Forum management. The downside is I cannot have them through the post like originally posted. I tried my best to pull all the photos and put them in the order in which you will be taking the components apart. If you have any questions feel free to ask and I will do my best to help. Good Luck!!!
I want to say that taking apart the A Pillars on the new MK7 is a serious undertaking and should not be done or tried by those who have 1. not worked with interior trim pieces and 2. have a willingness to take your car to the dealer and pay to have fixed what you break.
I have not had a chance to get pictures going but will get pictures and maybe even a simple video on this undertaking. The only picture I have at the moment is the one of my a pillar sitting on my dash but can say this is going to be one that makes you cuss while doing. Below will be in words how to do so and then I will post the pictures with later.
In words:
Step 1
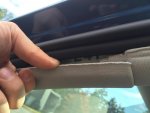
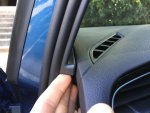
Remove Dash End Plate using a trim pry tool. Very simple to do, there are three points of contact that need to be popped to remove this piece. (easy)
Step 2
Remove Middle A-Pillar trim using a trim pry tool. This is the middle piece that curves with the body and the small, front triangular glass. This will need a little bit more persuasion to pull out but be careful not to bend causing stress whitening on the part. (easy)
Step 3.
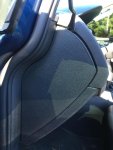
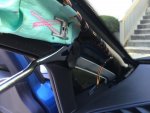
Beginning A-Pillar Trim Removal
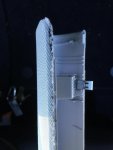
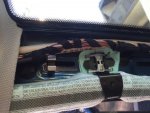
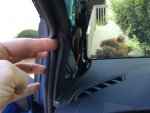
The A-Pillar is held on by three "christmas tree" clips. If you have dealt with any Volkswagen interior trim piece then you will know exactly what I am talking about. Unlike previous models of Volkswagens that had two clips and a T20 screw holding the pillar on, Volkswagen has gone away with the screw and "Airbag" cover in place with a more security style clip.
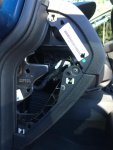
The best way I found to remove the clips: holding the a pillar at the top (near headliner) pull the bottom out from the door sill cover and lift up towards the windshield. This will give you a little gap so that you can see the places the three clips are. Using either a flat head or a trim pry tool slide the clips out of the a pillar trim leaving the clip in the body of the vehicle. (This is very important as when you see the type of clip that is now being used if you try to simply "pull" the pillar and clip you will end up damaging not only the clip but quite possibly the pillar itself)
I did not get a good enough picture but can explain. Once you have done the above and make the first pull of the A-Pillar, you will know because the a pillar pops out a bit but won't let you all the way due to that "security" clip, reach up through the opening by the body of the vehicle and use a flat head to pop the clips out of the trim as shown below. The lowest clip down was not a "security" clip on both sides of my a pillars so you do not have to remove it from the trim, just the top two.
Also good thing to have is an Exacto knife. I say this because on my MK7 I encountered that when the windshield was installed the glue squeeze out ran onto my a pillar enough to catch the fabric. By just pulling the a pillar from the glue has the potential to rip the a pillar and pull the fabric making your 2015 look like a 1994 trim piece. We have this same problem on the Passat and I have ripped plenty at the plant removing windshields. The only bonus I have is a plethora of Passat A Pillars to use and I am sure you all don't have many MK7 A Pillars, lol.
Removing A-Pillar Continued
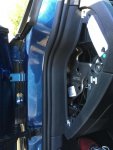
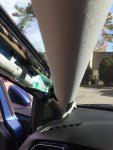
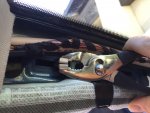
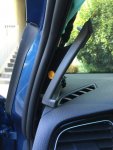
Now that the A-Pillar is unclipped the only thing to do is pull the pillar out. This is a little fun as it takes a bit more force. As before the a pillar slides into the side of the dash pad cover but now also the trim piece at the triangle door glass. (from now on referred as the 1/4 glass).
This seemed to me to be the most difficult part as it took a lot of persuasion to get the a pillar to come out of its hole without trying to damage the a pillar in the process. It will come out but again does take a bit of persuasion. (this I would say was the most difficult part)
I found rotating the trim towards the front of the vehicle so that the part that is slid into the 1/4 glass trim comes out first and then rotating back made the pillar trim come out best. This is just going to have to be a play with it thing as it's easy said then done.
Step 4
Removing 1/4 glass trim
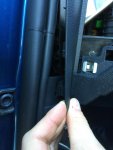
This trim piece is held on by one clip that simply pops out with a trim pry tool or a flat head. The piece then simply slides up and out. A little persuasion needed but nothing compared to the a pillar.
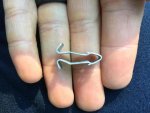
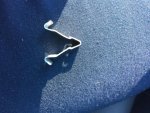
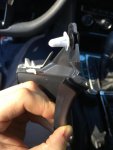
Clip Removal and Repair:
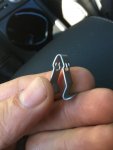
I did not find the most "ideal" way to remove these clips because they are a pain in the ass (sorry but it is true). Here is what I ended up doing and repairing and everything went back in wonderfully and you cannot tell I even removed the pillars to begin with.
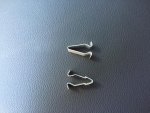
Squeeze the crap out of it with pliers, this will allow you to get the clip out of the hole:
And that is it. Like I said this isn't a simple, "hey I bet I can do that" job but it can be done. I will try to get pictures when taking the driver side off and I will post those tomorrow or Saturday. All that is left to do is the whole job in reverse and everything is reinstalled. Took me roughly an hour to remove and re-install due to the a pillar being the toughest part. They made everything tight as all get out.
Key notes:
PAY STRICT ATTENTION...to how you remove the base of the a pillar out from the side of the dash cover pad because the way you pull it out is critical for how you put it back in.
Best of Luck!
I want to say that taking apart the A Pillars on the new MK7 is a serious undertaking and should not be done or tried by those who have 1. not worked with interior trim pieces and 2. have a willingness to take your car to the dealer and pay to have fixed what you break.
I have not had a chance to get pictures going but will get pictures and maybe even a simple video on this undertaking. The only picture I have at the moment is the one of my a pillar sitting on my dash but can say this is going to be one that makes you cuss while doing. Below will be in words how to do so and then I will post the pictures with later.
In words:
Step 1
Remove Dash End Plate using a trim pry tool. Very simple to do, there are three points of contact that need to be popped to remove this piece. (easy)
Step 2
Remove Middle A-Pillar trim using a trim pry tool. This is the middle piece that curves with the body and the small, front triangular glass. This will need a little bit more persuasion to pull out but be careful not to bend causing stress whitening on the part. (easy)
Step 3.
Beginning A-Pillar Trim Removal
The A-Pillar is held on by three "christmas tree" clips. If you have dealt with any Volkswagen interior trim piece then you will know exactly what I am talking about. Unlike previous models of Volkswagens that had two clips and a T20 screw holding the pillar on, Volkswagen has gone away with the screw and "Airbag" cover in place with a more security style clip.
The best way I found to remove the clips: holding the a pillar at the top (near headliner) pull the bottom out from the door sill cover and lift up towards the windshield. This will give you a little gap so that you can see the places the three clips are. Using either a flat head or a trim pry tool slide the clips out of the a pillar trim leaving the clip in the body of the vehicle. (This is very important as when you see the type of clip that is now being used if you try to simply "pull" the pillar and clip you will end up damaging not only the clip but quite possibly the pillar itself)
I did not get a good enough picture but can explain. Once you have done the above and make the first pull of the A-Pillar, you will know because the a pillar pops out a bit but won't let you all the way due to that "security" clip, reach up through the opening by the body of the vehicle and use a flat head to pop the clips out of the trim as shown below. The lowest clip down was not a "security" clip on both sides of my a pillars so you do not have to remove it from the trim, just the top two.
Also good thing to have is an Exacto knife. I say this because on my MK7 I encountered that when the windshield was installed the glue squeeze out ran onto my a pillar enough to catch the fabric. By just pulling the a pillar from the glue has the potential to rip the a pillar and pull the fabric making your 2015 look like a 1994 trim piece. We have this same problem on the Passat and I have ripped plenty at the plant removing windshields. The only bonus I have is a plethora of Passat A Pillars to use and I am sure you all don't have many MK7 A Pillars, lol.
Removing A-Pillar Continued
Now that the A-Pillar is unclipped the only thing to do is pull the pillar out. This is a little fun as it takes a bit more force. As before the a pillar slides into the side of the dash pad cover but now also the trim piece at the triangle door glass. (from now on referred as the 1/4 glass).
This seemed to me to be the most difficult part as it took a lot of persuasion to get the a pillar to come out of its hole without trying to damage the a pillar in the process. It will come out but again does take a bit of persuasion. (this I would say was the most difficult part)
I found rotating the trim towards the front of the vehicle so that the part that is slid into the 1/4 glass trim comes out first and then rotating back made the pillar trim come out best. This is just going to have to be a play with it thing as it's easy said then done.
Step 4
Removing 1/4 glass trim
This trim piece is held on by one clip that simply pops out with a trim pry tool or a flat head. The piece then simply slides up and out. A little persuasion needed but nothing compared to the a pillar.
Clip Removal and Repair:
I did not find the most "ideal" way to remove these clips because they are a pain in the ass (sorry but it is true). Here is what I ended up doing and repairing and everything went back in wonderfully and you cannot tell I even removed the pillars to begin with.
Squeeze the crap out of it with pliers, this will allow you to get the clip out of the hole:
And that is it. Like I said this isn't a simple, "hey I bet I can do that" job but it can be done. I will try to get pictures when taking the driver side off and I will post those tomorrow or Saturday. All that is left to do is the whole job in reverse and everything is reinstalled. Took me roughly an hour to remove and re-install due to the a pillar being the toughest part. They made everything tight as all get out.
Key notes:
PAY STRICT ATTENTION...to how you remove the base of the a pillar out from the side of the dash cover pad because the way you pull it out is critical for how you put it back in.
Best of Luck!
Attachments
-
 1.JPG122.9 KB · Views: 8,959
 -
 2.JPG90.5 KB · Views: 8,701
 -
 3.JPG96.2 KB · Views: 8,773
 -
 4.JPG78.9 KB · Views: 8,766
 -
 5.JPG60.8 KB · Views: 8,893
 -
 6.JPG86.4 KB · Views: 10,132
 -
 7.JPG95.9 KB · Views: 8,886
 -
 8.JPG57 KB · Views: 8,919
 -
 9.JPG101 KB · Views: 8,509
 -
 10.JPG91.6 KB · Views: 8,427
 -
 11.JPG97.4 KB · Views: 8,344
 -
 12.JPG203.4 KB · Views: 8,196
 -
 13.JPG50 KB · Views: 8,169
 -
 14.JPG143.3 KB · Views: 8,470
 -
 15.JPG86.2 KB · Views: 9,288
 -
 16.JPG68.7 KB · Views: 8,489
 -
 17.JPG77.6 KB · Views: 8,313
 -
 18.JPG86.5 KB · Views: 8,183
 -
 19.JPG91.8 KB · Views: 8,021
 -
 20.JPG55.2 KB · Views: 8,392
Last edited:
")

