nicholam77
Go Kart Champion
- Location
- Minneapolis
For the 6MT drivers out there. I've done this a few times now. Thought I would document it in case anyone else is interested.
Why?
A stainless steel clutch line expands less under heat, supposedly providing more consistent pedal feel in a range of driving scenarios from daily to spirited to track. Also, a long enough aftermarket line has the potential to delete the clutch accumulator "swirl valve" that is attached to the master cylinder. Yes, this is a second delay valve in the clutch hydraulic system on our cars (the first one being the popular bleeder block restrictor removal). Lastly, if you look at aftermarket lines compared to OEM, the OEM has a thin metal section with more hard angles. No idea if it has an impact but an aftermarket line should allow more brake fluid with less resistance. All of the above should theoretically result in a smaller engagement window and quicker more natural clutch engagement and disengagement.
Take a look at the OEM line:

The snail looking black plastic thingy is the "swirl valve".
Not all aftermarket lines are long enough to delete it. I haven't tried them all of course but I can tell you that the KMD Tuning one is not long enough, and the ECS Tuning line is.
Tools Needed:
- Metric socket set (10mm and 13mm mostly)
- Small pick set
- Small flat head screwdriver
- Channel lock pliers
- 8mm wrench
- 1/4" ID clear plastic hose (optional)
- Fluid catch can (optional)
- Zip lock baggy (optional)
- Lots of rags (optional)
- DOT4 brake fluid
I cannot stress the small pick set enough. It will make the task so much easier. Something like this:

Step 1 - Remove Secondary Air Intake from air filter box. Pinch clip with fingers and slide off.

Step 2 - Remove intake hose clamp (with channel lock pliers, or similar), and remove intake hose.

Step 3 - Remove intake filter box by firmly pulling up and out. Set aside.
Step 4 - Remove battery cover and battery terminals. 10mm socket.
Step 5 - Remove battery retainer bracket. One 13mm bolt. Then remove battery and set aside.

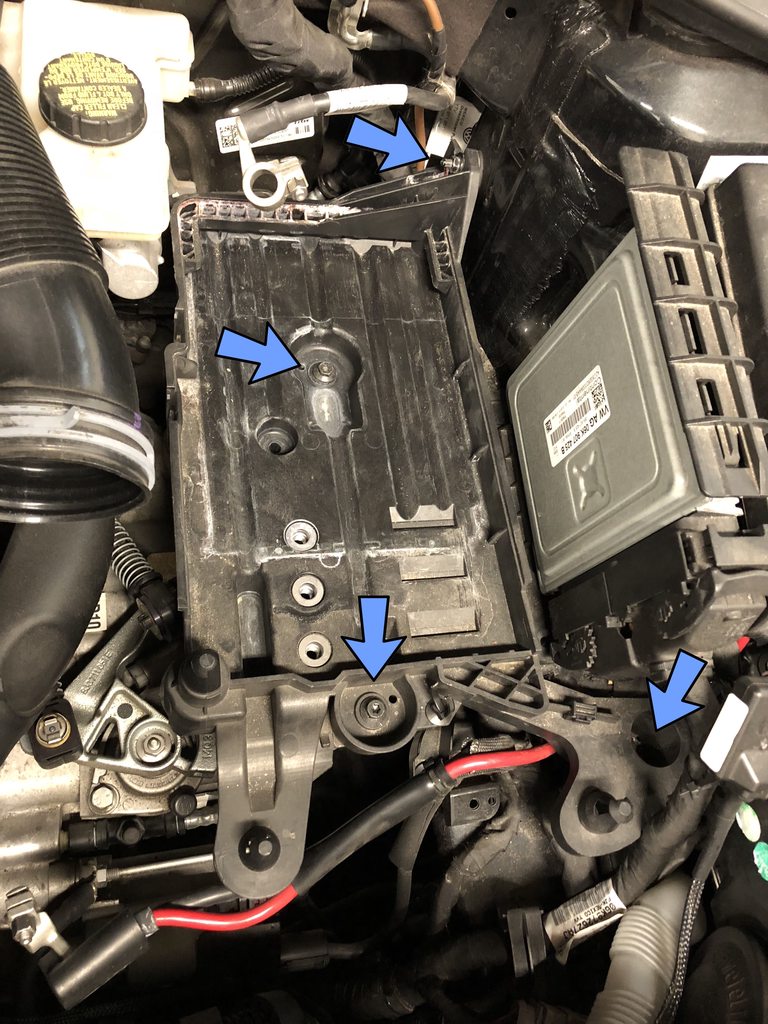
Step 6 - Remove battery tray. 4x 10mm bolts. The 3 vertical ones take completely out. The 4th one that's horizontal by the firewall you just need to loosen and the battery tray slides off of it. It will be obvious how this works when you've done it.
Step 7 - Remove the clutch line from the bleeder block. Pry up clip with pick or small flathead screwdriver where blue arrow is. Pull clutch line out and be prepared to catch dripping fluid in a zip lock baggy. I'd put down some rags as well in case you spill.

Step 8 - Remove clutch line from clutch master cylinder. This is the tricky part! Mostly because it's not an easy reach. Again, use the picks to manipulate the clip. In the pic, try to separate the ends of the clip where the blue arrows are, and then pull from the green arrow side. It was hard to get my camera in there. Again, it's one of those things where it's not that complicated, but hard to see what you're doing. Be prepared to catch leaking fluid here as well. Do not lose the clip! You'll need it to reattach.


Step 9 - Install the new line the opposite way, refitting the clips. Make sure the original O-rings came off with the old line, and that the new line has O-rings installed. Run the line under the transmission mount. Below you can see it installed.

Step 10 - Bleed the system. You don't have to, but life is much easier if you use a speed bleeder for this. It's basically a one-way valve so you can let fluid and air out, but air can't get sucked back in. The idea is to get ALL the air out that you introduced by emptying the line. The bleeder screw is on top of the bleeder block. Remove the cap and attach your plastic tubing here. Should be a tight fit.


If anyone wants to use a speed bleeder, this is the one I got and can confirm fits:
https://www.amazon.com/gp/product/B000C5C71S/ref=oh_aui_search_detailpage?ie=UTF8&psc=1
The bleeding process is as follows:
- Open bleed screw (turn with 8mm wrench)
- Open brake fluid reservoir
- Top off with brake fluid
- Pump clutch pedal by hand 10-15 times. Fluid should start to flow out your plastic hose
- Watch the fluid in the hose or have a friend keep an eye on it. If you see little fizzy air bubbles, there is still air in the system
- Repeat until fluid coming out is solid with no bubbles
IMPORTANT -- keep brake fluid reservoir topped off with brake fluid the whole time. I would refill every 5 or so pumps of the pedal. If you don't, air will be sucked into the system through the top and you'll just be in an endless cycle.

Once the fluid is solid, close the bleed screw. Pump the pedal 20-30 times to fully pressurize the system. It might be stuck to the floor at first and take a little bit to build resistance but after 20 pumps or so it should feel normal again and spring back.
That's it!
A few important notes:
If you don't use a speed bleeder, a slightly different bleeding method is required and you'll likely need a 2nd person.
You don't have to delete the "swirl valve". You can plug the stainless steel line directly into it, if you prefer to leave the delay in your system.
I'll maybe do a review on the line later after I've driven it a little more.
Why?
A stainless steel clutch line expands less under heat, supposedly providing more consistent pedal feel in a range of driving scenarios from daily to spirited to track. Also, a long enough aftermarket line has the potential to delete the clutch accumulator "swirl valve" that is attached to the master cylinder. Yes, this is a second delay valve in the clutch hydraulic system on our cars (the first one being the popular bleeder block restrictor removal). Lastly, if you look at aftermarket lines compared to OEM, the OEM has a thin metal section with more hard angles. No idea if it has an impact but an aftermarket line should allow more brake fluid with less resistance. All of the above should theoretically result in a smaller engagement window and quicker more natural clutch engagement and disengagement.
Take a look at the OEM line:
The snail looking black plastic thingy is the "swirl valve".
Not all aftermarket lines are long enough to delete it. I haven't tried them all of course but I can tell you that the KMD Tuning one is not long enough, and the ECS Tuning line is.
Tools Needed:
- Metric socket set (10mm and 13mm mostly)
- Small pick set
- Small flat head screwdriver
- Channel lock pliers
- 8mm wrench
- 1/4" ID clear plastic hose (optional)
- Fluid catch can (optional)
- Zip lock baggy (optional)
- Lots of rags (optional)
- DOT4 brake fluid
I cannot stress the small pick set enough. It will make the task so much easier. Something like this:
Step 1 - Remove Secondary Air Intake from air filter box. Pinch clip with fingers and slide off.
Step 2 - Remove intake hose clamp (with channel lock pliers, or similar), and remove intake hose.
Step 3 - Remove intake filter box by firmly pulling up and out. Set aside.
Step 4 - Remove battery cover and battery terminals. 10mm socket.
Step 5 - Remove battery retainer bracket. One 13mm bolt. Then remove battery and set aside.
Step 6 - Remove battery tray. 4x 10mm bolts. The 3 vertical ones take completely out. The 4th one that's horizontal by the firewall you just need to loosen and the battery tray slides off of it. It will be obvious how this works when you've done it.
Step 7 - Remove the clutch line from the bleeder block. Pry up clip with pick or small flathead screwdriver where blue arrow is. Pull clutch line out and be prepared to catch dripping fluid in a zip lock baggy. I'd put down some rags as well in case you spill.
Step 8 - Remove clutch line from clutch master cylinder. This is the tricky part! Mostly because it's not an easy reach. Again, use the picks to manipulate the clip. In the pic, try to separate the ends of the clip where the blue arrows are, and then pull from the green arrow side. It was hard to get my camera in there. Again, it's one of those things where it's not that complicated, but hard to see what you're doing. Be prepared to catch leaking fluid here as well. Do not lose the clip! You'll need it to reattach.
Step 9 - Install the new line the opposite way, refitting the clips. Make sure the original O-rings came off with the old line, and that the new line has O-rings installed. Run the line under the transmission mount. Below you can see it installed.
Step 10 - Bleed the system. You don't have to, but life is much easier if you use a speed bleeder for this. It's basically a one-way valve so you can let fluid and air out, but air can't get sucked back in. The idea is to get ALL the air out that you introduced by emptying the line. The bleeder screw is on top of the bleeder block. Remove the cap and attach your plastic tubing here. Should be a tight fit.
If anyone wants to use a speed bleeder, this is the one I got and can confirm fits:
https://www.amazon.com/gp/product/B000C5C71S/ref=oh_aui_search_detailpage?ie=UTF8&psc=1
The bleeding process is as follows:
- Open bleed screw (turn with 8mm wrench)
- Open brake fluid reservoir
- Top off with brake fluid
- Pump clutch pedal by hand 10-15 times. Fluid should start to flow out your plastic hose
- Watch the fluid in the hose or have a friend keep an eye on it. If you see little fizzy air bubbles, there is still air in the system
- Repeat until fluid coming out is solid with no bubbles
IMPORTANT -- keep brake fluid reservoir topped off with brake fluid the whole time. I would refill every 5 or so pumps of the pedal. If you don't, air will be sucked into the system through the top and you'll just be in an endless cycle.
Once the fluid is solid, close the bleed screw. Pump the pedal 20-30 times to fully pressurize the system. It might be stuck to the floor at first and take a little bit to build resistance but after 20 pumps or so it should feel normal again and spring back.
That's it!
A few important notes:
If you don't use a speed bleeder, a slightly different bleeding method is required and you'll likely need a 2nd person.
You don't have to delete the "swirl valve". You can plug the stainless steel line directly into it, if you prefer to leave the delay in your system.
I'll maybe do a review on the line later after I've driven it a little more.