GOLFMK8
GOLFMK7
GOLFMK6
GOLFMKV

VW Golf MK7 Estate, GT spec, Tungsten Silver, 1.4TSI

golfdave

Autocross Champion
Location
Scotland (U.K.)
Car(s)
Mk7 Golf GT Estate
Why did you remove the door speakers and rear taillights for preventative maintenance?

I'm working on the detailed post.....but simply I had to remove the front speakers to remove the rusty door check straps (arrestors)....I ended up doing preventative maintenance on all four doors & modifying the boots.....I also removed all the four rear tail light units..the foam that seals the unit to the bodywork is known to fail with age (like the speaker seal foam) & needs replacing....mine were ok, but I reckon would have gone in a year or two..so they were replaced...
 

southpawboston

Drag Racing Champion
Location
Somerville, MA
I'm working on the detailed post.....but simply I had to remove the front speakers to remove the rusty door check straps (arrestors)....I ended up doing preventative maintenance on all four doors & modifying the boots.....I also removed all the four rear tail light units..the foam that seals the unit to the bodywork is known to fail with age (like the speaker seal foam) & needs replacing....mine were ok, but I reckon would have gone in a year or two..so they were replaced...
I replaced my door checks when the car was new... couldn't stand the lack of detents in the stock ones. Replaced them with US Jetta checks which were a direct swap. At the same time, I removed all four door speakers and re-seated them with a bead of silicone caulk as a gasket to preempt any leaks, as I had learned those foam seals break down. Didn't know the taillight housing gaskets are also prone to failure. I'll have to check mine. Do you have the part #s handy for those taillight seals? (I've got the estate like you).
 

golfdave

Autocross Champion
Location
Scotland (U.K.)
Car(s)
Mk7 Golf GT Estate
I replaced my door checks when the car was new... couldn't stand the lack of detents in the stock ones. Replaced them with US Jetta checks which were a direct swap. At the same time, I removed all four door speakers and re-seated them with a bead of silicone caulk as a gasket to preempt any leaks, as I had learned those foam seals break down. Didn't know the taillight housing gaskets are also prone to failure. I'll have to check mine. Do you have the part #s handy for those taillight seals? (I've got the estate like you).

I didn't do the Jetta door arrestors, at least £15 more each over here & I've got used to the OEM ones!..The speakers is interesting, as I have the Dynaudio factory option, & they are way better made, with stronger plastic flanges, & a better foam seal. However I did redo all of mine!

The rear light foam seals, one set does both the hatch light units, the other set does both the body mount units.

5G9-945-197 Gasket set, x1required
5G9-945-198 Gasket set, x1required

Cost was circa £13 each set.

Normal Golf 3&5 door hatches have the rear light foam seals fail like mad.....mine were ok, but the car is garaged, & I reckon another 1yr I could have got out of them...
 

golfdave

Autocross Champion
Location
Scotland (U.K.)
Car(s)
Mk7 Golf GT Estate
October 2023,
Part 3,

Faulty rear door seals:-
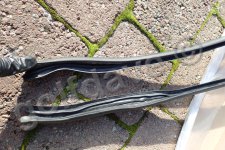
The leading edge of the outer rear door seal, to which the rear of the front door closes against, has internal corrosion on the lower section for a few years now. The internal spring steel that is used to help the seal grip the bodywork, is exposed to the salt/grit etc as the lowest end is cut at an angle & NOT re-sealed! This causes the raw metal end to corrode which then travels up inside the rubber grip section causing it to seriously deform!


I did this by the “book”, which involves removing the inner door cards, & I bought new VW seals. I would NOT recommend doing this as it’s a waste of time & money! Instead just cut off the offending corroded section & buy a section of “side fin” type seal from the web!

I’ll write a short “How to guide” on it, mainly as a pointer to not do it by the book!

PA173390-reduced.jpg
 
Last edited:

golfdave

Autocross Champion
Location
Scotland (U.K.)
Car(s)
Mk7 Golf GT Estate
October 2023,
Part 4,


Corroded Door arrestors:-

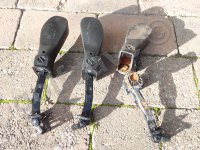
The door arrestors are known to start rusting internally where the sprung catch is inside the door, & my drivers door was doing this! The main reason is that the rubber boot that encloses the door arrestor, gets water/moisture inside & it sits in the lowest part of the boot, which happens to be where the metal parts are. VAG have not updated/superseded the part! There is a TPI for it which just states to drill a 8mm drain hole in a specific place on the underside of the boot to let any water drain out!

I looked at replacing the front door arrestors with the Jetta ones as they have the two intermediate “stops”. However, they were quite a bit more expensive over here & I’ve got used to the OEM Golf ones! I replaced both the front door arrestors, one front door boot & modified all the boots front & rear. The rear doors I doubt will suffer the same problem as they are higher up & out of the way from most of the drain water from the windows.

Again I'll do a short "How to guide" on it.

PA133360-reduced.jpg
 

golfdave

Autocross Champion
Location
Scotland (U.K.)
Car(s)
Mk7 Golf GT Estate
October 2023,
Part 5,

Door speaker seal problems:-
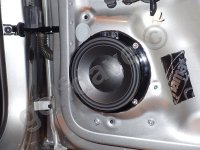
The bass/mid speakers in the doors are known for the foam seals failing, allowing drain water from the window to leak through into the inside of the door. Although I did not have water leak problems, I had to remove the speakers to get to the door arrestors, so whilst I had the speakers off I would sort it!

As I have the factory option Dynaudio sound-system, the speakers are far better made & will not have the problems caused by the standard speakers. However, I improved the fixing, by drilling out the holes in the metal work, fitting stainless steel rivet-nuts, & securing the speakers to these with stainless steel washer-head torx bolts! I also used U-Pol “Tiger-seal” black sealant to seal the gap between the speaker & door skin. Whilst the speakers were off, I also strategically placed additional small strips of Dynamat to the door skins, to dampen any panel vibrations.

Again, I’ll do a short “How to guide”, mainly just on pointers as there are plenty of existing threads etc. on sorting the problems.

PA153379-reduced.jpg
 

golfdave

Autocross Champion
Location
Scotland (U.K.)
Car(s)
Mk7 Golf GT Estate
October 2023,
Part 6,

Extra sound deadening:-
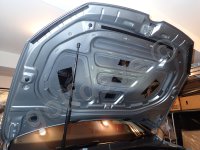
Whilst I had the door cards & speakers off, mainly to sort the door arrestors & rear seals, I thought I would add some more sound deadening to the car. In all my previous cars I have added more sound deadening, especially my first car which was a MK2 Polo (bread-van type)! Since I added all the underbody aero panels, the skid tray, harmonic dampener, etc., etc., all the noise in the Golf is now down to air resistance, tyre noise, & panel vibration, & when driving on smooth tarmac, the car is soooo quiet inside!!

The idea was to not spend lots of £££ ($$$$) on materials, & to try to achieve good results with only a small amount of strategically placed materials. Considering the limited time, cost, etc., I managed to achieve better results than I initially expected!

Again, I might do a “pointers” guide on this as everybody appears to coat everything with unnecessary dampening materials & just waste money in the process!

PA273464-reduced.jpg
 

golfdave

Autocross Champion
Location
Scotland (U.K.)
Car(s)
Mk7 Golf GT Estate
October 2023,
Part 7,

Rear tail light seals & 9 bulbs in tail lights replaced with LEDs:-
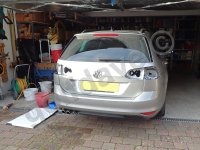
One of the other known “problems” with any MK7 Golf is the foam seals between the tail lights & the bodywork failing, thus letting water into the inside & flooding the spare wheel well! Although I had no faults with mine, this was just another known item of “preventative” maintenance to “sort” as my car is now 9yrs old!

I will recommend replacing all the incandescent bulbs with decent LED replacement “bulbs” at the same time. Unfortunately, I just did the reversing lights at the time, as the factory incandescent bulbs are pathetic & I couldn't make my mind up on the others! Then 4 weeks later I bought all the other LEDs in a “Black Friday” sale…so I had to remove the outer units again to do this!!

I’ll do a write up on this with the part numbers for the foam seals, the LED bulbs, & the correct VCDS coding as you have to alter the “hierarchy” of the functions to be able to get a distinct difference in the dimming between the “brake/stop” function & the “tail/running” light functions when the outer (body) unit red is used for both functions (mainly U.K. & European legislation).

PA183401-reduced.jpg
 
Last edited:

golfdave

Autocross Champion
Location
Scotland (U.K.)
Car(s)
Mk7 Golf GT Estate
October 2023,
Part 8,

Rear air vents behind bumper:-
One of the main known problems on the MK7 is the foam seal degrading on the pressure equalization vents that are behind the rear bumper & under the rear light units (on the Hatch 3&5 door body). This allowing water to get into the boot area.

VW fixed this by later modifying the vents to have a built-in rubber seal, which does not degrade as easily. So I ordered the latest revision for my car.

To cut a long story short my 2014yr build estate had from the factory, vent units with built in rubber seals!!! This in addition to the fact that the vents on the estate are in a different place (behind the bumper on the side of the car & near the rear wheel arch) & are far less likely to get water ingress even if the seals failed! Unfortunately, ETKA & the dealers had no idea/info on what versions of the vents had foam, or rubber seals!!

So that was a waste of money!!...

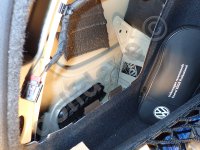
Anyway, it allowed me to add some panel dampening to the rear & I also found out that the bracket that holds the spare tool kit (behind the rear left boot carpet) was slightly loose with both bolts being slightly undone!!....I have no idea how that happened, (must be just 9yrs worth of road shocks!) but with both bolts now tightened up…there is less noise!

I’ll do a short “how to guide” on this with the part numbers etc.

PA193414-reduced.jpg
 
Last edited:

golfdave

Autocross Champion
Location
Scotland (U.K.)
Car(s)
Mk7 Golf GT Estate
November 2023,
Part 1,

Turbo air intake seal flaw:-
One of the known “problems” with the EA211 engines is the plastic intake pipe that connects to the turbo, has a moulding flaw (burr) on the tabs that retain the O-ring seal. VW are aware of this fault, with later versions being modified, & issued a TPI recommending to either replace the earlier version or to simply file down the burrs on the retaining tabs. The burr cuts into the O-ring seal causing oil (in the air vapour) to leak past the seal & down the outside of the engine.

My engine was in the “faulty” production number range, but thankfully I have not had this problem! However, I decided to file/sand down the edges of the tabs that face the O-ring as they were leaving indentations on the O-ring! I also fitted a new O-ring.

Again I’ll do a short “How to” guide on this issue!

PB053470---reduced.jpg
 

golfdave

Autocross Champion
Location
Scotland (U.K.)
Car(s)
Mk7 Golf GT Estate
November 2023,
Part 2,

Sorting front seat rail bolts & ISOFIX bracket :-
I decided to catch up & reinstall a few items better. One was the front seat rail bolts, the other being the Passenger side ISOFIX bracket that I had retro-fitted years ago….

The driver’s seat bolts I had removed way back in early 2015yr when I retrofitted the fire extinguisher bracket to the seat. The passenger seat bolts were removed when I was chasing an early intermittent fault with a connection to the Dynaudio amp which is under the passenger seat. In both cases I didn’t have the correct setting to torque the bolts upto, so I just applied blue Loctite & did them up to a mid-setting for the size/material spec from my bolt tables.

I removed the four bolts on each front seat, & cleaned both male & female threads with thread cutters, vacuumed the holes & then made certain everything was ok & redid the bolts upto the correct torque spec. of 40Nm (29.5lbft)

The front passenger seat in the Audi cars has the option of a front ISOFIX bracket (not that I’m using it), but as they were getting harder to find I wanted to fit & did the install back in Nov’ 2021yr. However, when I did the install, I was getting conflicting specs on the torque settings for the bolts & I ended up with them a bit too tight as they started spinning in the speednuts! So having got new bolts & nuts, I removed the older ones & fitted new ones & did them up tight with the small ratchet, which is way less torque that I initially did them up with! This job was done whilst I had removed the seat rail bolts as its better to have the seat flipped forward to do the ISOFIX bolts up!
 
Last edited:

golfdave

Autocross Champion
Location
Scotland (U.K.)
Car(s)
Mk7 Golf GT Estate
November 2023,
Part 3,

New waterpump!:-
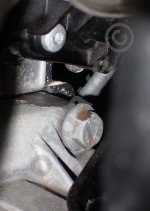
When I was servicing the car in October, I noticed that my coolant had very recently dropped in level! So I checked for leaks & found small pink coolant drops on the top bolts which connect the gearbox to the engine! This is directly beneath the water pump housing which is known to leak from the seals on these EA211 engines (VAG have issued a TPI for this problem, No.2047633/7). I had hoped that this fault would be noticed on the MOT & that would negate the need for the initial “diagnostics” fee that the dealers like to charge!

Unfortunately, they did not notice the leak (it was small) & so there was a bit of “to & fro” between myself & the service dept & me sending them photos of the leak & them checking with the parts blokes (some I have known for decades!)…In the end the service manager agreed with what I stated & decided that there no need for an initial diagnostics fee of £100!

Again this “we need to do a diagnostic” is a standard procedure, its recommended in the ERWIN books, & it helps cover the dealers from just wildly stabbing in the dark fault finding by replacing items, & racking up a parts bill for the customer! However, when the fault is clearly seen & known about, & the customer knows as much about his car as your trained techs do you ought to listen to him!!

On the EA211 engines the water pump is on the opposite side of the engine from the timing belt & is driven of the exhaust camshaft by its own belt. The water pump consists of an aluminium block with the water impellor in it, & a large black plastic cover which has the thermostat & the all water pipe stubs on it. The known fault is the seals leaking, specifically the one between the engine block & the aluminium water impellor block. The trouble is that to get to this engine seal the whole lot has to be taken off, & tightening the bolts on the plastic covers involves several stages & keeping the tension of the water pump belt!

As the whole lot has to be removed to get the faulty seal, & the plastic covers are known to break, you usually get the whole lot (aluminium impellor block, plastic cover with thermostat) as one part, with the belt being a separate item. I asked for a new belt to be fitted, as you have to remove the old one anyway!

The dealers did me a nice “deal” on the labour charge!..

For reference, the parts list & approx. costs in UK £
04E-121-600-CS, Water Pump (whole aluminium impellor block, with plastic over & thermostat), £195.60
04E-121-605-E, Toothed Belt, £24.42
PA263442-reduced.jpg
 
Top