GOLFMK8
GOLFMK7
GOLFMK6
GOLFMKV

Spring & Shock/Damper Installation Reference Guide

Ikbrown

New member
Location
Fair Oaks, CA
Car(s)
2019 Alltrack
Hey all, wanted to report back on the issue that I had posted about right after I installed Bilstein B8s with Neuspeed Sport springs on my Alltrack.

1. Steering wheel was aggressively self-centering, even if stopped with the wheel turned it would return to center - much more than normal. This was resolved with an alignment - it was behaving so poorly I thought it must be something more than just the alignment being off but I guess that's what happens when you lower your car 2.25" in front, 3" in rear. ha. Looking at the alignment printout the only numbers that were signficantly off was the toe, both right/left and total toe. Positive caster increased from the stock range but they were not able to adjust that at all - just resolved camber and toe.
2. Multiple warnings/lights (ABS Stabilization, Front Assist not available, TPMS, Error: Airbag). This was due to damage to the wheel speed sensor on the driver front side. When removing the strut assembly with the 2x4 method the wire got pulled tight and the connection was slightly bent/damaged in the process. The shop was able to repair the connection and the christmas tree lights are no more.

A couple notes on the front install for others:
- As stated before, get the right tools before attempting. Having the knuckle spreader made removal and installation of front struts easier - couldn't imagine attempting without it.
- Removal of the front struts was slow going with the 2x4 method until we used a strap placed under the jack and over the knuckle assembly to keep it from lifting up with the strut as we jacked up the strut. Brilliant recommendation by whoever it was who originally posted that idea. The passenger side was a breeze using that method from the get-go compared to the driver side where we remembered that halfway through.
- 80% of our difficulty in reinstalling the new strut assemblies in the front was due to misalignment of the strut to the knuckle. Once those two got lined up it was fairly easy to lower the strut in w/o resistance.
- Don't be a dumby like me, and just remove the wheel speed sensor wire from both the knuckle clip and the wheel well clip on the engine bay side to give you more room to not fuck things up. ha.
 

snobrdrdan

former GTI owner
- Removal of the front struts was slow going with the 2x4 method until we used a strap placed under the jack and over the knuckle assembly to keep it from lifting up with the strut as we jacked up the strut. Brilliant recommendation by whoever it was who originally posted that idea. The passenger side was a breeze using that method from the get-go compared to the driver side where we remembered that halfway through.

I know some are against this method, as voiced out in the few recent pages and it's not the proper method, but it's the quickest (and only) method I've used on all of my installs.
If you place the strut spreader in the proper location/it's opened enough, spray a little lube at the base of the strut/knuckle location, and give it a little tap with a rubber mallet or a swift kick....that should break the rust/connection/clamping force loose & it should slide right out/up after that.
 
Last edited:

mattkime

Passed Driver's Ed
Location
madison, wi
Update -

I survived!

While I had a ton of trouble with the passenger side, I rededicated myself to the 2x4 method on the driver side and I was rewarded. I got a 3x2" and it was perfect. Previously I was using a 3x1 and I suspect the thinner board caused me a lot of trouble. The driver side was so easy that I couldn't understand how it was difficult before. I didn't even need any help with the jack and had plenty of control when installing the new strut. I think if you're having trouble with the 2x4 method just take a step back and try modifying what you're doing.

I'm sure I spent too much time hammering away at the passenger side knuckle which was probably related to poor 2x4 method. Oh, using a rubber strap from below to pull downward on the knuckle is very helpful as well.

If for some reason you absolutely can't do the 2x4 method, just go ahead and remove the whole brake from the carrier bolts. I had no trouble maneuvering the knuckle once I did that. Tip for torquing those carrier bolts when you're on jack stands - use a jack under the torque wrench. Sounds dumb but worked quite well

Overall, it was a big surprise how much is left out of the shopdap videos. They're some sort of idealized version of swapping struts and shocks and only bore a vague resemblance to my experience. The removing the top mounts on the shocks gave me some trouble and I'd like so see how others would do it. Generally speaking, much of the value in youtube videos is seeing the extraneous bs that goes into a task.

While I have a couple of hex wrench sets I lacked the 7mm hex wrench I needed for the struts. I felt silly until I went to the store to discover that most sets lack that specific size.

My $7 ebay strut spreader worked great once I knew what I needed to do. I have a new fondness for my DeWalt impact driver.

In the end I'm sure I would have been better off paying someone to do the install assuming reasonable pricing. Part of the reason why I took on the project was because we can go a week without driving due to the pandemic but this was additional stress I didn't need. Instead I got an education I'm unlikely to apply again - aside from thinking twice before taking on such a project.
 

Acadia18

Autocross Champion
Location
The Greater Boston Metropolitan Area
Car(s)
2019 Golf R
Want to update this just for some closure in case others happen to have the same issue.

Might be a stupid question. Can you tighten\loosen the top strut nut while it is attached to the car? I want to ensure it is torqued to the correct spec. While I don't have any issues the majority of the time, if the wheel is fully turned all the way (say when pulling into a parking space), then turned back about half a turn, I have a slight clunk\pop noise when it gets to that half a turn point. I'd say it only happens at low speeds, but I also never fully turn the wheel as far as it can go at high speeds. Is there something else I should be checking for?

After I installed my springs 2 and a half months ago, I had a slight clunk\pop when straightening out the wheel after fully turning it to the right. it was only a very minor annoyance, so it wasn't very high on my list of priorities to fix. I got new end links since they're cheap, didn't fix the issue. Left it alone for more time. Doing some Googling, I read on one of these websites about hitting your end links\strut bearing with some silicone lubricant. So last week I did that. Sprayed the end links. Up in the strut to hit the bearing. The LCA bushings since I do that every ~6 months or so to avoid creaking. Pretty much anything that moved got hit with silicone lubricant.

What a bad idea. It just made the noises worse. The first ride was horrid. It calmed down after a few days, but the original noise was still worse. Said 'screw it', and ordered a set of VWR shocks\dampers, as well as all new (again) install hardware. Bearings, bolts, strut mounts, etc... Also ordered a pass through socket set, along with the actual 21mm strut nut socket. The first time I did it, I just used my cordless impact. Well, the VWR set is on backorder, so while I was waiting, I just decided to use the pass through socket set to see if my strut nut was loose.

It was.

Fully tightened it, and the noise is completely gone. All that headache (and $$$), and just had to tighten one nut. Morale of the story, always make sure everything is torqued properly.

Probably going to keep the VWR set on order and just install it, since my car is approaching 50k miles and I put lowering springs on a few thousand miles ago.
 

mattkime

Passed Driver's Ed
Location
madison, wi
Unfortunately my front struts are pretty squeaky. I verified all the nuts and bolts are properly torqued. I noticed some squeaking if I turn the top nut. I can move the spring a little bit with my hands and it squeaks as well. I don't understand why its squeaking since the strut bearing should prevent friction.

Anyway, I know the recommendation is to take it apart and put it back together again but I was hoping for some guidance on what to look for or whether others have been through this. I'd like to have a good plan if I'm going to remove the strut.
 

B3mt1

Passed Driver's Ed
Location
Croatia
Car(s)
Mk7 2.0TDI Hatch '16
Hi guys,

Is anybody familiar with Bilstein part numbering system? I am asking because I want to know what is the difference between Bilstein B4s for Golf and Audi.

22-230539Bilstein B4 front 55mmGolf 7
22-232342
Bilstein B4 front 55mmAudi A3

19-230559Bilstein B4 rearMulti-link, Golf 7, Skoda
19-232362Bilstein B4 rearMulti-link, Audi A3, Seat, Skoda
19-262208Bilstein B4 rearMulti-link, Audi A3 S-line
 
Last edited:

bootzilla

New member
Location
SoCal
1. Loosen axle bolts with wheels on the ground
2. lift both sides of the front
3. Remove wheels
4. Disconnect the sway bar from the strut, both sides if removing both struts
5. Remove the entire caliper via the two bolts, both bolts are reusable
6. Remove the rotor (for ease of access and lightens the load when re-installing struts)
7. Remove the lower strut pinch bolt and toss the bolt and nut in the trash
8. Remove the 3 lower ball joint nuts and toss in the nuts in the trash
9. Push the lower arm down and pull the ball joint out of the arm, the strut assembly should move freely.
10. Insert strut separator
11. Use a block of wood and a hammer, if needed, on the knuckle rim to force the knuckle down the strut shaft. Work the strut separator in different positions as needed to create the required space.

Loosening the Axle bolts - I'm assuming that after all of the brake items are removed, you're then pulling the bolt and separating the hub assembly from the end of the axle?

I tried the 2x4 method and failed miserably, I'm going to give it a go this way, then just give up and take it to my guy if that doesn't work. (I also only had one corner of the car up in the air, too - I think that made it more difficult)
 

bootzilla

New member
Location
SoCal
Finally got struts done. Getting both sides of the front up in the air at the same time definitely helped - then from there it was a combination of the two methods - separating the ball joint from the control arm gives a lot more movement, and a 1x3 finished the job of getting the old ones out. The wiggle room made separating the control arm and some brute force got the new ones in. The more you are willing to take apart, the better. Rears are SO much easier.

I did have to re-tighten the strut top-nuts after the suspension was loaded - stopped the alarming sound I heard as I pulled out of the driveway for a test drive. My new strut nuts were 19mm :( - but it turns out Harbor Freight has a sweet thru-socket kit that has a 19mm bit - easy to tighten them down through the hole in the engine bay.

Would I do it again? Oh hell no. Well - maybe if my life depended on it, or if I had some really excellent crack and didn't realize what I was up to.
 

xXDavidCXx

Autocross Champion
Location
AZ
Car(s)
2017 GTI SE DSG
Loosening the Axle bolts - I'm assuming that after all of the brake items are removed, you're then pulling the bolt and separating the hub assembly from the end of the axle?

Loosen axle nut with wheel on the ground, then take out the nut after taking the weight off the wheel.

1. Nut loose, then off
2. Remove caliper
3. Remove rotor
4. Remove lower ball joint nutsx3

After the job is done, the last step is to torque the axle nut with the brakes applied, no weight on the wheel, to 200nm/150ft/lbs.
Then with the wheel on the hub and weight on the wheel, turn the axle nut 180deg.
 

gomezvmarcelo

New member
Location
fresno, ca
Car(s)
17 gti pp
literally just made this account to give my heartfelt thanks. I went with the "improved" 2x4 method with the bolt through the sway bar hole. it went mostly well it was only frustrating learning how to work the strut spreader while your finessing the strut out at the same time. once I figured out that you have to work both together the other side was cake. I didn't even use a spring compressor on the other side I totally forgot that step because I was moving along so fast. While the drop wrench that I ordered wasn't sitting on the strut mount well, I found out I didn't have the right Allen wrench either. I made the executive decision to go to harbor freight and get an electric Impact and a 21mm deep socket and slam that sucker down. I understand that my lack of being able to torque down those tops nuts to the right spec might bite me in the behind later, it was still the best decision for me at the time. the pass through socket was days away and its literally all I needed to keep pushing forward. The other piece of insight ill share is that I needed to use the strut spreader to also get the assembly back into the knuckle, im sure others had to figure that out too but some people just pop the thing back in. Ive only driven for about 30-40 miles and nothing seems to sound like its out of place. thanks to everyone for all the help.
 

Hammersticks

Drag Racing Champion
Location
Bay Area, CA
Car(s)
'16 GTI, '18 e-Golf
One thing I've found, the old version of the SuperPro 7K LCA's don't play well with the 2x4 method. They're wider than the stock arms which force the 2x4 to rub, and basically give zero room to get the strut in/out of the knuckle. It's a great time.
 

Supercrumpet

Ready to race!
Location
Georgia/South Carolina
Car(s)
'19 Alltrack SE 6MT
Did rear coilovers on my Alltrack around Thanksgiving and had time to wrap up the fronts yesterday. This guide was immensely valuable, thanks so much to everyone for your contributions! Drove a bit yesterday and about 50 miles to work today with no issues. Car feels great and looks great too.
 

trashb0y

Ready to race!
Location
ca
installed my b14 coilovers this weekend, car rides great, no strange sounds or anything like that.

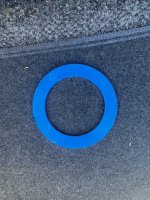
as i was cleaning up and about to throw the box away, i found this piece, which if i remember correctly goes on top of the rear spring, where the locking collar and the spring meet. you guys think its important enough to go through the hassle of putting it on, or should i just let it ride?
 

Attachments

  • image0.jpeg
    image0.jpeg
    115.6 KB · Views: 116
  • part.png
    part.png
    167.4 KB · Views: 134

xXDavidCXx

Autocross Champion
Location
AZ
Car(s)
2017 GTI SE DSG
installed my b14 coilovers this weekend, car rides great, no strange sounds or anything like that.

as i was cleaning up and about to throw the box away, i found this piece, which if i remember correctly goes on top of the rear spring, where the locking collar and the spring meet. you guys think its important enough to go through the hassle of putting it on, or should i just let it ride?
It's a plastic bearing that will keep the spring from scratching the hardware as the spring rotates around.

I would install it.
 

VL3X

Go Kart Newbie
Location
Delaware
Car(s)
2017 GTI SE
Install it and be happy it's not a part missing from the front. Rear springs are very simple.. Should only take 10-20 minutes start to finish.
 
Top