Hoon
Autocross Champion
- Location
- Rhode Island
ACE recently started an E-cutout thread, so i'm going to post up my own install in the event of it being useful for others.
If you're thinking "installing an E-cutout sounds like a pain in the d**k" you would be correct.
I'm not going to get too much into the tools used, but a cutoff tool, die grinder w/ quality carbide burr (not some harbor freight bit), welder for stainless, and basic set of hand tools would be required at the minimum. If you weld on the vehicle, always remember to disconnect the battery. If you use brake cleaner for prep, be sure it is non-chlorinated so you don't die a horrible death (chlorine + argon = phosgene gas).
The first thing to be aware of is that you need a foot of clearance to install one of these cutouts. The 2.5" cutout itself is roughly 9.5" long and the cord comes straight out the back, so figure another 1/2" to 1" there. Then keep in mind the exhaust is rubber mounted and moves around, so you want at LEAST an extra inch of clearance around all sides. This brings you to about a foot.
To install one right off the downpipe can definitely be done, but if you attempt this you're in for a project. If you think i'm kidding, take a look at the one DAP came up with for their shop car.
Personally, i do not see the added work being worthwhile. A 2.5" pipe will out-flow an IS20 or IS38 by A LOT. Will a 3" right off the DP be best? Yes. Worth it? I personally don't think so.
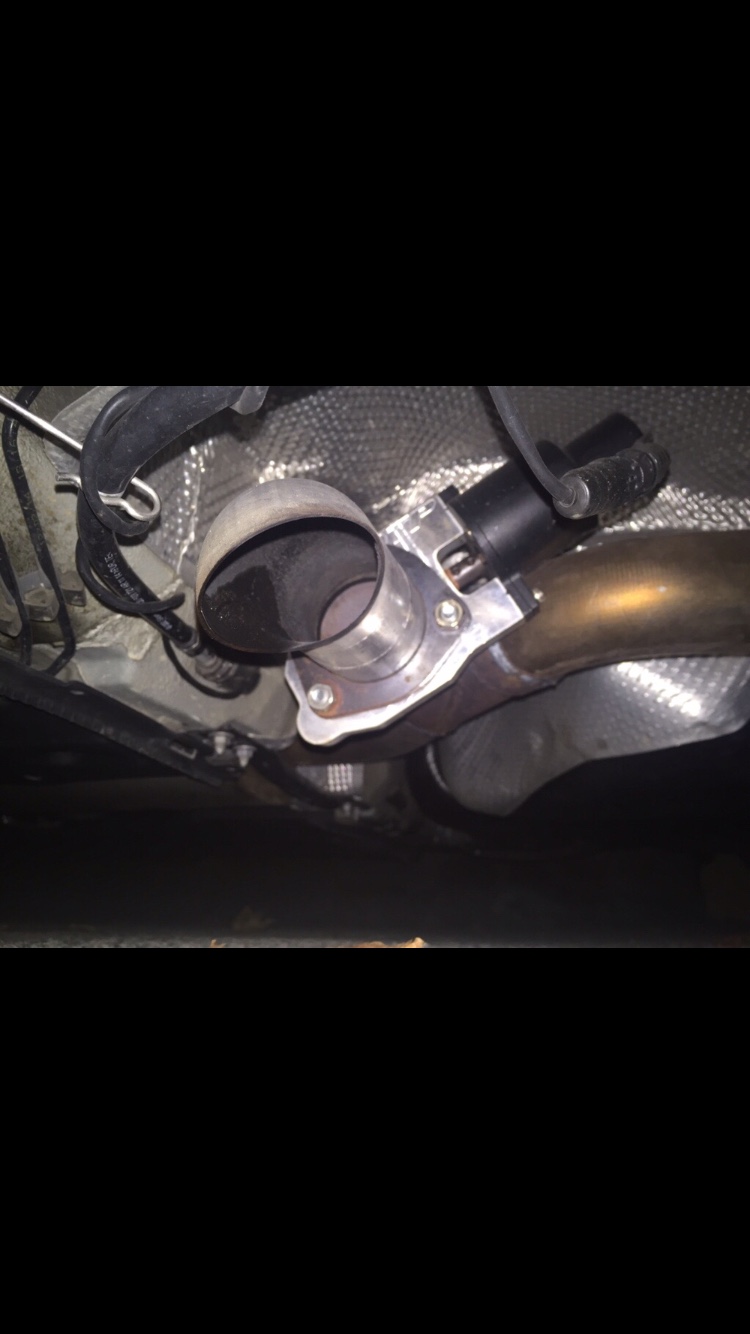
With me not being willing to fab a setup to fit within the tunnel, the next best place is after the resonator. The resonator is straight through, so that's not a restriction. The stock exhaust goes around the fuel tank (which is on the passenger's side), and there is a large open space just in front of the drivers rear tire. Being lowered, one of my personal needs is minimal loss of ground clearance, so this location was ideal.
When i ordered the QTP kit, i ordered an extra dump tube for flexibility on the install. I chose to use two dump tubes instead of the y-pipe included in the kit, which allowed me to better locate the unit and keep it more compact.
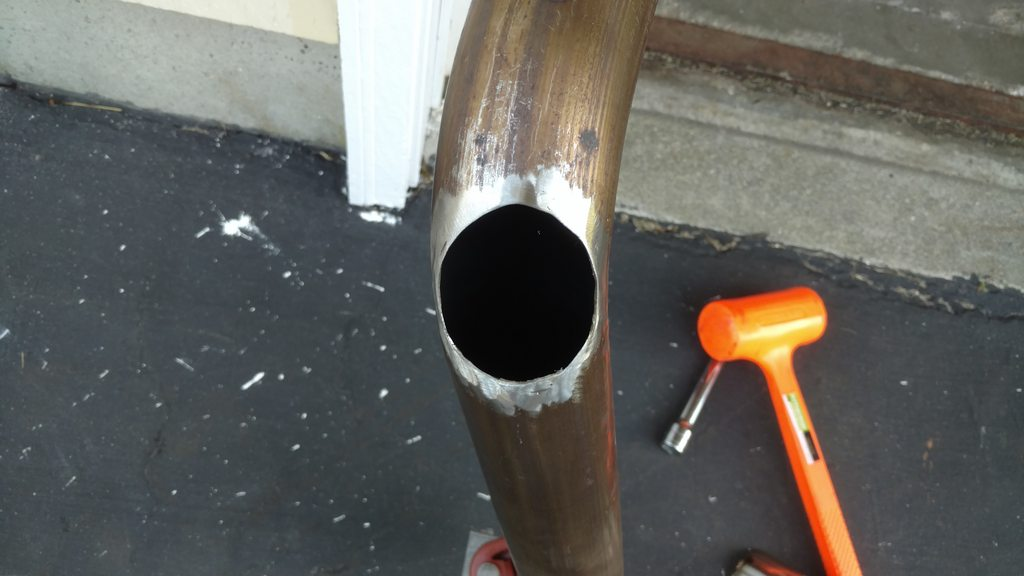
After screwing around under the car for awhile, i had my location chosen. The first step was to start cutting the dump tube to fit up to the outside of the elbow on the stock exhaust.

Once i had a rough fit-up done between my dump tube and the factory elbow, i tacked it in place to verify fit, and marked it with a sharpie.

IMO it's quicker and easier to drop the exhaust and weld it on the ground than to screw around with it on the car. I'm using a TIG, the quality is important to me, and i'd rather take the time to drop the catback than try to TIG weld overhead.
At that point i dropped the exhaust, cut a hole in the elbow with a cutoff tool, and used a die grinder to open up the hole as needed. I would not attempt this with a dremel or a cheap bit. You're grinding away stainless steel that has seen hundreds of heat cycles. A die grinder and a carbide burr are required IMO.
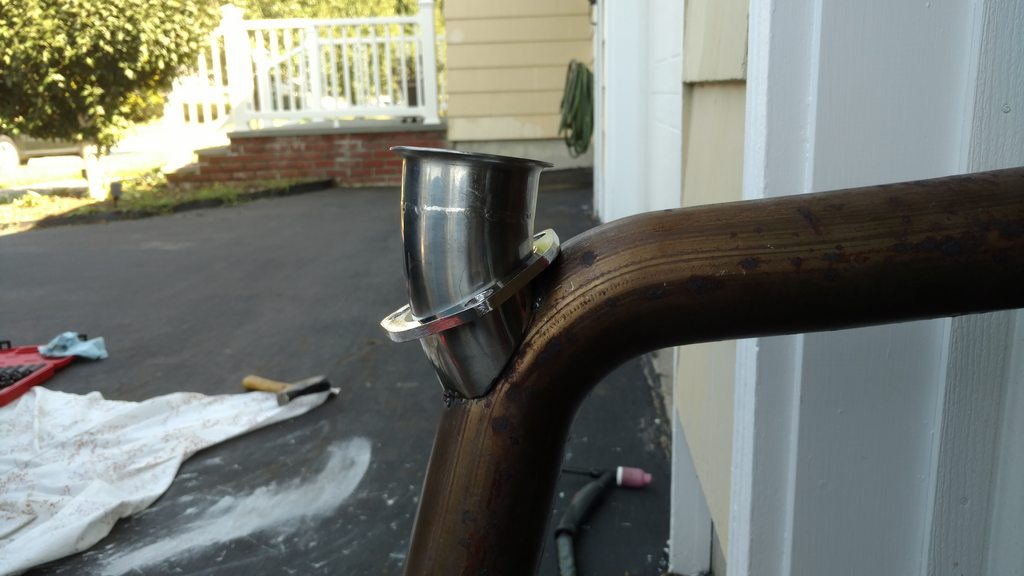
Once i had a good fit, i welded the two together (be sure to put the flange on before you do this). Even though all the components and filler are stainless, i still hit it with a quick coat of ceramic header paint on the weld.
After that just bolt the exhaust up, bolt the cutout on, mess with the orientation until it fits best, and then the wiring begins. It's just a power and a ground, but i ran out of time today. I'll wire it up next weekend. I haven't decided where the switch is going yet.


So far i have about 6 hours into this, but i'm a perfectionist so took my time with test fitting, spent a few hours grinding away at the dump tube and the stock exhaust to get everything perfect, etc.
The flanges do not leak, but the cutout itself has a very slight leak (they all do this regardless of brand). If you put your hand over the dump you can feel it, but it's very slight and not enough to be heard from in/around the car.
If you're thinking "installing an E-cutout sounds like a pain in the d**k" you would be correct.
I'm not going to get too much into the tools used, but a cutoff tool, die grinder w/ quality carbide burr (not some harbor freight bit), welder for stainless, and basic set of hand tools would be required at the minimum. If you weld on the vehicle, always remember to disconnect the battery. If you use brake cleaner for prep, be sure it is non-chlorinated so you don't die a horrible death (chlorine + argon = phosgene gas).
The first thing to be aware of is that you need a foot of clearance to install one of these cutouts. The 2.5" cutout itself is roughly 9.5" long and the cord comes straight out the back, so figure another 1/2" to 1" there. Then keep in mind the exhaust is rubber mounted and moves around, so you want at LEAST an extra inch of clearance around all sides. This brings you to about a foot.
To install one right off the downpipe can definitely be done, but if you attempt this you're in for a project. If you think i'm kidding, take a look at the one DAP came up with for their shop car.
Personally, i do not see the added work being worthwhile. A 2.5" pipe will out-flow an IS20 or IS38 by A LOT. Will a 3" right off the DP be best? Yes. Worth it? I personally don't think so.
With me not being willing to fab a setup to fit within the tunnel, the next best place is after the resonator. The resonator is straight through, so that's not a restriction. The stock exhaust goes around the fuel tank (which is on the passenger's side), and there is a large open space just in front of the drivers rear tire. Being lowered, one of my personal needs is minimal loss of ground clearance, so this location was ideal.
When i ordered the QTP kit, i ordered an extra dump tube for flexibility on the install. I chose to use two dump tubes instead of the y-pipe included in the kit, which allowed me to better locate the unit and keep it more compact.
After screwing around under the car for awhile, i had my location chosen. The first step was to start cutting the dump tube to fit up to the outside of the elbow on the stock exhaust.
Once i had a rough fit-up done between my dump tube and the factory elbow, i tacked it in place to verify fit, and marked it with a sharpie.
IMO it's quicker and easier to drop the exhaust and weld it on the ground than to screw around with it on the car. I'm using a TIG, the quality is important to me, and i'd rather take the time to drop the catback than try to TIG weld overhead.
At that point i dropped the exhaust, cut a hole in the elbow with a cutoff tool, and used a die grinder to open up the hole as needed. I would not attempt this with a dremel or a cheap bit. You're grinding away stainless steel that has seen hundreds of heat cycles. A die grinder and a carbide burr are required IMO.
Once i had a good fit, i welded the two together (be sure to put the flange on before you do this). Even though all the components and filler are stainless, i still hit it with a quick coat of ceramic header paint on the weld.
After that just bolt the exhaust up, bolt the cutout on, mess with the orientation until it fits best, and then the wiring begins. It's just a power and a ground, but i ran out of time today. I'll wire it up next weekend. I haven't decided where the switch is going yet.
So far i have about 6 hours into this, but i'm a perfectionist so took my time with test fitting, spent a few hours grinding away at the dump tube and the stock exhaust to get everything perfect, etc.
The flanges do not leak, but the cutout itself has a very slight leak (they all do this regardless of brand). If you put your hand over the dump you can feel it, but it's very slight and not enough to be heard from in/around the car.