Diggs24
Autocross Champion
- Location
- de plains! de plains!
- Car(s)
- 2015 GTI
Yup, back again.
Fairly straightforward, but of course if you're a moron like me you like to be spoon fed. Open up.
Tools:
various flathead screwdrivers big and small
hammer
tape
light so you can see
T15 (two of them, one to hold a screw while you screw the other side) EDIT: Allen key is better, not sure what mm it was as none of mine are marked. You need 2 of them though as the blue holdoffs like to spin when you tighten.
dremel
electrical connection crimper
wire stripper
2 drill bits (included)
drill
small needle-nose pliers or small hook/pick tool
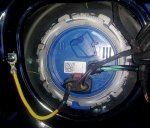
Before you take off the locking ring I would mark it with a sharpie and also on the car so when you knock it back in place you can line your marks up so you know it's locked down.
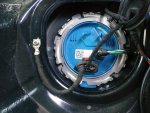
First off. These lines are annoying and in the way. The one in the tank will....drop into the tank if you let it go. It's no big deal to fish out but who wants to put their arm into a bunch of gas?

Tape them off to the side. Use something stronger than electrical tape. Line in tank fell in and took tape with it and had fish both out. The basket takes awhile to drain. Feel free to tip it just a bit (set something under the edge of it) to help it drain.
In step 11 you have to take off an itty bitty locking ring. The second time I did it I couldn't get it to come off so used a small curved hook/pick tool and it flew off! Supposedly it isn't really needed but just be careful as it is really small. Luckily I found it, but it is super tiny.
Ok, so drilling these out. GO SLOW. As soon as it starts to bind stop and reverse out. Did I mention go slow. GO SLOW. It should take a good 30-45 minutes to drill these out. It will make loud cracking sounds as it is stiff plastic, be not concerned. There are 2 bits in the kit, a 6.5mm and 8mm. Do the 6.5 first all the way through, then follow up with the 8mm. May need to angle 8mm back and forth a bit inside to ream it out but don't do too much as that will make it an easy leak point. Once done the pump assembly should pop right out.
Step16/17 says to take the black venturi out. I don't know why and I couldn't get it out. I just put the blue venturi extension in where it belonged. Done. Just make sure when you put pump back in basket it goes into venturi. It should go right in if lined up correctly.

When you take your old pump motor out make sure you get this green o-ring out too. EDIT: IGNORE THE NEW O-RING AND BLUE ADAPTER IN THIS PHOTO, IT IS UPSIDE DOWN. SEE POST 7 IN THREAD BELOW.

Because new pump has own o-ring that goes there. Also, you can see I cut just a bit too much as that one standoff cannot sit flush. That was all the tighter the screw goes. Leave a a little more meat on than I did. EDIT: IGNORE THE NEW O-RING AND BLUE ADAPTER IN THIS PHOTO, IT IS UPSIDE DOWN. SEE POST 7 IN THREAD BELOW.
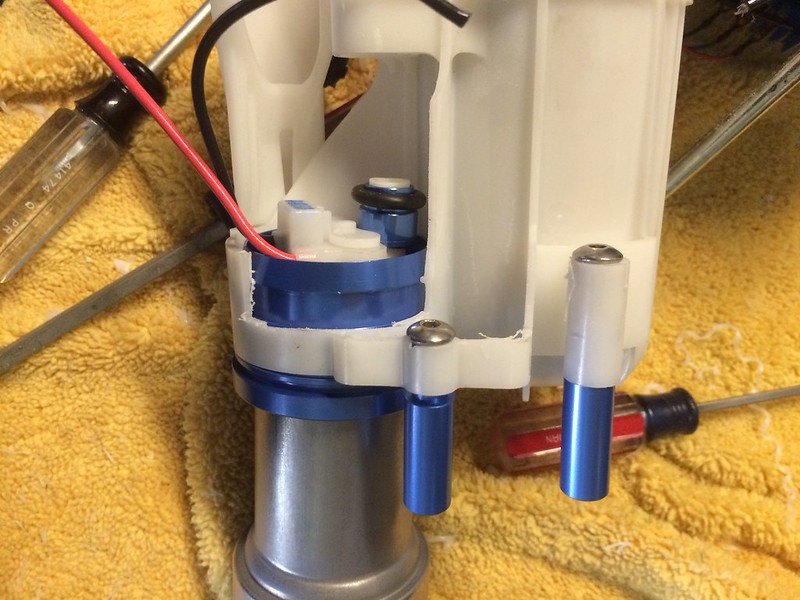
Oh, and the screws? They are hex head. Use Allen key.
Step 27 wiring it back up. I guess it was implied that you would cut the orange wire that you disconnected in step 19 from the OEM pump. Well, it was not said so I am saying it now, it needs cut from pump and take as much wire as you can as you have to crimp it in with the Walbro. Just snip it off right at the old pump.
Last but not least, fuel sender needs to move freely. Check it. Click for video.

I disconnected the battery after the pump ran dry as I didn't want the battery to run down since I was in and out of the car and I left hatch open for light. I think because I reconnected it it primed the pump as it fired right up without delay.
You'll have some codes from letting the pump run without fuel. Scan and clear them off.
Have fun. Took me about 4 hours taking my time. Enjoy.
Fairly straightforward, but of course if you're a moron like me you like to be spoon fed. Open up.
Tools:
various flathead screwdrivers big and small
hammer
tape
light so you can see
T15 (two of them, one to hold a screw while you screw the other side) EDIT: Allen key is better, not sure what mm it was as none of mine are marked. You need 2 of them though as the blue holdoffs like to spin when you tighten.
dremel
electrical connection crimper
wire stripper
2 drill bits (included)
drill
small needle-nose pliers or small hook/pick tool
Before you take off the locking ring I would mark it with a sharpie and also on the car so when you knock it back in place you can line your marks up so you know it's locked down.
First off. These lines are annoying and in the way. The one in the tank will....drop into the tank if you let it go. It's no big deal to fish out but who wants to put their arm into a bunch of gas?
Tape them off to the side. Use something stronger than electrical tape. Line in tank fell in and took tape with it and had fish both out. The basket takes awhile to drain. Feel free to tip it just a bit (set something under the edge of it) to help it drain.
In step 11 you have to take off an itty bitty locking ring. The second time I did it I couldn't get it to come off so used a small curved hook/pick tool and it flew off! Supposedly it isn't really needed but just be careful as it is really small. Luckily I found it, but it is super tiny.
Ok, so drilling these out. GO SLOW. As soon as it starts to bind stop and reverse out. Did I mention go slow. GO SLOW. It should take a good 30-45 minutes to drill these out. It will make loud cracking sounds as it is stiff plastic, be not concerned. There are 2 bits in the kit, a 6.5mm and 8mm. Do the 6.5 first all the way through, then follow up with the 8mm. May need to angle 8mm back and forth a bit inside to ream it out but don't do too much as that will make it an easy leak point. Once done the pump assembly should pop right out.
Step16/17 says to take the black venturi out. I don't know why and I couldn't get it out. I just put the blue venturi extension in where it belonged. Done. Just make sure when you put pump back in basket it goes into venturi. It should go right in if lined up correctly.
When you take your old pump motor out make sure you get this green o-ring out too. EDIT: IGNORE THE NEW O-RING AND BLUE ADAPTER IN THIS PHOTO, IT IS UPSIDE DOWN. SEE POST 7 IN THREAD BELOW.
Because new pump has own o-ring that goes there. Also, you can see I cut just a bit too much as that one standoff cannot sit flush. That was all the tighter the screw goes. Leave a a little more meat on than I did. EDIT: IGNORE THE NEW O-RING AND BLUE ADAPTER IN THIS PHOTO, IT IS UPSIDE DOWN. SEE POST 7 IN THREAD BELOW.
Oh, and the screws? They are hex head. Use Allen key.
Step 27 wiring it back up. I guess it was implied that you would cut the orange wire that you disconnected in step 19 from the OEM pump. Well, it was not said so I am saying it now, it needs cut from pump and take as much wire as you can as you have to crimp it in with the Walbro. Just snip it off right at the old pump.
Last but not least, fuel sender needs to move freely. Check it. Click for video.
I disconnected the battery after the pump ran dry as I didn't want the battery to run down since I was in and out of the car and I left hatch open for light. I think because I reconnected it it primed the pump as it fired right up without delay.
You'll have some codes from letting the pump run without fuel. Scan and clear them off.
Have fun. Took me about 4 hours taking my time. Enjoy.
Last edited: