7
You are using an out of date browser. It may not display this or other websites correctly.
You should upgrade or use an alternative browser.
You should upgrade or use an alternative browser.
PDC Retrofit Question
- Thread starter Fraysa
- Start date
Had some free time today, but not enough to install the sensors. However, I was able to get to the bumper harness through the wheel well (last time I didn't screw in all the screws since I was gonna disassemble it anyway). Plugged in the sensors and left the harness hanging there. And... it works! Thanks again @Cuzoe for the tips.

I also test fitted the new PLA brackets and it fits great! I guess I'd be the only one with those
As for the paint fitment - it's hard to see since my car is filthy due to lots of rain, but after I'll install the sensors I'll wash it and see.

Will update later this week once I get to fit the sensors and brackets. I want to sand the inside of my bumper to remove any leftover residue from my previous attempts and make sure the fitment is 100% flush!
I also test fitted the new PLA brackets and it fits great! I guess I'd be the only one with those
As for the paint fitment - it's hard to see since my car is filthy due to lots of rain, but after I'll install the sensors I'll wash it and see.
Will update later this week once I get to fit the sensors and brackets. I want to sand the inside of my bumper to remove any leftover residue from my previous attempts and make sure the fitment is 100% flush!
Its like a whole reunion! I used to receive email updates about this thread but not sure what happened.
Well. So far after a couple months here are my updates. I had to replace my rear right sensor, as it kept dying. The symptoms I got was intermittant failure of the whole rear sensors. I verified this by swapping the sensor to the other side and then got the same error to ground on that side.
This allowed me to use my sensors for a couple more months until the new year.. for the past few weeks my parking button would flash everytime I got in the car, I can also no longer connect to the module via scan tools.
I took this opportunity to change out the scotch locks for T taps as discussed a while ago. Still did not solve it, continity test of CAN connection showed the lines to be fine.
I assumed I was getting power to the module as the parking button would flash but no other communication was possible, therefore assumed module was dead. Decided this would be a decent time to purchase a PLA3.0 module. After fitting this, it results in the parking module no longer flashing but I still cannot communicate with the module (I guess they changed the output of errors when with PLA 2.0 vs 3.0?). I have since tested the module on a friends car, and I am able to connect to the PLA3.0 module. Therefore, under the assumption that my Aliexpress 2.0 module is in good order and there is something else that is wrong..
Unplugging the larger connector which holds the rear sensors along with the speakers and grounds causes the light to stop flashing..
I have no idea what else to test.. I can only assume my fuse tap is still working okay as the fuse is working fine. Anyone have any idea why it would flash with a pla2.0 module vs 3.0?
What it may signify? (bad ground? CAN? Power?).
I would appreciate any help but will also post an update if I manage to fix it myself.
So, the update you all been waiting for!!!
Finally had some time today and everything was ready, so I took out the bumper and brought it to a friend's apartment where we could easily work.
We started by removing the old glue residue from the previous attempts. We weren't super careful since I don't care how the inside of the bumper looks, and using a flathead screwdriver really removed a lot. We then proceeded with sanding everything down using a Dremel with a sanding "ball" attachment which was SUPER useful and made the job really easier. We then hand-sanded it using some sanding paper which made the surface super smooth and ready. And then 5 times again for each sensor ;-).

We then proceeded to install the genuine brackets. This was the hardest part, however, this time I had the genuine tool VAS6614/6, which is supposed to act as a "parking sensor" to hold the bracket in place while the glue dries:


HOWEVER. And this is a PSA for anyone reading this thread in the future. I got 2 tubes of JB-Weld PlasticWeld black from Amazon, since in Israel they don't import this variant, for some reason. I paid 60$ (!!!) to get them shipped fast since I wanted to get it over with. I did everything by the book, and the bonding process was still shitty! which leads me to say that this product sucks! It failed me so many times, I gave it enough time to cure and did everything as mentioned in the box. It's just not strong enough to hold the plastic brackets to the bumper!!!
We did somehow manage to get it to stick, but it wasted SO MUCH of our time and it kept failing. We had to reinforce it with some glue on the sides to make it work.
We used the genuine harness. Using the clips that came with it was super satisfying, everything just clicked into place like it came from factory!!!
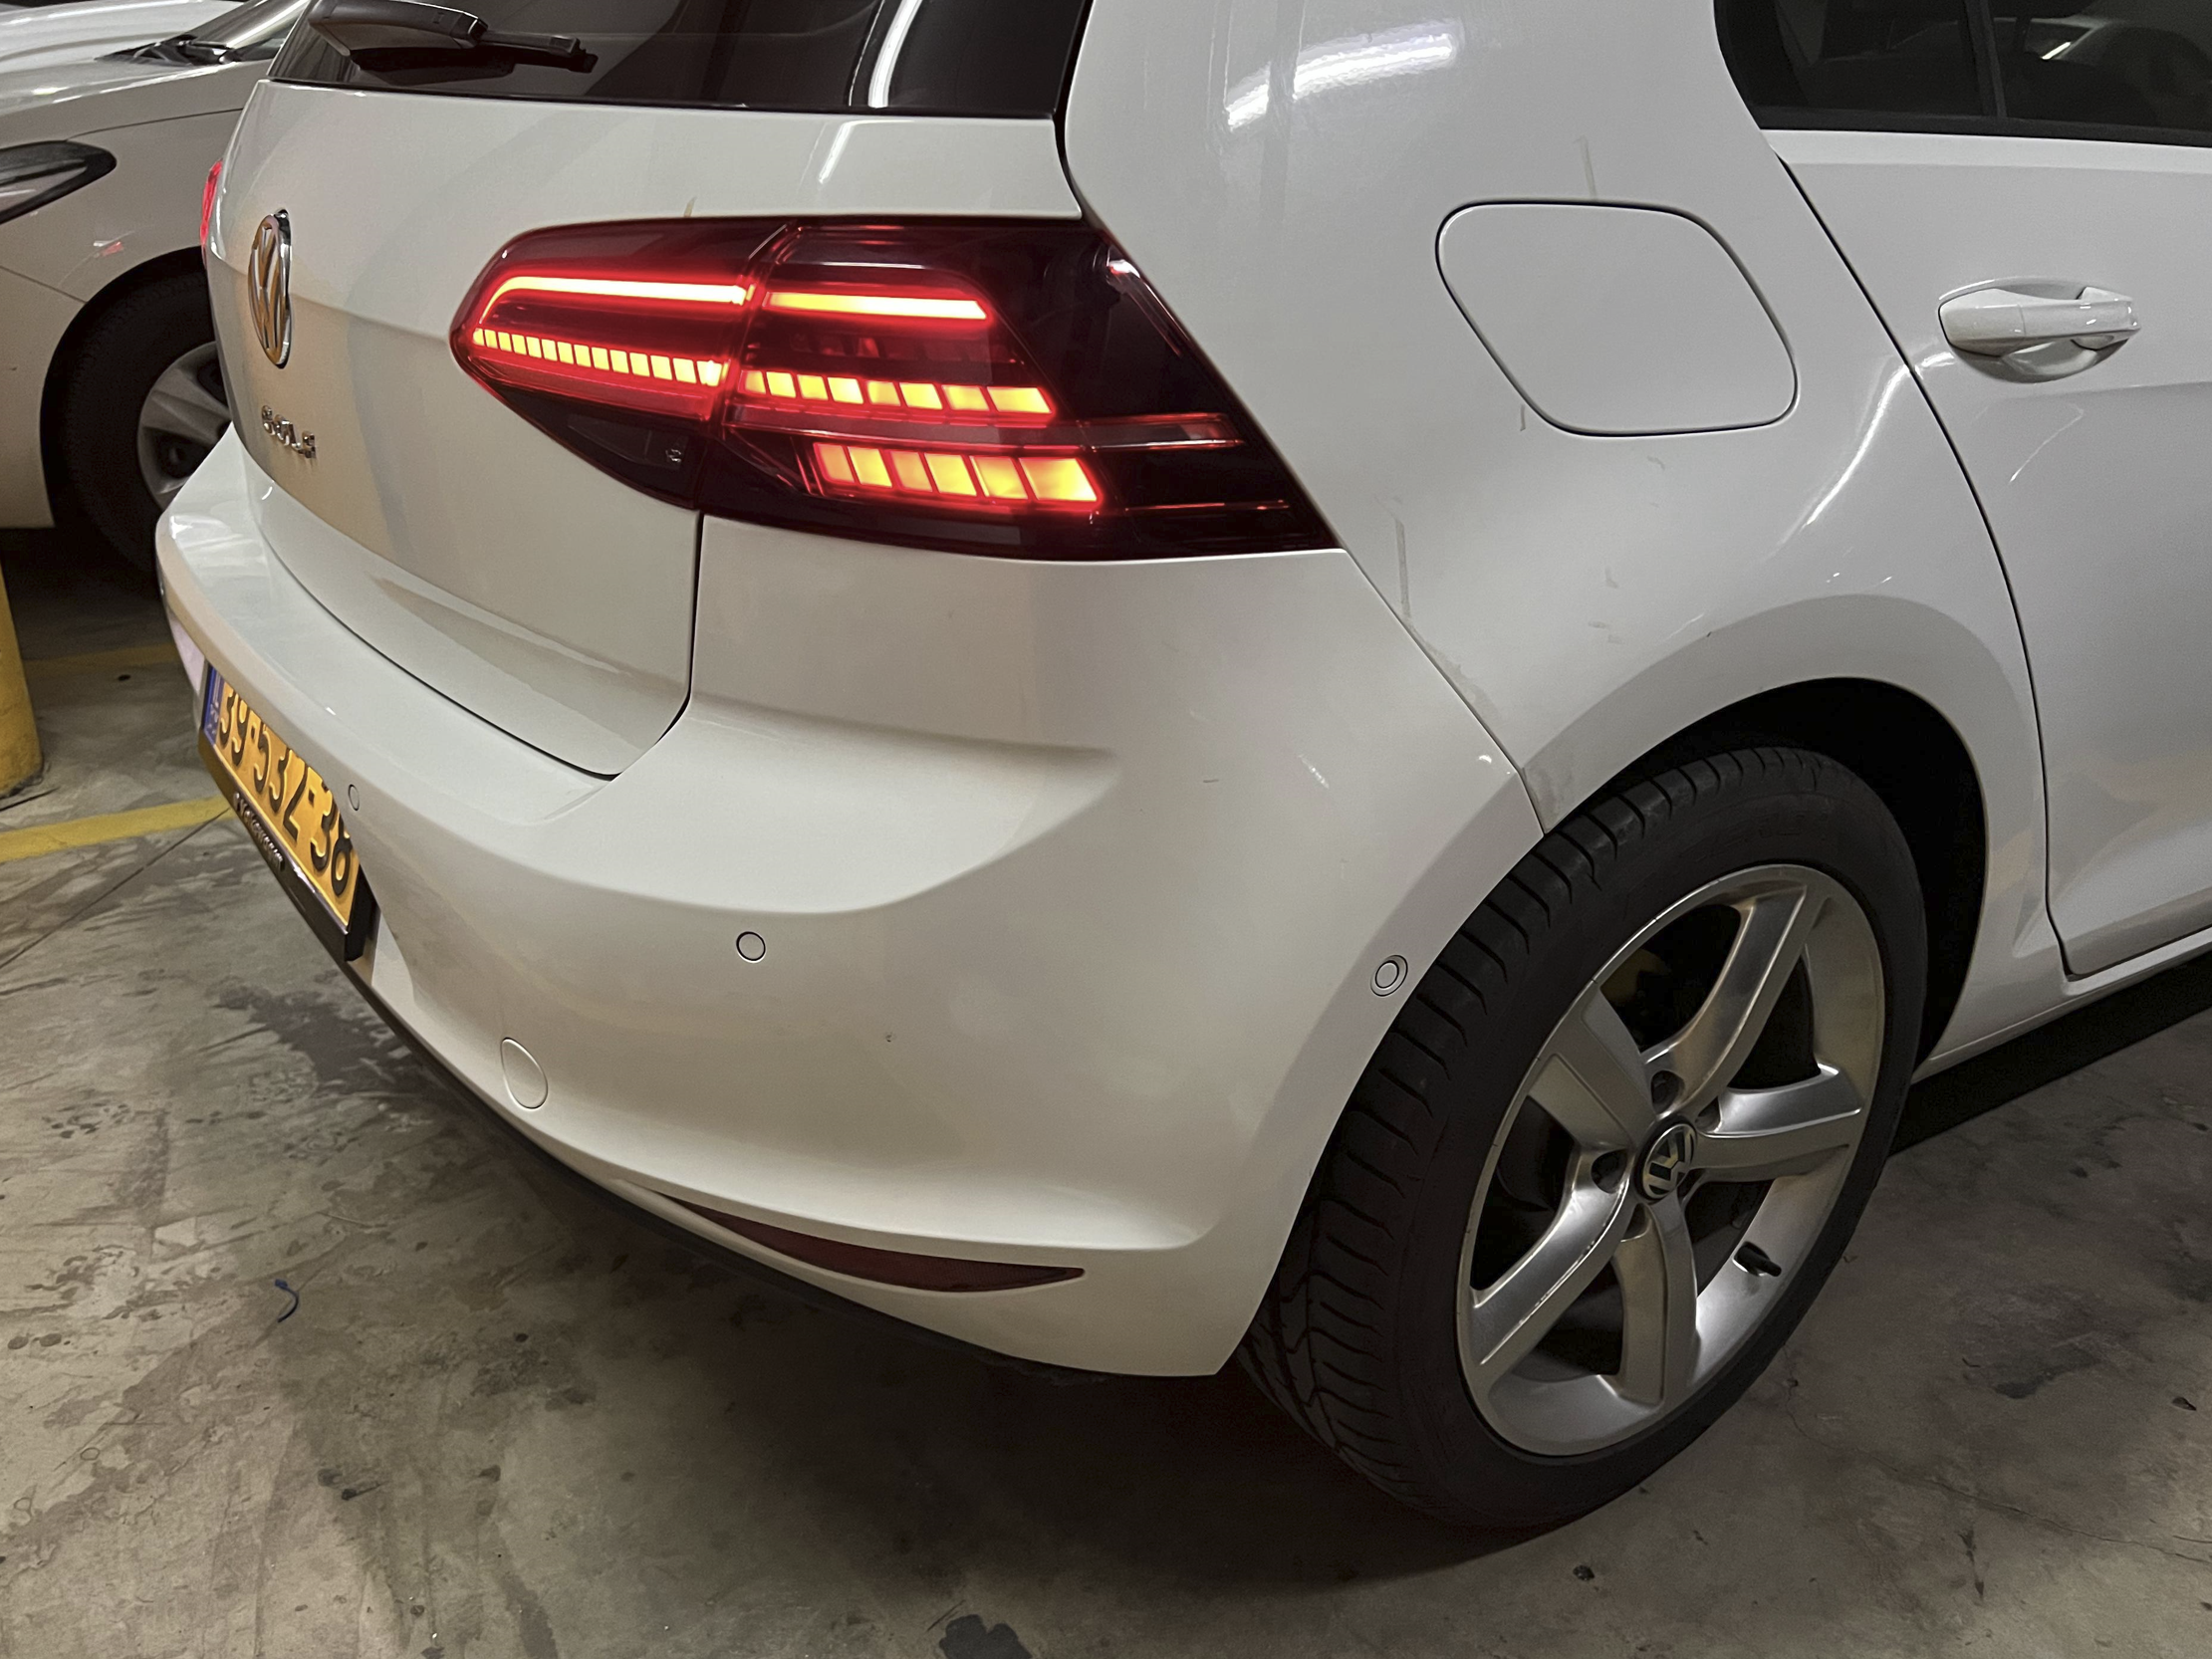
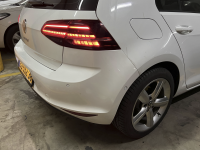
And the final result...
Side view (you can see the PLA sensor in its own bracket):


And better lighting:
Finally I'm done with this project for good, and can share important remarks that I learned along the way:
Finally had some time today and everything was ready, so I took out the bumper and brought it to a friend's apartment where we could easily work.
We started by removing the old glue residue from the previous attempts. We weren't super careful since I don't care how the inside of the bumper looks, and using a flathead screwdriver really removed a lot. We then proceeded with sanding everything down using a Dremel with a sanding "ball" attachment which was SUPER useful and made the job really easier. We then hand-sanded it using some sanding paper which made the surface super smooth and ready. And then 5 times again for each sensor ;-).
We then proceeded to install the genuine brackets. This was the hardest part, however, this time I had the genuine tool VAS6614/6, which is supposed to act as a "parking sensor" to hold the bracket in place while the glue dries:
HOWEVER. And this is a PSA for anyone reading this thread in the future. I got 2 tubes of JB-Weld PlasticWeld black from Amazon, since in Israel they don't import this variant, for some reason. I paid 60$ (!!!) to get them shipped fast since I wanted to get it over with. I did everything by the book, and the bonding process was still shitty! which leads me to say that this product sucks! It failed me so many times, I gave it enough time to cure and did everything as mentioned in the box. It's just not strong enough to hold the plastic brackets to the bumper!!!
We did somehow manage to get it to stick, but it wasted SO MUCH of our time and it kept failing. We had to reinforce it with some glue on the sides to make it work.
We used the genuine harness. Using the clips that came with it was super satisfying, everything just clicked into place like it came from factory!!!
And the final result...
Side view (you can see the PLA sensor in its own bracket):
And better lighting:
Finally I'm done with this project for good, and can share important remarks that I learned along the way:
- Don't go cheap and get AliExpress "premade" kits. It's not 80% cheaper just because, they use cheap materials for the wiring looms (which made me replace mine), and you can never know if things are really genuine. Use eBay or salvage sites to get genuine OEM parts!!!
- Use a high quality epoxy. Unfortunately I can't recommend anything because JB-Weld is trash, but I know VW sells one as well!
- Use the VAS6614/6 tool to hold your brackets in place while the epoxy cures! It REALLY helps!
- Use genuine brackets. The aftermarket brackets that come with the double-sided 3M tape (which is fake 3M, btw) don't hold shit. The genuine brackets are designed to fit exactly in the right spots.
- Take your time. Don't rush. Leave your bumper to dry overnight if possible, it really makes a big difference.
Attachments
-
 1645132807886.png4.4 MB · Views: 511
What did you use for the main bulk of the harness? That connects to the module, live etc?So, the update you all been waiting for!!!
Finally had some time today and everything was ready, so I took out the bumper and brought it to a friend's apartment where we could easily work.
We started by removing the old glue residue from the previous attempts. We weren't super careful since I don't care how the inside of the bumper looks, and using a flathead screwdriver really removed a lot. We then proceeded with sanding everything down using a Dremel with a sanding "ball" attachment which was SUPER useful and made the job really easier. We then hand-sanded it using some sanding paper which made the surface super smooth and ready. And then 5 times again for each sensor ;-).
View attachment 239566
We then proceeded to install the genuine brackets. This was the hardest part, however, this time I had the genuine tool VAS6614/6, which is supposed to act as a "parking sensor" to hold the bracket in place while the glue dries:
View attachment 239567
View attachment 239565
HOWEVER. And this is a PSA for anyone reading this thread in the future. I got 2 tubes of JB-Weld PlasticWeld black from Amazon, since in Israel they don't import this variant, for some reason. I paid 60$ (!!!) to get them shipped fast since I wanted to get it over with. I did everything by the book, and the bonding process was still shitty! which leads me to say that this product sucks! It failed me so many times, I gave it enough time to cure and did everything as mentioned in the box. It's just not strong enough to hold the plastic brackets to the bumper!!!
We did somehow manage to get it to stick, but it wasted SO MUCH of our time and it kept failing. We had to reinforce it with some glue on the sides to make it work.
We used the genuine harness. Using the clips that came with it was super satisfying, everything just clicked into place like it came from factory!!!
And the final result...
Side view (you can see the PLA sensor in its own bracket):
View attachment 239568
View attachment 239569
View attachment 239570
And better lighting:
Finally I'm done with this project for good, and can share important remarks that I learned along the way:
- Don't go cheap and get AliExpress "premade" kits. It's not 80% cheaper just because, they use cheap materials for the wiring looms (which made me replace mine), and you can never know if things are really genuine. Use eBay or salvage sites to get genuine OEM parts!!!
- Use a high quality epoxy. Unfortunately I can't recommend anything because JB-Weld is trash, but I know VW sells one as well!
- Use the VAS6614/6 tool to hold your brackets in place while the epoxy cures! It REALLY helps!
- Use genuine brackets. The aftermarket brackets that come with the double-sided 3M tape (which is fake 3M, btw) don't hold shit. The genuine brackets are designed to fit exactly in the right spots.
- Take your time. Don't rush. Leave your bumper to dry overnight if possible, it really makes a big difference.
Also could it be possible that because you shaved the surface flat and smooth, then used the PDC tool that you did not give it a surface to stick to, along with squeezing it all out?
Congratulations on it all!
Cuzoe
Autocross Champion
- Location
- Los Angeles
I'm glad you got it sorted... but I would push back on a lot of your advice for others considering this retrofit.
No one else (that has reported in this thread) has had the extent of problems you did with brackets or harness. Not at all saying they were your fault. But yours is not the typical experience.
Lots of us are still running the full kit from Ali with zero problems outside of the really sub-par adhesive. I've used JB Weld for tons of things, for over a decade. Then used it here with zero problems. It works great when used as specified, including for these brackets.
It does have a shelf life though (assuming it's like the various adhesives we use at work). After that time or if it's been exposed to extreme temperatures it may not mix, attach or cure properly. I've never checked the date on JB Weld, but I've probably never had any old stock either.
Thanks! I didn’t understand what do you mean in the first question?What did you use for the main bulk of the harness? That connects to the module, live etc?
Also could it be possible that because you shaved the surface flat and smooth, then used the PDC tool that you did not give it a surface to stick to, along with squeezing it all out?
Congratulations on it all!
Well, I haven’t seen any of you post results of your final product so I can’t know if our standards are the same.I'm glad you got it sorted... but I would push back on a lot of your advice for others considering this retrofit.
No one else (that has reported in this thread) has had the extent of problems you did with brackets or harness. Not at all saying they were your fault. But yours is not the typical experience.
Lots of us are still running the full kit from Ali with zero problems outside of the really sub-par adhesive. I've used JB Weld for tons of things, for over a decade. Then used it here with zero problems. It works great when used as specified, including for these brackets.
It does have a shelf life though (assuming it's like the various adhesives we use at work). After that time or if it's been exposed to extreme temperatures it may not mix, attach or cure properly. I've never checked the date on JB Weld, but I've probably never had any old stock either.
Cuzoe
Autocross Champion
- Location
- Los Angeles
I'm not going back through 20+ pages to find results that you're suggesting don't exist. People without problems don't spend a lot of time posting.
The whole problem with the adhesive, scraping it off and replacing with JB Weld... all of that was talked about here. And proves a working solution. You may (or may not) recall myself and others posting measurements of the sensors, linking tools, discussing the wiring (left side routing), etc.
As for my personal standards... I bring to my car the same energy and attention to detail that I bring to my career in aviation maintenance. A look through my post history and/or build thread speaks to that.
If you don't have trust in the standards of others here then it seems to me you should be asking for less advice. This forum and this thread are filled with people very passionate about their cars and mods/retrofits.
You need to qualify the advice you're giving in this thread. Your post suggests that you've solved unknown issues or that anything not OEM (by your definition) doesn't work. Quite frankly that's bull jive.
I'm not going back through 20+ pages to find results that you're suggesting don't exist. People without problems don't spend a lot of time posting.
The whole problem with the adhesive, scraping it off and replacing with JB Weld... all of that was talked about here. And proves a working solution. You may (or may not) recall myself and others posting measurements of the sensors, linking tools, discussing the wiring (left side routing), etc.
As for my personal standards... I bring to my car the same energy and attention to detail that I bring to my career in aviation maintenance. A look through my post history and/or build thread speaks to that.
If you don't have trust in the standards of others here then it seems to me you should be asking for less advice. This forum and this thread are filled with people very passionate about their cars and mods/retrofits.
You need to qualify the advice you're giving in this thread. Your post suggests that you've solved unknown issues or that anything not OEM (by your definition) doesn't work. Quite frankly that's bull jive.
The whole reason other here have this retrofit is due to this thread.
I don’t need to quality anything, AliExpress is fake and shit quality, your standards are low so you don’t notice the difference.
Cuzoe
Autocross Champion
- Location
- Los Angeles
The whole reason your retrofit works at all is because of me. You were doing a shit job of troubleshooting, after what was presumably a shit job of taking proper care when routing/connecting your harness, that in all likelihood was the cause of your problems. And you want to talk about standards, that's a f***ing joke, absolutely laughable.
Until a page ago you lacked a basic understanding of point to point wiring and why you do resistance checks from origin to destination. You chose to guess about what wires might be at which pin based on nothing. The reason modern electronics have protection engineered into them is to prevent someone like you from frying a module by connecting power/ground backwards or putting power through a sensor.
Despite that you come here asking for advice, often bumping the thread when you didn't get an answer "quick enough" even though the people (myself and others) here, in different time zones, are helping you solve problems that are imagined and/or self induced.
The last 5 pages are filled with your problems, you asking for advice, not accepting that advice, then impatiently asking for advice solving the problem that it was predicted you would have.
Then after that an "update" providing advice to those who might later see this thread . No one has been waiting for that update. Plenty of us completed the retrofit with none of the problems you had. Anyone coming into this thread would do well to ignore the last 5 pages at least.
Until a page ago you lacked a basic understanding of point to point wiring and why you do resistance checks from origin to destination. You chose to guess about what wires might be at which pin based on nothing. The reason modern electronics have protection engineered into them is to prevent someone like you from frying a module by connecting power/ground backwards or putting power through a sensor.
Despite that you come here asking for advice, often bumping the thread when you didn't get an answer "quick enough" even though the people (myself and others) here, in different time zones, are helping you solve problems that are imagined and/or self induced.
The last 5 pages are filled with your problems, you asking for advice, not accepting that advice, then impatiently asking for advice solving the problem that it was predicted you would have.
Then after that an "update" providing advice to those who might later see this thread
. No one has been waiting for that update. Plenty of us completed the retrofit with none of the problems you had. Anyone coming into this thread would do well to ignore the last 5 pages at least.Nuje
Go Kart Champion
- Location
- Island near Vancouver
- Car(s)
- 2015 Sportwagen TDI
Ummmm....no. On both counts.AliExpress is fake and shit quality, your standards are low so you don’t notice the difference.
With Aliexpress, sure - some stuff is indeed bogus knock-off quality, but *every* thing I've purchased from Doki / Aidu Auto (including PDC retrofit kit) that's been listed as OEM as been OEM - top quality stuff. Wires are proper gauge; terminals have differed from what came on my car, but it's not surprising given that their harness is for the Chinese market vs. my NAR. Not too hard to work around.
And @Cuzoe having "low standards" - that's truly laughable. Take a look at any wiring he's done, or the lengths he goes to in order to do things "factory" and again, you're so far off base, you're in a different ballpark.
And as for your experience with JB Weld....I have no idea what you did wrong, but you did something wrong (or somehow a bad batch, or something).
I started with automotive Goop (brand name) and while it adhered well, it had too much "spring" to it. So I switched to JB Weld Black PlasticWeld and that stuff is AMAZING! It's currently holding two of the three blades on a 80cm diameter fan together on the heat pump that heats our house. No more than 1-2mm cross-section over roughly 20cm break in the fan blades, and it's been working for over a month like that through weather ranging from -10°C to +14°C.
So, JBWeld PlasticWeld holding approx. 5cm^2 surface weighing maybe 10g....yeah, it's up to that task. If you use it right away, maybe(?) not great. But let it set up for 5-10minutes until it's starting to get thick, results for me have been stellar.
Glad you got your parking sensors working, @Fraysa, and it looks like you did excellent work with it, but I just wanted to add another viewpoint on the hardware and tools for being able to do this job well.
And to refute your characterization of at least one other member.
Last edited:
Hey everyone, I am changing PLA 3.0.
I would like to ask how did you Swap the module ? i have 5Q0 module and I am changing it to 5QA. My car already have 12 sensors and self parking (only in reverse).
My problem is that the 5QA module is bigger than the 5Q0 and it does not fit to the bracket... How did you overcome this problem ?
Should i change the whole bracket or is there any way around ?
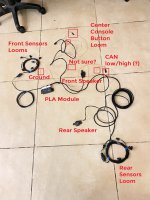
Okay, so good news - I received the PLA 2.0 kit from AidaAuto. I have a few questions after planning it at my house.
This is what the full kit looks like. I connected it lightly to get a rough idea how to make it work in the car.:
View attachment 183908
1. Why does the CAN connection has an extra connector? Shouldn't it be just two pins and that's it?
View attachment 183909
2. What is the black/green wire for?
View attachment 183910
3. I assume this connector is for the center console buttons. However, what is the extra wired pin/connector for?
View attachment 183911
4. The speakers need to be mounted properly. Do you need securing screws for them?
If anyone has any pictures from their installation process, it'd be great.
hi where can we get this connector from the model to the front sensor??? please advice
Attachments
-
 VW sensors.JPEG1,010.4 KB · Views: 137
Cuzoe
Autocross Champion
- Location
- Los Angeles
I can't really see the pins in your picture, but it appears (from what I can see) that the pin you are not sure about is for power. Factory location is fuse SC 32 (cabin fuse box, on the left side of the car. Depending on the other equipment in your car there may or may not be a fuse there already. You can tie into whatever is there or add your own fuse elsewhere, as long as you're still on Terminal 15 (ignition on).
Can low/high is for you to connect to Suspension Can. I assume the connector they are giving you is to tie in at the Gateway; pin 8 (low), pin 18 (high).
Can low/high is for you to connect to Suspension Can. I assume the connector they are giving you is to tie in at the Gateway; pin 8 (low), pin 18 (high).