GOLFMK8
GOLFMK7
GOLFMK6
GOLFMKV

PDC Retrofit Question

joka23

New member
Location
UK
Car(s)
golf mk7 1.4 TSI
As an update. I spent all day yesterday fitting the sensors. I used the PowerTec 92489 kit. I dont know if I can recommend it because it left multiple rings around the bumper, I dont believe it to be user error. One of the holes I had to repunch as the tool was flexing and went in at an angle nearly destroying itself. I'm sorry for not including any progress picture updates as I was racing the sun.

When following the bumper removal guide there are 4 screws on the wheel arch, I forgot to remove the top one for one of the sides and thought the clip was being stubborn and ended up breaking it, still managed to reuse the same screw hole so not a problem.

I had to go for a full attack and hope for the best as I only really had 1 day (Sunday with work on Monday). This is definitely a 2 man job in my opinion between making sure you dont scratch the bumpers removing them, removing trims and cutting yourself multiple times in the process, and last of all just mentally!

This is the first time I participated in a thread like this to help people in the future so I am trying to do a memory dump for others to learn from my mistakes.

From the beginning for RHD people trying to a partially good job:

  1. I tapped into the TIUL connection on the side of the passenger (one trim to be removed) my sensors do not work and I think it is because of this CAN connection - will update in the future
  2. The main harness went from the TIUL connection under the trim, by the rear left passenger seats and to the back.
    1. You dont have to completely remove the bottom trim, partially remove it and tuck the cable in, I found taping the rear speaker to the harness going to the rear also helped.
    2. I took off the rear seats, the bulging plastic panel that sits between the passenger and the door
    3. After this I took off the trim that is behind the seat belt, this has 1 bolt i think within a piece of plastic that is a cylindrical shape.
    4. I also took off the trim that the boot latch goes through that goes across the rear bumper.
    5. Because I dont care about OEM placement of things, I tied up the excess behind the trim in the boot along with the rear speaker and put some felt tape to stop it rattling (along with zip tie the bulk to the side).
  3. Cut the bumper holes etc, I routed the cable down the same way as XaGiCo.
    1. While youre doing this check your rear boot flaps, if they are moving/ the silicone looks bad go over it with silicone as it can cause water to leak where your spare tyre sits.
  4. The front was easier for me to undo/ place back in my opinion. If you have an ACC module, this does not come off with the bumper so you will not have to recalibrate this.
    1. For the wiring, I took off the battery along with its tray, there is a rubber nipple to the right of the brake booster (I think thats what it is). I cut this, and routed a coat hanger down this hole into the passenger footwell. This required roughly 30 minutes of screaming and trying to pull foam pieces down from inside while someone outside was poking the coat hanger in from the bonnet. this guide for visuals.
Routing all cabling to behind the screen seems to work quite well. all I have left to do is wire the blue cable to the light switch so it lights up. Along with figuring out why I cant reach the module with obd11, haven't had time to multimeter this yet.

I used 1 and a half tubes of JB weld black, it works very well, to stick, I removed the "3M stickers" they came with, but these stickers must be fake as they couldnt hold on to any material. I did leave residual trails of glue on the sensors. The side sensors sit very flush and are quite tight to get into the front because of the brackets, because of this I fitted them and then put JB weld around the side (they sat in very tight without any glue).

I am quite happy with the flushness and they seem more flush than my friends Golfs/Polos which have OEM sensors.

Other notes:
  • JB weld black is also great at sticking to your fingers, dont be an idiot like me. Wear gloves! It does slowly start peeling off after 24 hours it seems!
  • It is a good idea to let JB weld black to sit for a minute or two to thicken, this helps you apply it.
  • Watch/ collate a bunch of YouTube videos on how to remove bumpers etc as this will help you fitting.
  • Purchase the bigger side sensors for the rear as in my opinion they look better and you will not have to cut the current sensors to let them sit in the corner.
  • I DO NOT RECOMMEND BUYING HALFORDS LH5X SPRAY PAINT AND DIY as the colour for my car is visually off when in sunlight (annoying but can live with it). Weirdly the larger sensor holders came out looking better than the actual sensors in terms of colour matching.
 

IWMTom

Autocross Newbie
As an update. I spent all day yesterday fitting the sensors. I used the PowerTec 92489 kit. I dont know if I can recommend it because it left multiple rings around the bumper, I dont believe it to be user error. One of the holes I had to repunch as the tool was flexing and went in at an angle nearly destroying itself. I'm sorry for not including any progress picture updates as I was racing the sun.

When following the bumper removal guide there are 4 screws on the wheel arch, I forgot to remove the top one for one of the sides and thought the clip was being stubborn and ended up breaking it, still managed to reuse the same screw hole so not a problem.

I had to go for a full attack and hope for the best as I only really had 1 day (Sunday with work on Monday). This is definitely a 2 man job in my opinion between making sure you dont scratch the bumpers removing them, removing trims and cutting yourself multiple times in the process, and last of all just mentally!

This is the first time I participated in a thread like this to help people in the future so I am trying to do a memory dump for others to learn from my mistakes.

From the beginning for RHD people trying to a partially good job:

  1. I tapped into the TIUL connection on the side of the passenger (one trim to be removed) my sensors do not work and I think it is because of this CAN connection - will update in the future
  2. The main harness went from the TIUL connection under the trim, by the rear left passenger seats and to the back.
    1. You dont have to completely remove the bottom trim, partially remove it and tuck the cable in, I found taping the rear speaker to the harness going to the rear also helped.
    2. I took off the rear seats, the bulging plastic panel that sits between the passenger and the door
    3. After this I took off the trim that is behind the seat belt, this has 1 bolt i think within a piece of plastic that is a cylindrical shape.
    4. I also took off the trim that the boot latch goes through that goes across the rear bumper.
    5. Because I dont care about OEM placement of things, I tied up the excess behind the trim in the boot along with the rear speaker and put some felt tape to stop it rattling (along with zip tie the bulk to the side).
  3. Cut the bumper holes etc, I routed the cable down the same way as XaGiCo.
    1. While youre doing this check your rear boot flaps, if they are moving/ the silicone looks bad go over it with silicone as it can cause water to leak where your spare tyre sits.
  4. The front was easier for me to undo/ place back in my opinion. If you have an ACC module, this does not come off with the bumper so you will not have to recalibrate this.
    1. For the wiring, I took off the battery along with its tray, there is a rubber nipple to the right of the brake booster (I think thats what it is). I cut this, and routed a coat hanger down this hole into the passenger footwell. This required roughly 30 minutes of screaming and trying to pull foam pieces down from inside while someone outside was poking the coat hanger in from the bonnet. this guide for visuals.
Routing all cabling to behind the screen seems to work quite well. all I have left to do is wire the blue cable to the light switch so it lights up. Along with figuring out why I cant reach the module with obd11, haven't had time to multimeter this yet.

I used 1 and a half tubes of JB weld black, it works very well, to stick, I removed the "3M stickers" they came with, but these stickers must be fake as they couldnt hold on to any material. I did leave residual trails of glue on the sensors. The side sensors sit very flush and are quite tight to get into the front because of the brackets, because of this I fitted them and then put JB weld around the side (they sat in very tight without any glue).

I am quite happy with the flushness and they seem more flush than my friends Golfs/Polos which have OEM sensors.

Other notes:
  • JB weld black is also great at sticking to your fingers, dont be an idiot like me. Wear gloves! It does slowly start peeling off after 24 hours it seems!
  • It is a good idea to let JB weld black to sit for a minute or two to thicken, this helps you apply it.
  • Watch/ collate a bunch of YouTube videos on how to remove bumpers etc as this will help you fitting.
  • Purchase the bigger side sensors for the rear as in my opinion they look better and you will not have to cut the current sensors to let them sit in the corner.
  • I DO NOT RECOMMEND BUYING HALFORDS LH5X SPRAY PAINT AND DIY as the colour for my car is visually off when in sunlight (annoying but can live with it). Weirdly the larger sensor holders came out looking better than the actual sensors in terms of colour matching.
Did you prime the sensors first?
 

joka23

New member
Location
UK
Car(s)
golf mk7 1.4 TSI
Did you prime the sensors first?
Both the brackets and sensors were sanded, to create a rough surface and to remove some of the paint from the sensors as some forums stated a thick coat could effect the sensors.
I used grey plastic primer as it was stated for the best results I should use this.
I went slow and gave it multiple thin coats. Followed by a clear coat.

I used a multimeter and realised one of the CAN connections wasn't connected properly via the scotchlock. I replaced it and the sensors now seem to work. The scotchlocks will be replaced as I do not trust them to hold up.

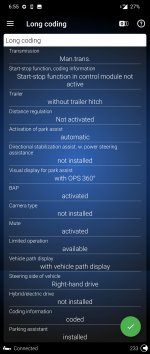
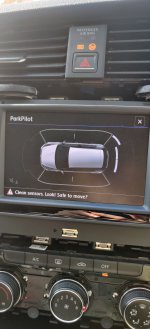
This is the current state of my sensors. Front and rear works, sides do not. I have not changed all the other modules to tell it I have added park pilot as I wanted to create a full backup first incase something was to go wrong.
My only other issue is when I put it in reverse it does not activate the parking sensors and no matter how close I get to objects there is no speaker noise. I have tested both speakers and they both work (via output test).
 

Attachments

  • IMG_20210907_152932.jpg
    IMG_20210907_152932.jpg
    863.8 KB · Views: 112
  • Screenshot_20210907-152952.jpg
    Screenshot_20210907-152952.jpg
    973.8 KB · Views: 118

Cuzoe

Autocross Champion
Location
Los Angeles
I would have to look at the coding again but I'm not sure that OPS 360 is correct... wouldn't you need side cameras for that? My ParkPilot graphic does not have that area down each side of the car.
 

Cuzoe

Autocross Champion
Location
Los Angeles
Ahhh, gotcha... my AliExpress kit was PLA 2.0. All I need is the module for PLA 3.0 though right... anybody got a part number? I'm itchy, haha.
 

joka23

New member
Location
UK
Car(s)
golf mk7 1.4 TSI
Ah that would be it! I didn't have to change anything yet but I will change that and see! Thank you. I have Pla2.0 as I didn't want to change my ABS module, my car is from 2013
 

joka23

New member
Location
UK
Car(s)
golf mk7 1.4 TSI
Even if it doesn't, it's only the AEB that you lose out on.
Sorry what does AEB stand for?

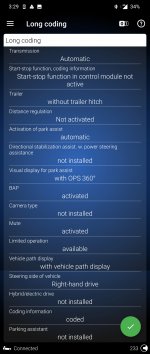
I got OPS360 working! I guess I just had to change some settings. These are the ones that worked for me.

I forgot to change it to manual transmission instead of automatic so the speakers wouldn't work and it wouldn't recognise when I put it into reverse.

Auto park also works now that I have changed all of the settings recommended by XaiGiCo. All that is left is for me to change the Scotch locks over to T-taps and organise the wiring a little. I have one error left on the parking sensor module but forgot to take a screenshot of it. It is very generic.

Other than that, thank you very much again for all your suggestions, hopefully it will last! I will report back with an update on false positives etc once I take it on an actual drive
 

Attachments

  • Screenshot_20210907-185503.jpg
    Screenshot_20210907-185503.jpg
    970.1 KB · Views: 84

IWMTom

Autocross Newbie
Sorry what does AEB stand for?

I got OPS360 working! I guess I just had to change some settings. These are the ones that worked for me.

I forgot to change it to manual transmission instead of automatic so the speakers wouldn't work and it wouldn't recognise when I put it into reverse.

Auto park also works now that I have changed all of the settings recommended by XaiGiCo. All that is left is for me to change the Scotch locks over to T-taps and organise the wiring a little. I have one error left on the parking sensor module but forgot to take a screenshot of it. It is very generic.

Other than that, thank you very much again for all your suggestions, hopefully it will last! I will report back with an update on false positives etc once I take it on an actual drive
Autonomous Emergency Braking.
 

Cuzoe

Autocross Champion
Location
Los Angeles
I've had the red warning come up in my dash once, I was going through an intersection and a car going the opposite way started to make the turn across in front of me. Got the warning, clutched in and moved my foot over to the brake, about the same time as the other driver turned back into their lane. All pretty quick and I didn't actually have to use the brake, so I'm not sure if the car would have braked on its own.

I did wonder about AEB with a 6MT though. Out on the road I'm fine with how it worked for me, the warning cannot be ignored, haha. But if I was in a parking lot and the car hit the brakes I could see stalling out. Not that stalling out will destroy the car but it's not something I want happening. I guess for me I'm happy without AEB.
 

Black&WhiteGTI

Passed Driver's Ed
Location
St. Louis, MO
Car(s)
'16 GTI '92 Miata
Hi everyone, I’m sure that I am a little late to the party but my GTI SE 2016 came from the factory with the full driver assistance package (with Park Assist) and I am also willing to answer any questions anyone has.

I am curious how the car has the parking sensors depicted all the way around the car on the OPS 360, I haven’t been able to actually test if it has sensors in/near the doors, or if the middle two sections on each side of the car just indicate objects are there by memory.
What I mean by this is that as you drive forwards the last sensor measures the distance to something and the amount of rotations of the wheels to figure out which section will display the obstruction on the OPS.
Or does the car have 16 sensors and only 12 sensors are visible? If that is so, then where are the other 4 sensors located? In the rocker panel?

I have been looking everywhere for this info.
 

IWMTom

Autocross Newbie
Hi everyone, I’m sure that I am a little late to the party but my GTI SE 2016 came from the factory with the full driver assistance package (with Park Assist) and I am also willing to answer any questions anyone has.

I am curious how the car has the parking sensors depicted all the way around the car on the OPS 360, I haven’t been able to actually test if it has sensors in/near the doors, or if the middle two sections on each side of the car just indicate objects are there by memory.
What I mean by this is that as you drive forwards the last sensor measures the distance to something and the amount of rotations of the wheels to figure out which section will display the obstruction on the OPS.
Or does the car have 16 sensors and only 12 sensors are visible? If that is so, then where are the other 4 sensors located? In the rocker panel?

I have been looking everywhere for this info.
You pretty much nailed it here. That's exactly how it works.

It's a best guess based on surroundings already scanned and other inputs like speed and wheel direction.
 
Top