GOLFMK8
GOLFMK7
GOLFMK6
GOLFMKV

nicholam77's PP GTI thread

nicholam77

Go Kart Champion
Location
Minneapolis
In the video it looks like the lights become out of sync on the second and third flashes. Is that just the way the video was recorded or did you notice that in person as well?

⬆️ this, noticed that the inside comes on a millisecond sooner then the outer catches up...

Yes I saw that, too. It's more apparent in the video, but you do get the tiniest sense of it it person as well. It's weird because most of the blinks seem dead on. I don't know why or how to correct it, though. I do have the deautokey bulbs so maybe that factors in??
 

nicholam77

Go Kart Champion
Location
Minneapolis
Installed my KMD stainless steel clutch line this afternoon. It's a fairly easy job, just disconnect the OEM line from the slave bleeder on one end and clutch master cylinder on the other end, replace with the new line and then bleed the system. Both ends are held in with metal retaining clips.

To get access to both ends you will need to remove the air box, the battery, and the battery tray. The battery tray has three 10mm bolts and one 10mm nut at the locations in the pic below. The positive battery lead wires are zip tied to it so you will probably have to cut those free.


After removing the battery tray you will see where the clutch line connects to the clutch master cylinder against the firewall on the driver's side (#1 in the below pic). In the middle of the line there is a clip (#3 in the below pic) holding it to the side. It is underneath where the arrow is pointing and just lifts out by hand:


I removed the clutch master cylinder end first with two small screwdrivers. One to push the bottom of the retaining clip up, and one to pry underneath and pull it out. Space is limited so this took some patience.


Once the retaining clip is out just pull the hose out. It requires a bit of force. Some fluid will spill so be ready to catch it with a towel or zip lock baggy.

The slave side is easier to access and comes off the same way.

To install the new line, just do the reverse and replace the retaining clips. New stainless line installed at both ends:


Once everything is secure, bleed the clutch system. It helps to attached a clear plastic hose to the bleeder screw so you can monitor the air bubbles coming out. And make sure to keep the reservoir topped off at all times.


Just for reference, here is what the stock line looks like. Its actually half rubber hose and half hard line:


And this is the KMD Tuning part:


Impressions:

It does make a difference, although not a drastic one. The pedal feel is still light and soft, but it does seem the engagement window has been focused. In driving around I feel like my starts in 1st from a standstill are easier and don't require slipping the clutch to get a smooth start. :eek:
 

nicholam77

Go Kart Champion
Location
Minneapolis
Installed auto folding mirrors this afternoon.

To cut straight to the good news -- auto fold on lock/unlock is working, as well as passenger mirror dip with return memory function!

I have to say, while totally doable, this job was a major PITA. From the door clips, to swapping the mirrors and caps, to routing the mirror wires, to reassembling the door, it was a frustrating process. Probably took me 3 hours total.

I didn't break any clips, though. Thankfully I have some experience removing VW trim pieces but if this is your first time be prepared for a struggle.

The process is pretty well-documented on the forums here and I just want to shout out to Sabo for his excellent DIY guide < here >, as well as inc55's helpful installation tips < here >. The USP Motorsports guide is helpful as well but these extra tips from forum members really helped.


After getting everything buttoned up, I proceeded to follow the USP walkthrough for coding. The manual switch for folding worked, but the convenience folding on lock/unlock did not. I discovered there are some extra adaptations that need to be performed to allow that functionality. For those using OBDeleven, here's what worked for me (aug 2016 car):

42 Door Electronics Driver's Side --> Coding --> Long Coding

To enable the puddle lights, go to Byte 01 and enable bit 0:


Next, to tell the car that folding mirrors are installed and to enable comfort folding, go to Byte 04 and enable bits 4 and 6:


Then, do the same for the passenger side "52 Door Electronics Passenger" (in Byte 01 enable bit 0, and in Byte 04 enable bits 4 and 6). If you want the passenger mirror dip in reverse as well, also in Byte 04 enable bits 1, 2, and 3.

Now the manual knob should work to fold and unfold the mirrors. To get the automatic folding on lock and unlock, two adaptations are necessary in the Body Control Module.

Go to 09 Central Electronics --> Access Control 2 --> Adaptation

change "Funk Spiegelanklappen" to active

change "Funk Speigelanklappung Modus" to by look command via remote control key

enter security code 31347 and accept changes.


After all coding has been accepted successfully, reset "Mirrors and Wipers" in the car settings menu of the head unit. Now it should work!

Quick video of the mirrors in action: https://www.youtube.com/watch?v=BwdHQA5oQi8&feature=youtu.be
 

nicholam77

Go Kart Champion
Location
Minneapolis
Installed 034 Dogbone Insert.

Tools needed: Breaker bar, torque wrench, 21mm socket, jack stands or ramps

Installation: Just remove the bolt, place the insert, put the bolt back in, and torque to 100 nm or 73 ft-lbs. Took me 20min including jacking the car up.

Impressions: There are lots of first hand accounts of this mod, but nevertheless here are my results. Much less movement of the transmission. Everything feels tighter and more rigid. Throttle response seems better and rev-matched downshifts are easier because of it. NVH is increased but it's not what I was expecting/fearing. It's non-existent at idle, 0/10. It cannot be felt through the steering wheel and it does not feel like the car is going to rattle apart. During acceleration however, and especially take-offs in 1st gear, there is definitely more vibration. I would say 2/10 or 3/10. It's subtle, but does give the whole car a different feel. Maybe more raw like a sports car than a GT car. I am interested to see if it changes after a bit or if it will "break in", but for now I think I like it, and I certainly like the increased performance regarding the throttle and shifting.


nicholam77

Go Kart Champion
Location
Minneapolis
Got another small mod done last night. OEM / Euro / S3 short shifter.

Tools Needed: 3/8 ratchet, 13mm deep socket, 20inch 3/8 extension, pliers, small flathead screwdriver, grease, torque wrench

Installation: I used DAP's video as a guide (purchased from them as well). When reassembling be careful not to over-torque the retaining nut.


Impressions: This short shift bracket made a huge difference for me. Reduction definitely feels the 20% advertised. It's a great OEM solution. I had already done the solid bushings, but now you can really feel their benefit. Shifts are short, crisp, direct, precise. The whole assembly feels tight and without play. Obviously "shifter feel" and "notchiness" are subjective, but personally I REALLY like how it feels now. I had the 5 speed version on my old MK4 Jetta so I more or less knew what to expect, but still, it's quite an improvement.

In total, regarding the transmission, I've done the CDV delete, stainless steel clutch line, 034 Insert, ECS bushings, and OEM short shifter. All together they make the 6MT on this car a completely different experience than how it came from the factory. I would say everything felt vague and masked before. Now it is very clear and sportier. And when shifted skillfully, very smooth and satisfying to drive. I would highly recommend pretty much any of these mods to all the manual drivers out there.


Pics:


Make sure to add some grease to the part that intersects the side-to-side bracket.


popnloc

Passed Driver's Ed
Location
CA
Got another small mod done last night. OEM / Euro / S3 short shifter.


Make sure to add some grease to the part that intersects the side-to-side bracket.


dumb question, but what kind of grease did you use? just a multi-purpose? I installed mine without using any grease.

Do you also feel like you sort of have to force it in to gear on some shifts?
 

nicholam77

Go Kart Champion
Location
Minneapolis
dumb question, but what kind of grease did you use? just a multi-purpose? I installed mine without using any grease.

Do you also feel like you sort of have to force it in to gear on some shifts?

not a dumb question :) the grease that was on the old part was thicker than what I used, but I think as long as you use something that won't wash off or melt away it should be fine. I just used an all-purpose spray-on can I got at Napa.


As for shifting, it's pretty consistent effort in all gears for me. It feels more notchy (read: precise) than before, and on cold start when the gear oil/synchros aren't heated up yet it does require more effort sometimes. But I wouldn't describe it as forcing it by any means. If it's not going into gear smoothly with a quick, deliberate movement and moderate pressure, or you have trouble in some gears but not others, something may be off and you may need to do an alignment of the linkage. I didn't remove my linkage ends (black plastic and spring piece), so I didn't fiddle with it but if you did it may need a slight adjustment.
 

nicholam77

Go Kart Champion
Location
Minneapolis
OBDeleven came through again! Last night coded my fogs to be the coming home/leaving home lights, as well as set my hill hold assist to the lightest setting. While I like the feature, I always felt the brakes grabbed too hard and too long when trying to start on a hill. Pretty awesome that this setting is adjustable.


nicholam77

Go Kart Champion
Location
Minneapolis
Finally had time to do a write-up of my latest installation:

Dark Cherry LED Euro Tails

I've been wanting to grab a set of these for awhile, but $600+ for lights is a tough pill to swallow. Many other mods could be had for that money (jb1, stage 1 tune, downpipe, tint, etc). However, from the moment I opened the box, I had no regrets. These lights look absolutely awesome, and I think they totally transform the rear end of the car. Much more upscale / Audi-esque, and match the LP front lights in looks and utility. I got mine from BEC Autoparts with their adapter harnesses. They were the ones made for VW China by Koito, not the Automotive Lighting European ones. To me this is no big deal -- they are OEM and ooze quality.

Comparison of US spec vs ROW spec outer units:


They just have so much more dimension and depth, even when off. I love the partial tint of the Dark Cherry version, and I think it looks great on Carbon Steel Gray. One last thing on looks -- they come across even better in person vs pics.
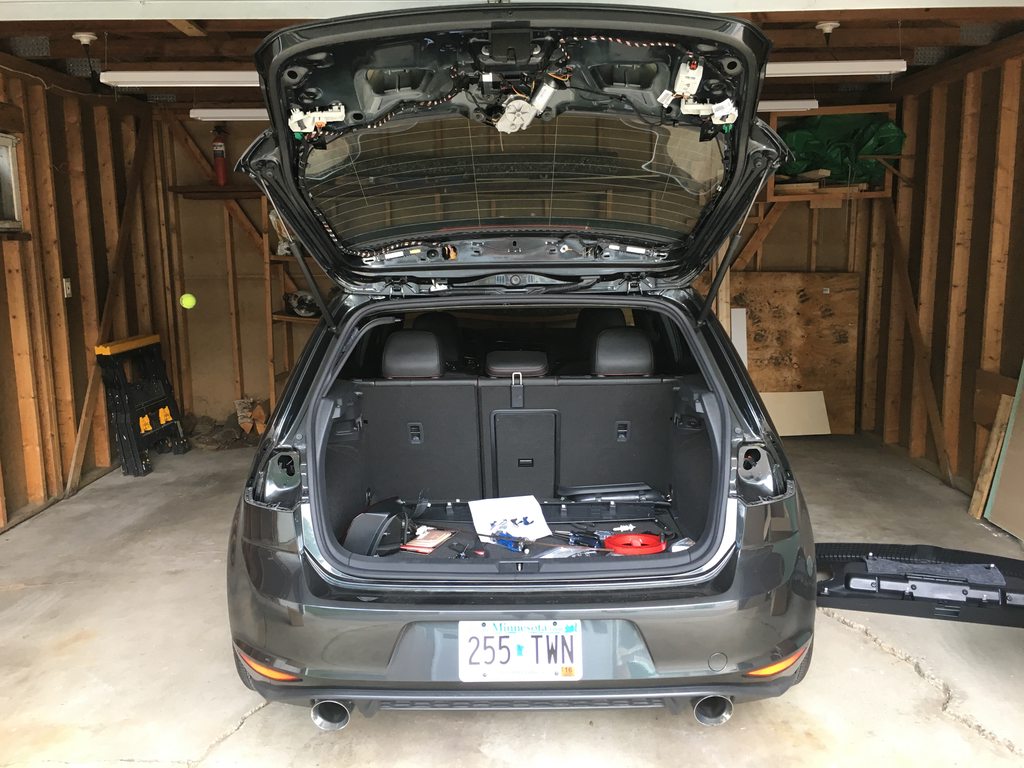
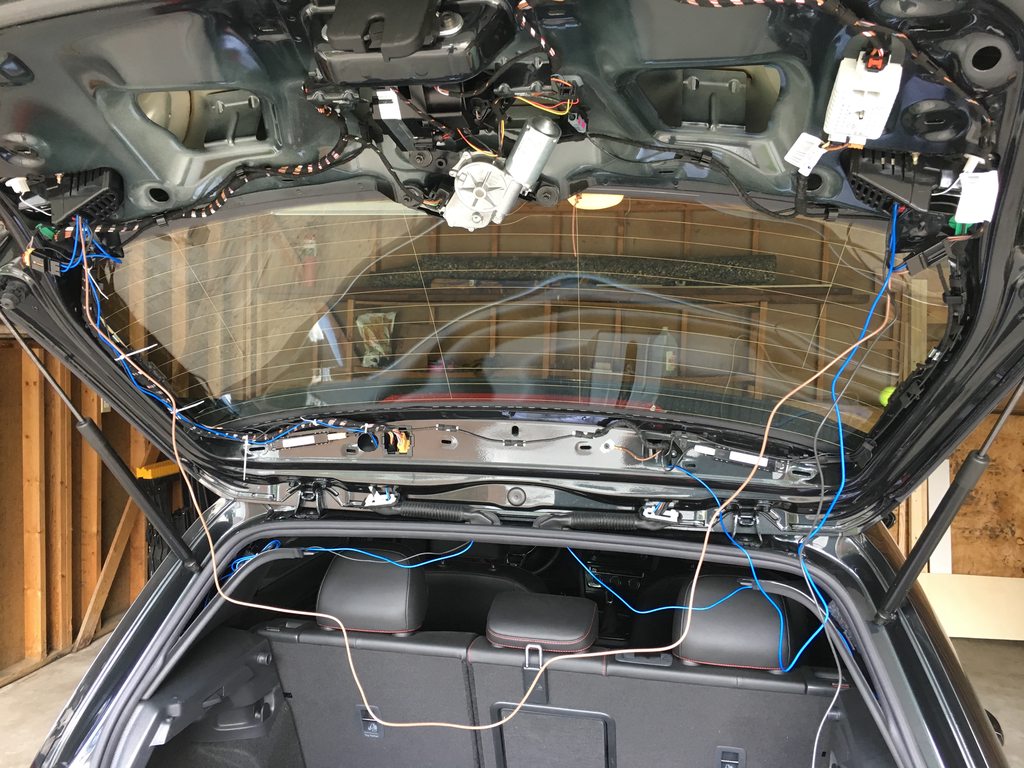
Installation:

It was somewhat miserable, I'll be honest. Removing VW trim pieces with clips is never fun, and I had a few mishaps with the wiring. DAP has an excellent video on the process <here> that shows how to remove the trim pieces and the basic idea of routing the harnesses (BEC harnesses are very similar). Some tools that will make your life easier are a small flathead screwdriver, 8mm deep socket and ratchet, wire snake/fish tape, electrical tape, zip ties, utility blade, and a flashlight if you don't have adequate lighting.

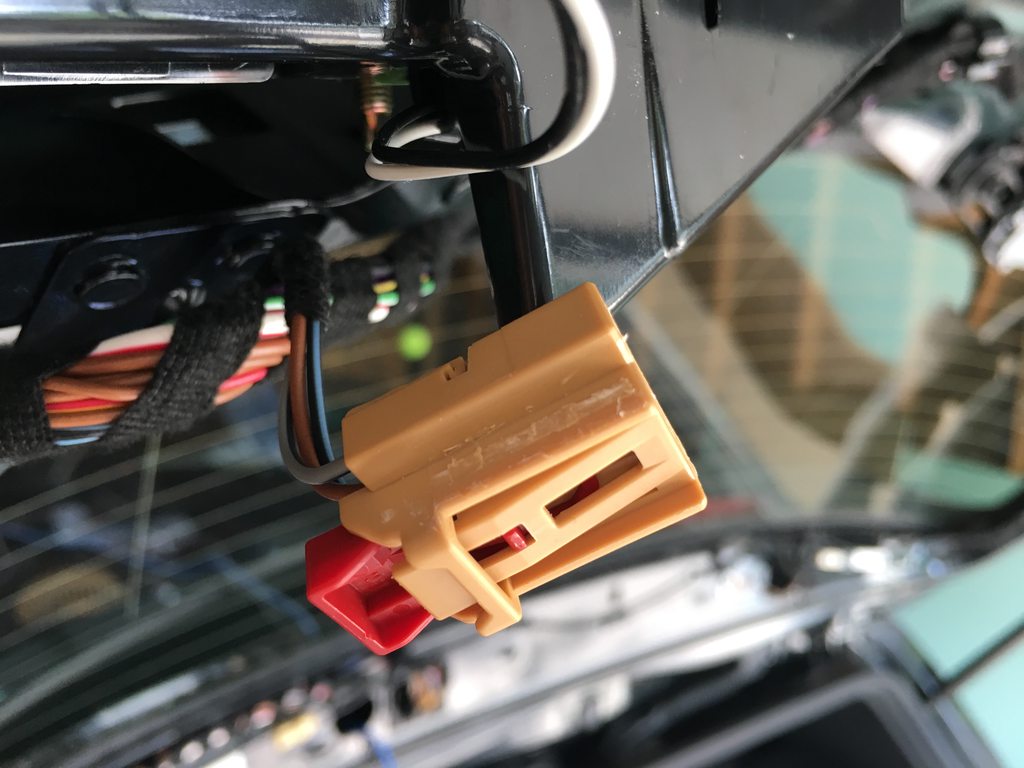
Where I ran into trouble is trying to make one of the harness connections. The pin terminal wasn't seating correctly in the harness, and after too much finagling it weakened and broke off inside. :eek: I was 80% done with the job, and had all the trim ripped out of the hatch. All I could do was email Ed at BEC and ask if he had it in his heart to ship me a new black wire if I paid for it. Not only did he email me back right away, on a Sunday, but offered to send a whole new left inner adapter for only the cost of shipping.

I would also like to mention at this point that before I purchased I emailed him with some questions, and he got back to me right away with clear and concise answers. Top notch customer service.

So... after a week of driving around with the lights plug and play, with no trim in my hatch (no way I was putting that back on and taking it off again to finish up the job!), the new harness arrived from Canada. Eager to wrap things up, I proceeded to swap out the harness only to find... I needed to re-make several of the connections, which meant undoing some wires. Well, apparently these wire pins LOCK into place once seated, and the only way to get them out is with a special little tool. Frustrated, I used my google-fu and found it is possible to flatten a small paper clip with a hammer to stick in the harness and release the pin flanges. I did just that, and by some miracle it worked, although it took 45 min of struggling just to remove two wires. Cue the swearing and fits of rage. :mad:

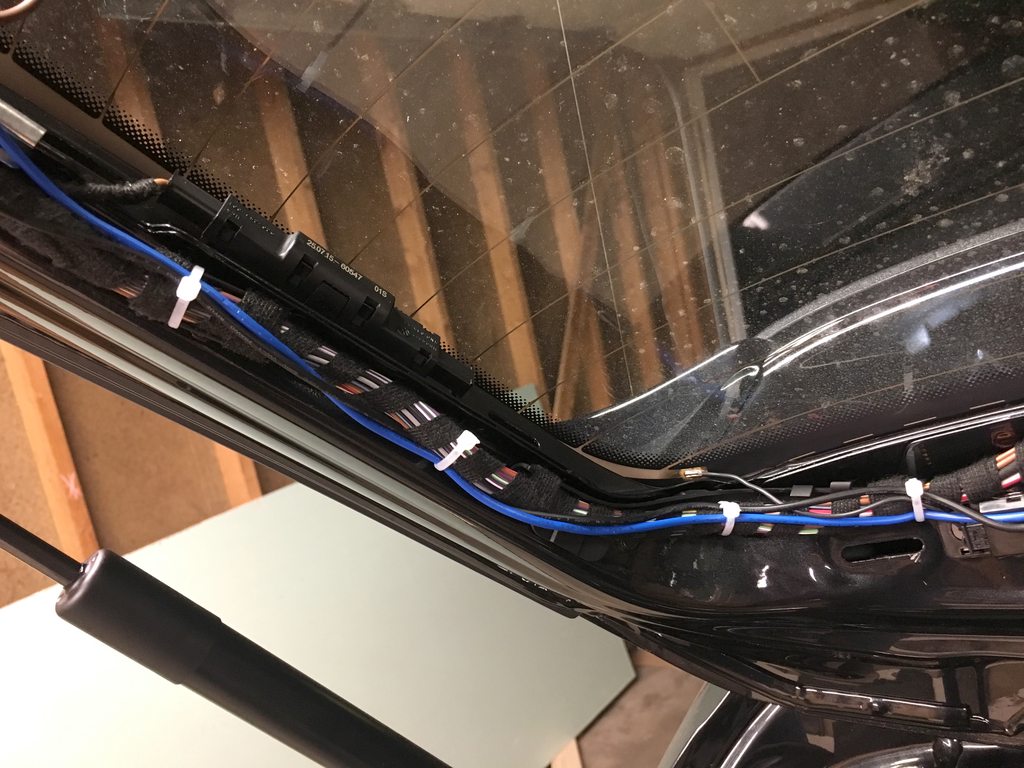
With my mistakes rectified, I got everything in place, and made it neat. Zip-ties everywhere!

Coding:

BEC provided coding instructions with the lights, which worked flawlessly. They adjusted to the correct dimmwert values of 10 where necessary to provide ROW contrast between running and brake light. Their coding is set up to match ROW implementation where only the outer units act as brake lights. I did some additional coding so both inner and outer light up when braking, as I prefer it that way.

Last thing to do was install deAutoKey LED reverse bulbs to get rid of the bulb-out warning.

Now everything is set up and working the way I want it to. 3 weeks from start to finish and about 8 hours of total work with all the mishaps and redo's, but it was definitely worth it.
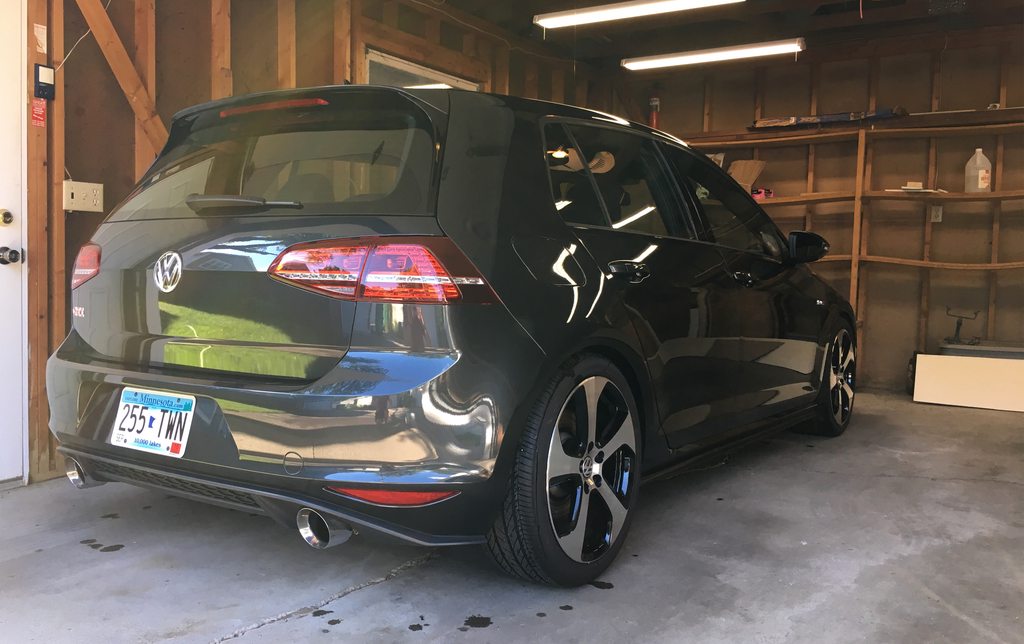
Pics:


Shaving down the right inner connector:


My makeshift paperclip tool:


The finished product:


nicholam77

Go Kart Champion
Location
Minneapolis
Took this little culprit out (clutch pedal spring):


One more step towards making the clutch pedal feel less artificial. Thanks to BravoMike and his thread <here>
 

nicholam77

Go Kart Champion
Location
Minneapolis
Performed my car's first oil change recently.

5,000 miles on the clock at the time I changed it. I decided to change it early because it had been 10 months, driven through a harsh winter, and my commute is very short so I don't have a lot of highway time or long drives.

Not too much to say about it except that it was very easy. I drained it from the pan vs extraction and I spent more time getting the car lifted so I could get under it than actually doing the oil change. The top mounted filter is nice, too.

I used the Liqui Moly kit from Deutsche Auto Parts. At ~$65 I'm not sure how much cheaper it really is than going to the dealership but I like doing things myself if I can.


nicholam77

Go Kart Champion
Location
Minneapolis
DeAutoKey LED license plate bulbs + coding

I'm sure this has been covered plenty of times before, but I just installed DeAutoKey LED license plate bulbs, so I'm going to put it on my "build" thread! :eek:

I went with option two on their site (similar to OEM light output) without resistors, as I have OBD11 and it is very easy to code out the bulb error warning. I was impressed that DeAutoKey shipped my order within 1 hour of placing it.

Replacing the bulbs is extremely easy and self explanatory.

Here is a comparison shot with the new LED bulb on the left and the old OEM halogen bulb on the right:


As expected it's brighter, whiter, more even light.

Here is the final result:


Here is a look at the rearview camera at night. This is with LED reverse bulbs as well. Although you can see the license plate bulbs create a hot spot on the ground in the center:


To code out the bulb error warning, you must change an adaptation channel to tell the car to expect LED bulbs in the license plate housing. To do this, go to 09 Central Electronics, choose Adaptation, and search for Leuchte25KZL HA59. Then under the child channel Lasttyp 25, change the value to 41- LED Keinleistung.


Bäsemödel

Go Kart Champion
Location
Lancaster PA
just read thru the thread! Great work! high attention to detail! car looks awesome!
 
Top