GOLFMK8
GOLFMK7
GOLFMK6
GOLFMKV

Mystic's Golf 1.8T

MysticBlueX3

Ready to race!
Location
Bay Area

MysticBlueX3

Ready to race!
Location
Bay Area
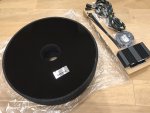
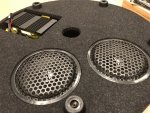
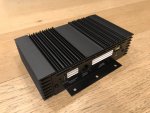
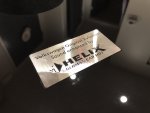
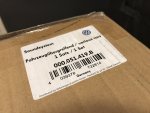
Yay! The Helix came. It got here so quick I didn’t realized it’s been sitting in my mail room for 3 whole days!

My first unboxing thought after seeing the wiring harness and instructions were oh man, I’m in over my head. I usually have no issues with mechanical things but electrical stuff scares me. But it doesn’t seem so bad after watching a few YouTube videos. Here’s some unboxing pics. Hopefully I’ll get some time soon to install this along with the SSK. Also, the sub is heavier than I thought. 35lbs according to the ship weight. Not usually a fan of adding more weight to the car. I guess I better go Stage I soon to make up for the added weight, lol.

IMG_5888.JPG
IMG_5884.JPG
IMG_5885.JPG
IMG_5887.JPG
IMG_5886.JPG


Sent from my iPhone using Tapatalk
 
Last edited:

Bäsemödel

Go Kart Champion
Location
Lancaster PA
one of the best mods ive done to my car...
 

MysticBlueX3

Ready to race!
Location
Bay Area
Finally got around to installing the Helix sub and amp. Install was very straight forward. Took me a total of 2 hours. My first impression is it sounds great! At least for radio and bluetooth. Way more mids and lows. You can really feel the bass but not in an obnoxious way. Overall volume is also louder. I'm very impressed. Audio through my phone vis Apple Carplay while louder sounds worse than stock. I haven't programed it with the dongle yet but it sounds like that should fix it. Here are everything I've used. The instructions that came from VW was super confusing. I didn't even touch it.


- VW head unit removal tool (amazon)

- Trim removal tool (amazon)

- Connector pin removal tool (amazon)

- Trim removal instructions: https://www.youtube.com/watch?v=6dKJtnaV9CU&t=318s

- Wiring instructions: https://www.youtube.com/watch?v=59bKOruoJys

- Instructions on how to mount the sub w/ the spare: https://www.golfmk7.com/forums/showthread.php?t=31070

- Dongle rental thread: https://www.golfmk7.com/forums/showthread.php?t=45767


A few notes of my own. All the tools are definitely helpful. The head unit removal tool and pin removal tool is a must. Trim removal tool is not necessary but nice to have.


In the video, it showed removing the entire rear seat bottom. That is not necessary. I did not do that. Just popped it up high enough so I can access the rear passenger door sill and feed the harness to the trunk.


Disconnecting the battery is not necessary but recommended. I didn't do it because I knew what I needed to avoid doing. If you watch the video I linked, you will see why disconnecting the battery is a nice safety net.


When running the harness, start with the amp connector and feed it through the glove box and then from the front of the car to the rear. Don't go from rear to front. Also when feeding the harness through the glove box, make sure to go up and over the head unit railing. If you go through the side, the head unit will not fit back into the glove box. It will pinch the wiring harness and the head unit won't go back in all the way.


Photo of all the passenger trim pieces pulled apart.


Photo of using the head unit removal tool to pull the head unit out. Glove box is dropped downed.


Head unit is out!


Harness wired to the head unit.


You can see here the wiring harness runs back and up over the head unit railing.


From the side of the glove box. You can see the harness running over the head unit railing.


When putting the trim pieces back together, start with the passenger L shape floor piece you see here.


Then the thin wavy side trim piece.


And finally the side glove box panel.


Then you can do the front passenger and rear passenger door sill trims.

Helix sub sitting on top of the spare.
 
Last edited:

MysticBlueX3

Ready to race!
Location
Bay Area
Two mods in one weekend! Now that the Helix sub & amp are done, it’s time to move on to SK VeeDubR’s SSK.

This was the first mod that I have done where I didn’t have full start to finish instructions or video to follow. But I think I did ok piecing other DIYs together and doing some detective work on other missing areas (like where do the 42DD bushings go?).

First is removing the intake and battery. Removing the battery and the battery tray was cake walk. But I have to say removing the Neuspeed intake panel (that metal piece under the cone filter) is a PITA. Those 3 rubber grommets are so hard to pull off.

Here is a photo of the stock shifter linkages with the intake and battery out of the way.


Pulling the two shift brackets out was pretty easy. You can see the comparison between the stock shift brackets and the ones from SK VeeDubR.

On the left is SK VeeDubR’s kit. You can see where the spring loaded end links are attached. It is in a different location than on the stock one. It’s closer to the middle so the throw is shorter.


Took me awhile but eventually I figured out where the 42DD bushings went. Here it is with the 42DD design metal bushing installed vs stock plastic bushing.


Here is the other metal bracket with 42DD metal bushing (left) vs stock plastic bracket with plastic bushing.


SSK installed! It took awhile to figure out the two spring loaded end links and the position of where I should clip it to the threaded cable. The location of where it clips to the cable is adjustable and I realized that pushing the cables in and out adjust where the shift knob sits in its neutral position. After playing around with it, I finally found the sweet spot. For the cable on the right (that controls the forward and backward movement of the shifter) I left about 1/2” of the cable exposed. For the cable on the left (that controls the left and right movement of the shifter) I left none of the cable exposed. See final installed pic below.


I did have a momentary freak out when I turned on the car for the first time. It threw 3 different warnings. One was tire pressure, one was DSC, and the other was the front collision sensor. I was able to clear the tire pressure warning by resetting the tire pressure but the other two didn’t go away even after turning off and restarting the car. My immediate thought was did I fry something when I disconnected and reconnected the battery? Luckily, after driving the car for a few minutes, the other two warnings went away. I’m guessing it needed some time to recalibrate. One thing that did surprise me was that all my radio stations were still there. I thought I would have lost that after disconnecting the battery. What I did have to do was to reprogram the auto windows up and down. And also the coding that I did for the comfort windows are now gone. So I will have to recode that.

Overall I’m very happy with the SSK. The shifts feel short and crisp. Shifting through the gears does take a little more effort as the throw is shorter so it does take a little bit more muscle. The 42DD bushings are nice. I imagine over time the stock plastic bushings will wear and the shift will feel sloppy. Next I plan to cut the shifter rode by an inch so the shift knob sits a little bit lower. Big thanks to SK VeeDubR for the SSK!


Sent from my iPhone using Tapatalk
 
Last edited:

MysticBlueX3

Ready to race!
Location
Bay Area
Ordered a few more goodies!

First, ordered some 4.5" exhaust tips. I currently have 4" tips and they feel a bit small compared to the 5" opening in the center exit valance. They also didn't have them centered when they installed it the first time around which have been driving crazy every time I look at them.

Photo of currently 4" setup. As you can see, still a lot of room between the tips and the valance.


Link to the 4.5" tips: https://www.ebay.com/itm/263545269033?ViewItem=&item=263545269033&ssPageName=ADME:X:COCE:US:3160

Second, ordered a set of Maxton side skirts for the Golf. For the longest time I thought Maxton only made side skirts for the GTIs. Which means I would have to get GTI side skirts just so I can mount the Maxton side skirts which would be $$$. So happy I came across some specifically for the Golf. This will complete the look of the Maxton front splitter and my rear center exit valance.


Lastly, finally pulled the trigger on a rear spoiler. I entertained the idea of a real clubsport spoiler but it was just way too expensive and the lead time is like 3+ months. In the end, I opted for a clubsport like 3pcs spoiler from AliExpress. I was originally worried about fitment. But as you see on the video in the link below, the quality and fitment looks pretty good. For $200, I'll give it a shot. I haven't decided if I want to keep the carbon fiber or paint it gloss black. One thing I will do for sure is to vinyl wrap the surface around the 3rd brake light gloss black. The actual clubsport spoiler has a separate gloss black piece that covers up that area.

Here is the one I ordered: https://www.aliexpress.com/item/33034200173.html?spm=a2g0s.9042311.0.0.35534c4dFmA5P7

Photo of what it looks like (lucky me the car is in Tungsten Silver too so I can get a good feeling on how the carbon fiber will look on my car). You can also see in this photo how much sweet the rear looks if the surface around the 3rd break light was wrapped in gloss black to blend into the rear windshield.

 
Last edited:

MysticBlueX3

Ready to race!
Location
Bay Area
Added some home made intake vents!

I traced out the shape I wanted on paper then scanned them into the computer.


Used Solidworks to CAD the geometry.


Laser cut out of 1.5mm acrylic.


Painted it black.


Dremel out the opening and drilled some screw holes in the front grill.


Install with some black screws.


Final product =)


Sent from my iPhone using Tapatalk
 

mk7_bk

Autocross Champion
Added some home made intake vents!

I traced out the shape I wanted on paper then scanned them into the computer.


Used Solidworks to CAD the geometry.


Laser cut out of 1.5mm acrylic.


Painted it black.


Dremel out the opening and drilled some screw holes in the front grill.


Install with some black screws.


Final product =)


Sent from my iPhone using Tapatalk


That looks good. Any chance u would make the top piece again? Im looking for one to cover my normal scoop and original seller didnt answer my pm


Sent from my iPhone using Tapatalk
 

MysticBlueX3

Ready to race!
Location
Bay Area
New spoiler!


Sent from my iPhone using Tapatalk
 
Last edited:

MysticBlueX3

Ready to race!
Location
Bay Area
Here is a little bit more in depth update on the spoiler. I love it! Its so awesome. Compliments the center exit exhaust nicely. At first I was hesitant to go too aggressive. Especially with the carbon fiber. I was going to go for more like a oem GTI/R look. But I decided to go big or go home. Turns out the carbon fiber is actually very subtle. It reads gloss black. Its only when you get up close do you see the carbon fiber. My wife didn't even notice it until I told her a week later. Her response was, I'm sorry I didn't notice it, it looks like how it should have come from the factory.

Install was a little tricky, as I was using the double sided 3M tape that it came with. The issue is both sides have to come down evenly and at the same time. If you go down on one side first, you will have to slide the other side which you can't slide double side tape. But I think my friends and I did a good job lining things up and dropping both sides evenly and at the same time. I was a little afraid of fitment because it was an Aliexpress piece but for the price of $200 shipped to my door, the fit was great (8/10) and the finish was 10/10. And its real carbon fiber and not that fake vinyl carbon fiber! Here are a few more shots of the rear. My face lights up every time I look at it.


I did have a little boo boo during the install as I was eager beaver before my friends arrived. I placed the spoiler on the car to check fitment and to see how it looks from a distance. You are probably thinking it, I should not have left it and waited for someone to hold it while standing back. You are right. Not long after I stepped back, it fell on the ground. A small section (about an 1" long chipped off). Luckily, after some research and a stop at the resin shop, I was able to fill it, wet sand it, and polish it back to perfection.

Before with the chip.


After filling with resin, wet sand, and polish.
 

Bäsemödel

Go Kart Champion
Location
Lancaster PA
looks great! similar to the CS spoiler but without all the $$$
 

MysticBlueX3

Ready to race!
Location
Bay Area
After much waiting. The Maxton side skirts finally arrived from the Maxton factory in the UK with free shipping thanks to the guys over at ECS!


Sent from my iPhone using Tapatalk
 

Cuzoe

Autocross Champion
Location
Los Angeles
Now you've done it... Got tired of waiting for some GTI skirts to pop up I guess, haha. Those look great. I wonder how similar their shape is to the GTI skirts.

I'm running OEM mud flaps right now... GTI in the rear because I have the GTI dual exhaust valance and Golf in the front because I don't have the side skirts. Of course I couldn't buy just front or just rear mud flaps so I have the GTI front mud flaps waiting to go on when (if, thanks to how good those Maxtons look) I get the skirts.

That's a mean-looking TSI you have there, keep it up.

Sent from my ONEPLUS A6013 using Tapatalk
 
Top