StealthGTI
Autocross Champion
- Location
- Newport News, VA
- Car(s)
- 2017 GTI Sport
Hello,
I can't believe there hasn't been more discussion about rear seat deletes, love them or hate them. There's a business dedicated to rear seat deletes, so *someone* must be buying them.
The first question you'll ask is "WHY?????" I've seen Euro Kreations' (EK) products and had asked the same question. It seemed wasteful and impractical to me. But now my daughter is grown and driving on her own. I really don't need the rear seat these days. Plus, I want to carry more cargo and have storage cubbies for certain items. So I set off to achieve a goal...
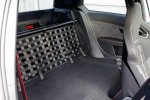
Again, I had seen EK's work. It's certainly good looking, but I was after something more practical with doors, something I knew would support a lot of weight, if required. Someone shared his rear seat delete project in FB and it gave me an idea for the frame. Here is my frame, made from ½-inch plywood and a 2x2...

My construction method is a little crude, but I knew I'd be covering it with carpet. It hooks into the seat hinge, is wedged into place by a 2x2 that spans the width of the interior, and should never break free in an accident or during aggressive cornering...

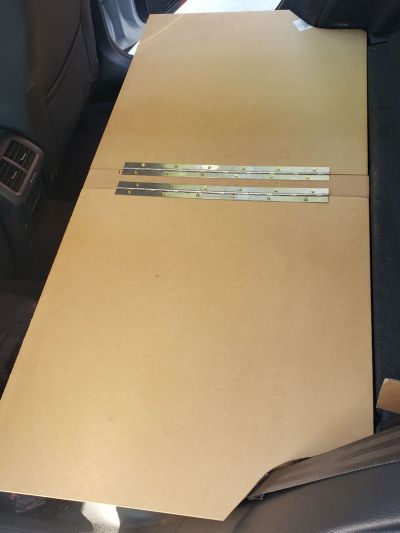
Here is how I crafted and oriented the doors, made from ½-inch MDF...
Since my project has doors that would expose the underside of the new floor, I decided to finish the area with carpet...

The carpet and extra padding also protects my wiring and eliminates the possibility of any of my cargo rattling. Two-door owners get to avoid finishing the sides, but this area is exposed on 4-door cars. I made a simple trim panel to cover the edges of the seat tub.

I'm sure EK has a more elegant solution, but this works for me. Here are a few more photos of the nearly finished project...


I still need to add a few fasteners, but will do that after I've found some I like. I'm also going to top this with a Denier canvas similar to Canvasback's cargo liner. That will resolve the color difference between the two carpeted panels.
See more on my website in this entry. I'll create a video that details installation and removal soon. The rear seat can be restored in about 15 minutes, which is why the seat belts and LATCH hardware is still present.
Thoughts?
Scott
I can't believe there hasn't been more discussion about rear seat deletes, love them or hate them. There's a business dedicated to rear seat deletes, so *someone* must be buying them.
The first question you'll ask is "WHY?????" I've seen Euro Kreations' (EK) products and had asked the same question. It seemed wasteful and impractical to me. But now my daughter is grown and driving on her own. I really don't need the rear seat these days. Plus, I want to carry more cargo and have storage cubbies for certain items. So I set off to achieve a goal...
Again, I had seen EK's work. It's certainly good looking, but I was after something more practical with doors, something I knew would support a lot of weight, if required. Someone shared his rear seat delete project in FB and it gave me an idea for the frame. Here is my frame, made from ½-inch plywood and a 2x2...
My construction method is a little crude, but I knew I'd be covering it with carpet. It hooks into the seat hinge, is wedged into place by a 2x2 that spans the width of the interior, and should never break free in an accident or during aggressive cornering...
Here is how I crafted and oriented the doors, made from ½-inch MDF...
Since my project has doors that would expose the underside of the new floor, I decided to finish the area with carpet...
The carpet and extra padding also protects my wiring and eliminates the possibility of any of my cargo rattling. Two-door owners get to avoid finishing the sides, but this area is exposed on 4-door cars. I made a simple trim panel to cover the edges of the seat tub.
I'm sure EK has a more elegant solution, but this works for me. Here are a few more photos of the nearly finished project...
I still need to add a few fasteners, but will do that after I've found some I like. I'm also going to top this with a Denier canvas similar to Canvasback's cargo liner. That will resolve the color difference between the two carpeted panels.
See more on my website in this entry. I'll create a video that details installation and removal soon. The rear seat can be restored in about 15 minutes, which is why the seat belts and LATCH hardware is still present.
Thoughts?
Scott