DISCLAIMER
This is a "mini" writeup because I didn't take much photos of the process. I do however go deep into details so let me know if you need any help.
Background
My 2016 1.4TSI MK7 Golf came pretty spec'd (compared to what you can buy here in Israel), however there were still a lot missing.
When I switched to the 8" glass screen, I used the opportunity to upgrade my whole dash trim to gloss black which cost a hefty amount of money,
but I was saitisified. The only thing I didn't buy was the door cards, because they're impossible to find here in Israel. I found a guy on eBay selling the door card
trims in gloss black along with the LED ambient light, so I opted for that instead. Installation was a nightmare - you have to desolder the old trim from the door card,
install the new one, wire everything up... and it still doesn't look 100% OEM because even though I used a generous amount of adhesive and even welded the trim to the plastic,
it still doesn't hold as the original and I can hear queakes. Whatever.
I noticed some guy on AliExpress selling the chrome strip part of the glovebox dash trim with the LED inside it, which tries to mimic the original door ambient light look.
As I have VERY bad experience with AliExpress, I gave it a lot of thought and decided to give it a chance - what could go wrong.
Step 1: Remove the current glovebox trim
This is pretty easy to do with trim removal tools - but better yet there's a YouTube video explaining how to do this:
.
Step 2: Separate the old chrome strip from the glovebox trim
This part is pretty tricky. You have to separate the actual chrome strip that came with your dashboard trim in order to install the new one. You can notice there are a few welding points
on the trim that are used to hold it in place. I used a soldering iron to slowly melt them until it all came out.
Step 3: Test fit
Slide the new chrome piece and test fit everything. I went a step further and connected the two wires from the LED module to a 9V battery to light everything up to see that it works.
At this point... I became pretty skepctical. It does show very bright in the picture below, but in reality it was rather dim (not as bright as the OEM door cards LED).
This is a good opportunity to cut up any excess plastic left from the old trim that's in the way of the new strip. Because we're using adhesive to hold the new trim in place, we don't really
need the old plastic tabs so you can get cut them off to allow more space for the new strip. Note that it will still not sit flush 100% - this is just how AliExpress is!

Step 4: Install the new strip in the trim
I used hot glue as well as "plastic welding" which is a method of melting "paper clips" into the plastic in order to give it a better hold. You can use JBWeld or whatever suits you best.
It doesn't have to be pretty, it just has to hold it well enough so it doesn't budge - as close to the original welding as possible.

Step 5: Install the completed trim in your car
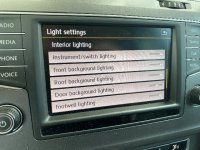
The easiest way is to connect this to the footwell lights, which are a close source and it will benefit from all the light configuration that the footwell lights enjoy.
I highly suggest to remove the glovebox at this point so you have a lot of free space to work with. I started by drilled a 3mm hole (the exact size of the fiber optic) to route
the fiber optic downwards. I then connected the actual LED module and wired it up to the footwell lights. That is pretty much it.

Results
DISCLAIMER: They look nice on photo, in reality it's very dim - not compared to the OEM one!

Conclusions
The light at first was very dim. This happened because of two things:
This is a "mini" writeup because I didn't take much photos of the process. I do however go deep into details so let me know if you need any help.
Background
My 2016 1.4TSI MK7 Golf came pretty spec'd (compared to what you can buy here in Israel), however there were still a lot missing.
When I switched to the 8" glass screen, I used the opportunity to upgrade my whole dash trim to gloss black which cost a hefty amount of money,
but I was saitisified. The only thing I didn't buy was the door cards, because they're impossible to find here in Israel. I found a guy on eBay selling the door card
trims in gloss black along with the LED ambient light, so I opted for that instead. Installation was a nightmare - you have to desolder the old trim from the door card,
install the new one, wire everything up... and it still doesn't look 100% OEM because even though I used a generous amount of adhesive and even welded the trim to the plastic,
it still doesn't hold as the original and I can hear queakes. Whatever.
I noticed some guy on AliExpress selling the chrome strip part of the glovebox dash trim with the LED inside it, which tries to mimic the original door ambient light look.
As I have VERY bad experience with AliExpress, I gave it a lot of thought and decided to give it a chance - what could go wrong.
Step 1: Remove the current glovebox trim
This is pretty easy to do with trim removal tools - but better yet there's a YouTube video explaining how to do this:
Step 2: Separate the old chrome strip from the glovebox trim
This part is pretty tricky. You have to separate the actual chrome strip that came with your dashboard trim in order to install the new one. You can notice there are a few welding points
on the trim that are used to hold it in place. I used a soldering iron to slowly melt them until it all came out.
Step 3: Test fit
Slide the new chrome piece and test fit everything. I went a step further and connected the two wires from the LED module to a 9V battery to light everything up to see that it works.
At this point... I became pretty skepctical. It does show very bright in the picture below, but in reality it was rather dim (not as bright as the OEM door cards LED).
This is a good opportunity to cut up any excess plastic left from the old trim that's in the way of the new strip. Because we're using adhesive to hold the new trim in place, we don't really
need the old plastic tabs so you can get cut them off to allow more space for the new strip. Note that it will still not sit flush 100% - this is just how AliExpress is!
Step 4: Install the new strip in the trim
I used hot glue as well as "plastic welding" which is a method of melting "paper clips" into the plastic in order to give it a better hold. You can use JBWeld or whatever suits you best.
It doesn't have to be pretty, it just has to hold it well enough so it doesn't budge - as close to the original welding as possible.
Step 5: Install the completed trim in your car
The easiest way is to connect this to the footwell lights, which are a close source and it will benefit from all the light configuration that the footwell lights enjoy.
I highly suggest to remove the glovebox at this point so you have a lot of free space to work with. I started by drilled a 3mm hole (the exact size of the fiber optic) to route
the fiber optic downwards. I then connected the actual LED module and wired it up to the footwell lights. That is pretty much it.
Results
DISCLAIMER: They look nice on photo, in reality it's very dim - not compared to the OEM one!
Conclusions
The light at first was very dim. This happened because of two things:
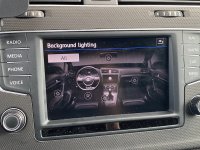
- The footwell lights configuration make it so they dim to 100% (from 127% - maximum) when the doors are closed. This is nice, because they light up at full brightness when you enter the car and then slowly dim. This makes it so the LED strip also dims, which is a bummer, because you want to enjoy it at full brightness at night. To overcome this, I changed adaptation LC72- Dimmwert AB30 to 127 in 09 Central Electrics. This made them a bit more bright, but you lose the "dimming" effect for the footwell lights when you enter the car. Well... what can you do.
- The LED module in the AliExpress kit is... obviously fake. I looked up the part number and ordered a genuine one (from HELLA) - P/N is 3G0927103. I installed it and the lights are brighter - but still kinda dim. This is because the light diffuser on the AliExpress part just sucks.
")