GOLFMK8
GOLFMK7
GOLFMK6
GOLFMKV

DIY - HD Clutch Stop - for less than a dollar! for all MQB MK7 Golf 5 and 6MT

iflyforfood

Passed Driver's Ed
Location
earth
Necromancing an old thread, but did this mod recently.

You don't need those neoprene washers. Just double up the skid pads (assuming you use the exact same ones OP used) by putting two of them back to back. Takes out exactly the maximum allowable pedal travel while still allowing you to a) be able to start the car and b) have no load on the clutch whatsoever. There's about 3-5mm tolerance left for both a) and b)
 
Last edited:

HOT H2O

Drag Race Newbie
Location
Canada
Necromancing an old thread, but did this mod recently.

You don't need those neoprene washers. Just double up the skid pads (assuming you use the exact same ones OP used) by putting two of them back to back. Takes out exactly the maximum allowable pedal travel while still allowing you to a) be able to start the car and b) have no load on the clutch whatsoever. There's about 3-5mm tolerance left for both a) and b)

glad you found this DIY useful! And yes, as I mentioned, one could double up the skid pads, but I found that the use of the washers better enabled the anchor to be kept in place, as well as helped with the 'feel' of the stop.

Cheers!
 

Tooly

Drag Race Newbie
Location
Kelowna, BC Canada
Car(s)
2018 GTI Autobahn
Did this mod today, went with 4 rubber washers and the clutch feels a lot nicer to engage now. Similar to my wife's Subaru clutch pedal.

Oh and the price of the skids pads has increased at Home Depot! They're now $3.36CDN and the washers are $1.06 each.
 

GTIjush

Passed Driver's Ed
Location
Austin, TX
Just did this mod and loving it. This option seemed more durable and fun to make. Plus it's cheap!

I have extra skid pad things so if anyone in the Austin area needs one, can donate :)
 

KillboBaggins

Passed Driver's Ed
So completely new to Golfs; and it's my first car that's a manual. Apologies if this is going to sound completely stupid...

But what does this do exactly? And for someone who has very little experience driving stick how do you think this will help?

Sent from my Pixel 2 using Tapatalk
 

akimmel

Go Kart Champion
Location
Ipswich, MA
Car(s)
2015 GTI AB 6MT
So completely new to Golfs; and it's my first car that's a manual. Apologies if this is going to sound completely stupid...

But what does this do exactly? And for someone who has very little experience driving stick how do you think this will help?

Sent from my Pixel 2 using Tapatalk

This car has an extra long amount of throw in the clutch pedal, specifically AFTER the point where the clutch disengages when you push it in. So the clutch pedal moves further than is needed to just disengage the clutch from the flywheel. Adding in the thicker clutch stop gets rid of this unnecessary travel and makes it so that the pedal stops moving right after the actual clutch is disengaged. Super easy and cheap mod that gets you to the bite point much faster when lifting your foot.
 

KillboBaggins

Passed Driver's Ed
This car has an extra long amount of throw in the clutch pedal, specifically AFTER the point where the clutch disengages when you push it in. So the clutch pedal moves further than is needed to just disengage the clutch from the flywheel. Adding in the thicker clutch stop gets rid of this unnecessary travel and makes it so that the pedal stops moving right after the actual clutch is disengaged. Super easy and cheap mod that gets you to the bite point much faster when lifting your foot.
Looks like I might be stopping at the HD shortly then...

Currently the seat is way to far up for me because of the clutch. It's not uncomfortable but also not exactly comfortable.

Sent from my Pixel 2 using Tapatalk
 

akimmel

Go Kart Champion
Location
Ipswich, MA
Car(s)
2015 GTI AB 6MT
Update on having the clutch stop installed since march: checked in on it the other day while detailing the pedals and it seemed to spin more than when I installed it. Took it apart and found that 1. When you tighten down the screw it sucks the wall anchor into the rubber washers. This is probably desirable because it lets the wall anchor tighten against the backside of the hole but I don't like that it wrecked the washer hole 2. The bumper and the wall anchor chemically reacted somehow and turned the gray wall anchor yellow and possibly made it brittle, causing the flat end to crack and 3. The wall anchor split at the point where it's designed to expand. Maybe my screw is too thick.


Sent from my SM-G960U using Tapatalk
 

HOT H2O

Drag Race Newbie
Location
Canada
You didn’t follow my instructions haha!

But seriously speaking.. 1) your pad or stop should have a metal insert like the ones described in original post. 2) your screw looks a tad thick while the threads a tad shallow, use a more coarse screw. 3) you need to add shrink tube or even electrical tape around the wall anchor to both secure the anchor and prevent spinning.

I can see why your anchor failed. Right idea, wrong parts. Lemme knowif toubhave any questions or need clarification.

Update on having the clutch stop installed since march: checked in on it the other day while detailing the pedals and it seemed to spin more than when I installed it. Took it apart and found that 1. When you tighten down the screw it sucks the wall anchor into the rubber washers. This is probably desirable because it lets the wall anchor tighten against the backside of the hole but I don't like that it wrecked the washer hole 2. The bumper and the wall anchor chemically reacted somehow and turned the gray wall anchor yellow and possibly made it brittle, causing the flat end to crack and 3. The wall anchor split at the point where it's designed to expand. Maybe my screw is too thick.


Sent from my SM-G960U using Tapatalk
 

akimmel

Go Kart Champion
Location
Ipswich, MA
Car(s)
2015 GTI AB 6MT
I have the same home depot pads with the captive metal washer. If I remember correctly the screw I used was the one included with them but i can't be sure. I'm going to retry with a different wall anchor I guess. And shrink tubing is a good idea, I may try that to get a tighter fit.


Sent from my SM-G960U using Tapatalk
 

uberdot

Autocross Champion
Location
Ten Forward
Car(s)
Silver 2017 6MT
Surprised you guys could get 4 washers in. Mine wouldn’t start with 3. Is the clutch-in to-start based on engagement or just a device up there. Perhaps VW nerfed this mod on 2017s+?
 
Last edited:

SuperDuper

Go Kart Newbie
Location
IL
Surprised you guys could get 4 washers in. Mine wouldn’t start with 3. Is the clutch-in to-start based on engagement or just a device up there. Perhaps VW nerfed this mod on 2017s?

I only used 1 washer, and you can't even remove that. 4 washers felt like the clutch was grabbing immediately off the floor.
 

uberdot

Autocross Champion
Location
Ten Forward
Car(s)
Silver 2017 6MT
I think some of these clutches grab low in general. This mod helps remove a few mm of guess work that’s for sure. Great stuff!
 

eurobahnm

New member
Location
Eurobahn BMW MINI Mercedes-Benz Greensboro, NC USA
Car(s)
Eurobahn BMW MINI
Sometimes it's the little things that matter. This is one of those little things that can have a positive effect on your driving and enjoyment. The infamous Clutch Stop.

Now I'm not going to belabour this DIY thread on why you may want to upgrade/change your clutch stop, nor am I going to mention any vendor or company names in this writeup. What I am going to do is show you how to build a better clutch stop than what is currently on the market for a fraction of the cost!

Why did I not just go ahead and buy a clutch stop that was already available? Well to be honest I did not care for the materials used (mostly dense foam and plastic). People have also reported clutch 'stickiness' when depressed against these other clutch stops, and a 'break-in' period while the dense foam compressed over repeated use. Some have also complained of a slight rattle or noise if using multiple metal washers, and an inconsistent feel at the clutch stop. Foam pads have also been known to fall off as they are simply glued on to the plastic support. Given the relative simplicity of the concept I figured I would have a go at making my own - just so happened that it was a LOT less expensive than I thought it might be.


Introducing the 'HD MQB Clutch Stop'


Now, you may think that 'HD' stands for Heavy Duty.. Well it kinda does, but it also stands for Home Depot lol


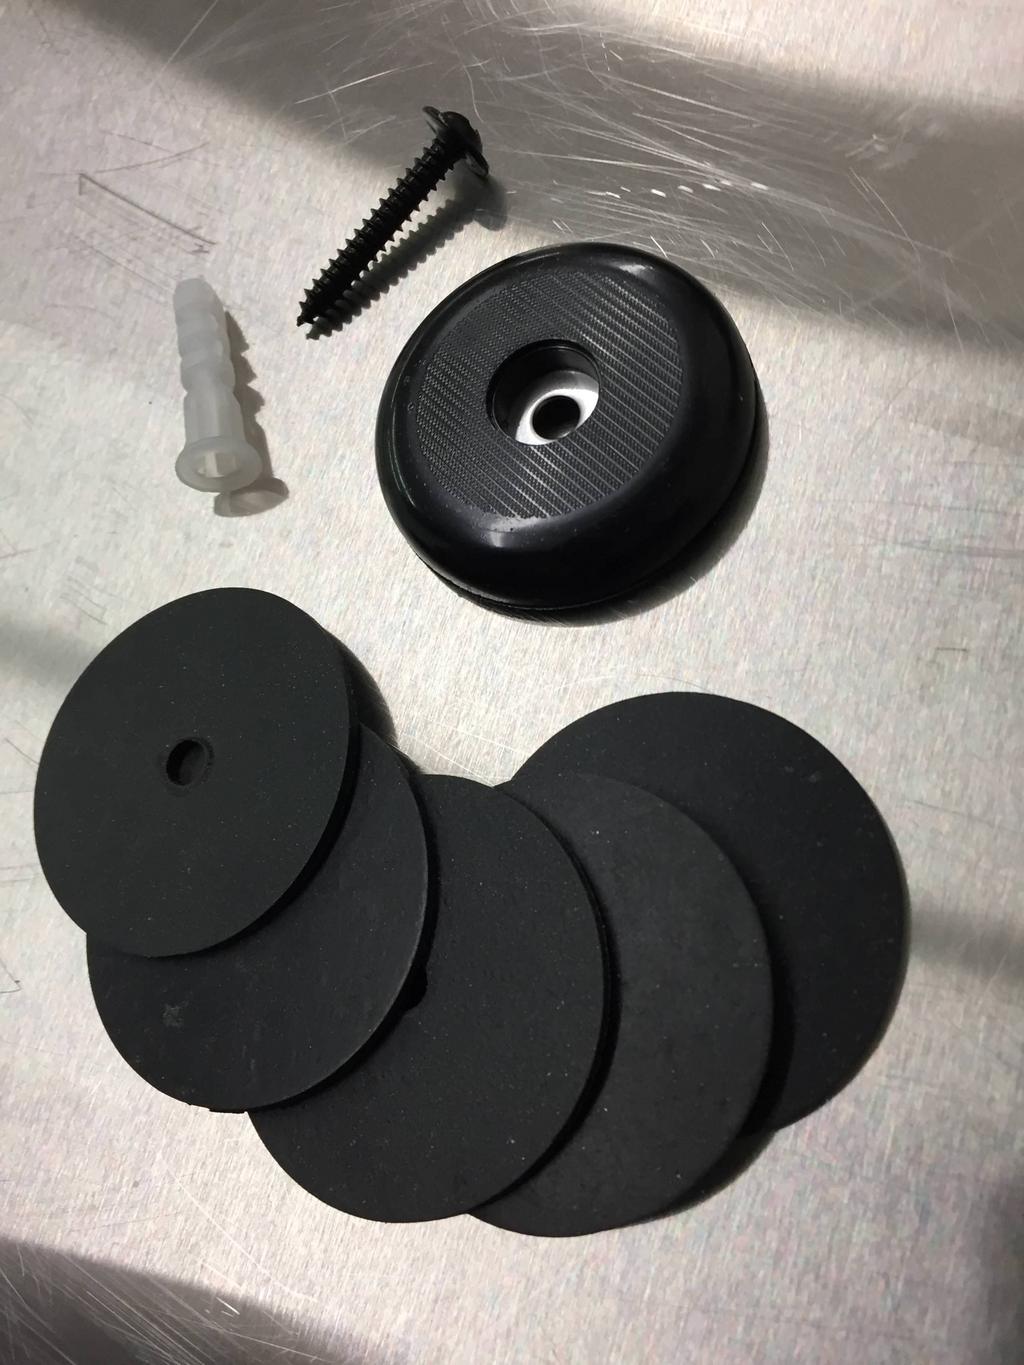
These Heavy Duty Pads, as advertised on the packaging, are actually sliders that are typically used on furniture. They are impregnated with a stainless washer, surrounded buy a very HD rubber with a slight texture on the face.

I picked a pack of four sliders up from my local Home Depot for just over $3 CAD (that's about 25 cents American if my math is correct :D ). The sliders I chose are 1.5" in diameter. They also have 1" available for $2.64 CAD if you want to save some money :p

Then on to the hardware isle for some rubber washers. Chose rubber washers with the same OD as your slider, obviously I chose 1.5" rubber washers.

The next thing you're going to need is a wall anchor. Yes you heard me, a wall anchor. You know those damn little plastic things that come with every damn thing you buy for your home or garage?! I guarantee your mom has like five of them in her drawer, I bet if you ask nice she'll let you have one.

Finally, you may want to get a 1" sheet metal or 'body' screw. Really though, any course thread screw that is not too thick will do. I chose an auto body screw as it had a black finish with a larger head. If you really wanted you could use the screws provided in the package, again if you wanted to save money haha


so again, here is what you need


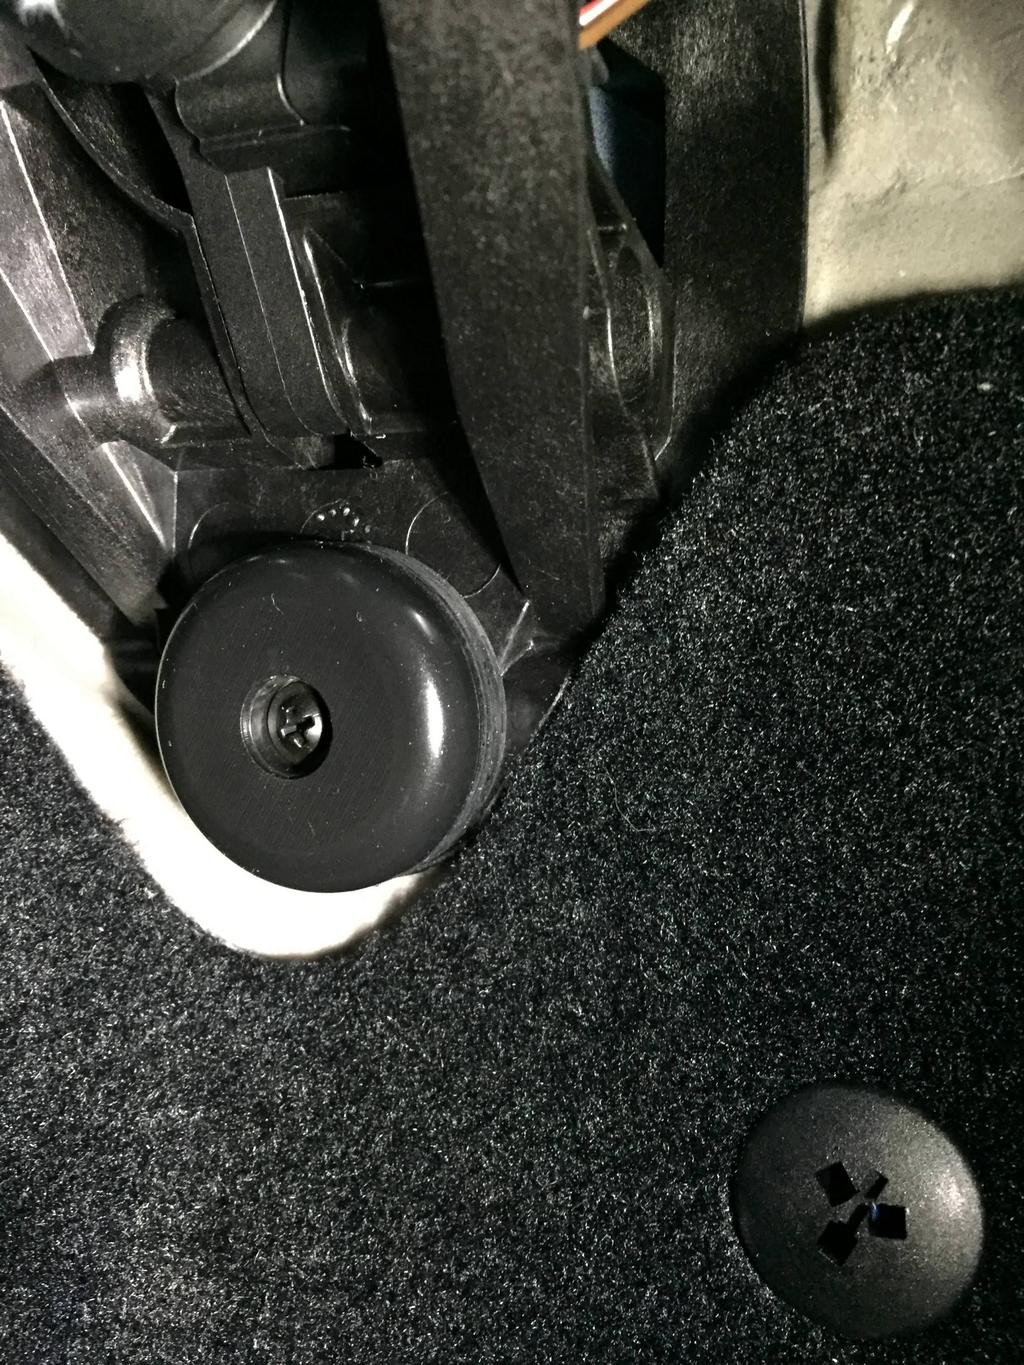
Step 1 - pop out the rubber OEM 'stopper' where your clutch stop is to be inserted..


Step 2 - Insert your anchor. For reference the anchor size I found fits best is approximately 9mm at the head, and I had to cut it down to approximately 20mm (any longer and it doesn't go in flush). Your anchor should sit basically flush as the hole that exists there has a taper.

*MacGyver's pro tip - thread your screw into the anchor a few times prior to installing the anchor, it will make threading the screw easier once you mount your new clutch stop. Also, when screwing in, you will have to provide a bit of pressure on the stop itself to help prevent the anchor from spinning.. Likewise, when removing, you will need to provide outward pressure as you unscrew, again to prevent the anchor from spinning freely.

** MacGyver's pro tip part deux - if you find your anchor spins too much, try wrapping it with a thin layer of wire loom fabric tape, or even hockey tape will do in a pinch. This will provide some needed friction!


next is to decide how many rubber spacers (washers) you need/want. I settled on four, with each having a thickness of approx. 1.5mm. Combined with the 8mm slider that works out to be about 14mm.

* if you want a thicker stopper, from here you could stack two sliders back to back to put you at 16mm, then add rubber washers in-between as you see fit.


the clutch arm meets the new clutch stop perfectly. No 'sticky' or 'squishy' spots, no break-in period necessary.


I gained approx 3whp with this 'mod', at least this is what I calculated on the highly sensitive and accurate ButtDyno. Results may vary.


EDIT - Please see this wonderful video by one of our fellow member's TheKickinSquid as he performs this DIY
nice post
 
Top