Raguvian
Autocross Champion
- Location
- Bay Area, CA
- Car(s)
- 2019 GSW 4MO 6MT
**Originally posted on VWVortex**
I installed a DieselGeek SuperPin, Sigma 6 and the shaft bushings today. Since the entire center console has to be removed to install the SuperPin, some members said it would be useful to have a DIY on how to do it, so here's my attempt at making one.
I won't be covering how to install the Sigma 6, since DieselGeek already has great videos on how to do that. I also installed a USB outlet in place of the 12v socket in the center console, so I will show how I did that as well.
Tools needed:
T20 Torx
T30 Torx
Trim removal tool
Philips head screwdriver (for Superpin)
A good light
Here's what we're starting with. I already replaced the shift knob, so the removal of mine will be slightly different, but otherwise everything else would apply.

Open the center cubby lid partially and stick your fingers under the HVAC trim panel and pull towards you:
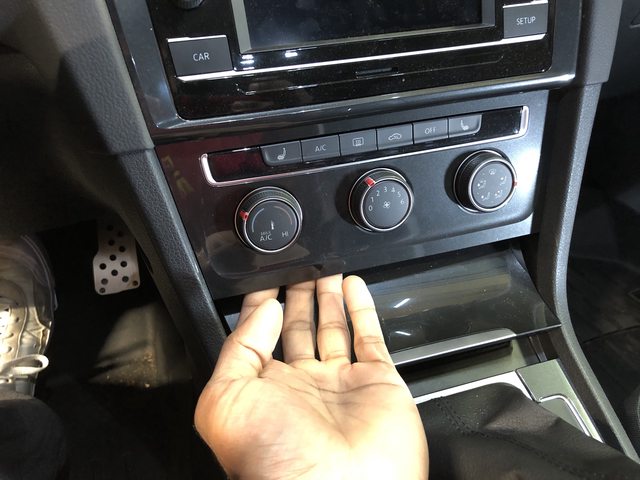
Trim panel removed:

Pull the 4 little circle things out to release the HVAC controls:

Lift these red clips back to unplug the HVAC controls and set aside:

To remove the center cubby, I put my hands on each side of the cubby as shown and pulled straight up. There are two clips at the bottom that will pop out:

Release the connector for the USB on the back of the center cubby by pushing the little tab on the inside (to the right):

Once the cubby is out, remove the 5 screws shown here (4 are T20, the center one is T30). You can also remove the plastic T that the three screws go into:

Remove the two T20 screws next to the HVAC controls as well:

To remove the shift boot, grab by the front as shown and pull up to release the clips:

Pull the shift boot up like so:

If you have the stock knob, you will have to cut the metal clamp to release the knob from the shaft (not my picture):

Then remove the trim ring as well (just clipped in; if you have buttons on your trim ring those will need to be unplugged as well):
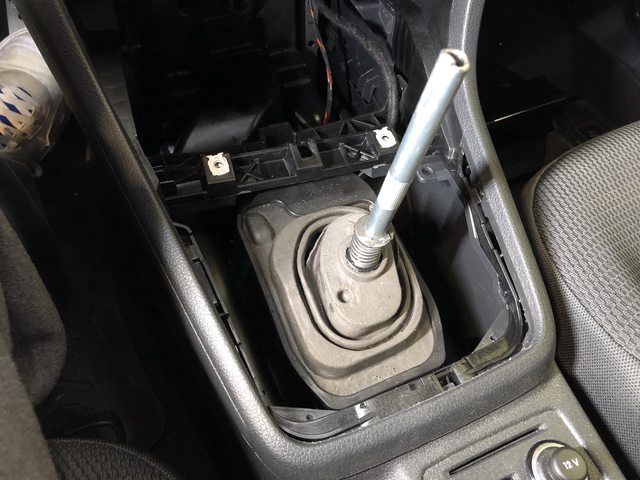
Next we will remove the plastic pieces in the footwells. There is one T20 torx holding each piece on (driver and passenger footwells):


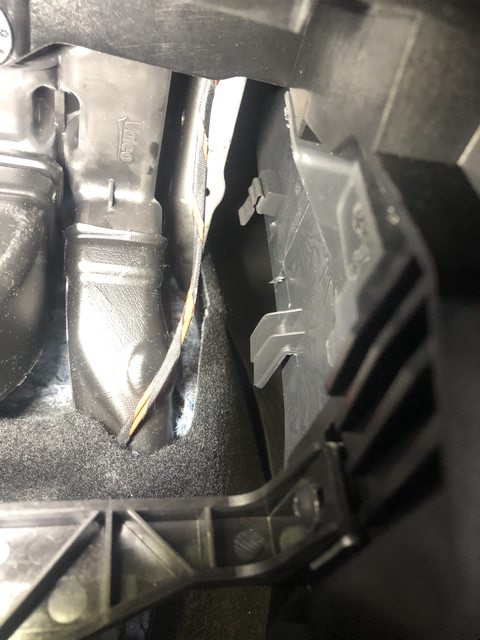
Once the T20 torx screw is removed, you can pull straight down to unclip the plastics. You will probably get some of the little metal clips to come out with the side pieces, but you want to remove those and put them back on the console side. I've also shown a picture of how the clips hold the side pieces from the inside of the console. There are two metal clips per side:



Next we can move on to the handbrake. To remove the boot, just lift up on the boot in front of the handle:

Then flip it up and over to remove:

Pop this piece out, and the little metal bar underneath:
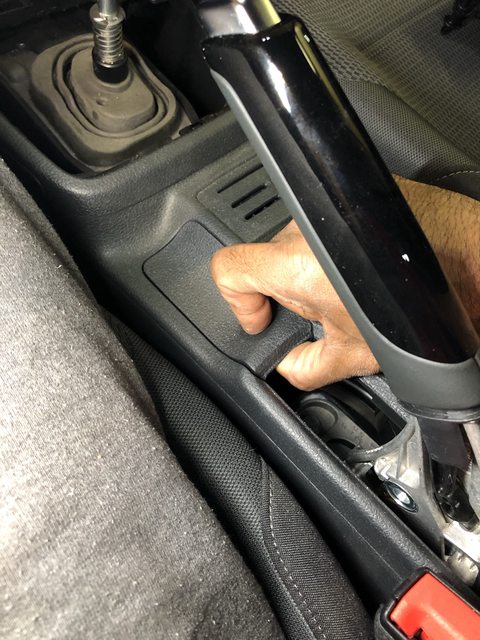

You might want to protect the handbrake with some tape as well since the console will probably rub on it while removing and reinstalling.
Then, move to the back seats, and push the front seats all the way forward. Pop the little plastic tabs out and remove the T30s underneath:


Then take a trim tool and start removing the rear HVAC panel:

Pull out the center HVAC plastic tube thing, and remove the two T30 screws at the bottom corners:


Then grab the back of the console and start lifting up. Be sure to disconnect the 12V (white connector) from underneath before removing the console.

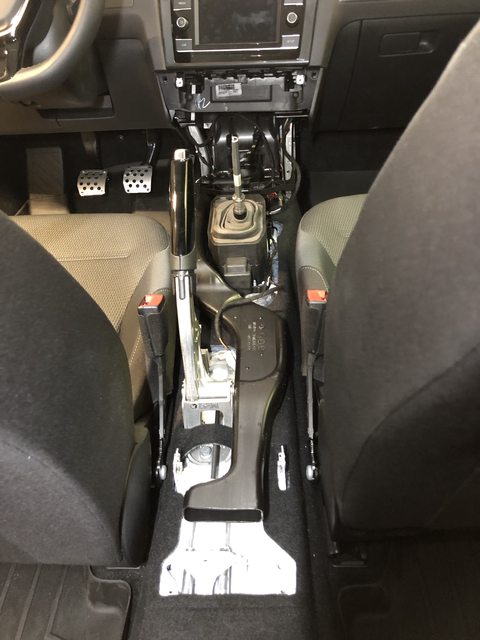
Also be sure to remove the long black plastic A/C duct that runs from the front and between the front seats to the rear vents.
In order to get to the pin on the shifter, you need to first lift up on this plastic block thing, then remove the 4 10mm nuts on the corners:

Also, take out the little "trees" that hold the two small wire harnesses to the sides of the black plastic covering the shifter. Once everything is out of the way, you can lift the black plastic covering off and expose the shifter and the pin that you need to replace:

New vs old pins:

New pin installed. I had to use a small mallet to tap it in all the way before screwing it in:

New shifter bushings (black) vs stock:

I also installed a USB outlet in place of the 12v outlet. To wire it, I just took some spade connectors and plugged them into the stock connector that went to the 12v outlet:

I enlarged the hole for the 12v outlet a little and screwed in the USB outlet. I did have to cut out a bunch of plastic on the underside of the console to get everything to fit:

Installation is just the reverse of these instructions. I got the handbrake and shifter to fit first by lowering the front of the console into place, and then the rear. Make sure that the HVAC and front USB connectors are routed in place before you get everything set, and don't be like me and forget to put the A/C vent back in before setting the console in.
Anyways, hope that helped a bit. If you have any questions, let me know!
I installed a DieselGeek SuperPin, Sigma 6 and the shaft bushings today. Since the entire center console has to be removed to install the SuperPin, some members said it would be useful to have a DIY on how to do it, so here's my attempt at making one.
I won't be covering how to install the Sigma 6, since DieselGeek already has great videos on how to do that. I also installed a USB outlet in place of the 12v socket in the center console, so I will show how I did that as well.
Tools needed:
T20 Torx
T30 Torx
Trim removal tool
Philips head screwdriver (for Superpin)
A good light
Here's what we're starting with. I already replaced the shift knob, so the removal of mine will be slightly different, but otherwise everything else would apply.

Open the center cubby lid partially and stick your fingers under the HVAC trim panel and pull towards you:

Trim panel removed:

Pull the 4 little circle things out to release the HVAC controls:

Lift these red clips back to unplug the HVAC controls and set aside:

To remove the center cubby, I put my hands on each side of the cubby as shown and pulled straight up. There are two clips at the bottom that will pop out:

Release the connector for the USB on the back of the center cubby by pushing the little tab on the inside (to the right):

Once the cubby is out, remove the 5 screws shown here (4 are T20, the center one is T30). You can also remove the plastic T that the three screws go into:

Remove the two T20 screws next to the HVAC controls as well:

To remove the shift boot, grab by the front as shown and pull up to release the clips:

Pull the shift boot up like so:

If you have the stock knob, you will have to cut the metal clamp to release the knob from the shaft (not my picture):

Then remove the trim ring as well (just clipped in; if you have buttons on your trim ring those will need to be unplugged as well):

Next we will remove the plastic pieces in the footwells. There is one T20 torx holding each piece on (driver and passenger footwells):


Once the T20 torx screw is removed, you can pull straight down to unclip the plastics. You will probably get some of the little metal clips to come out with the side pieces, but you want to remove those and put them back on the console side. I've also shown a picture of how the clips hold the side pieces from the inside of the console. There are two metal clips per side:


Next we can move on to the handbrake. To remove the boot, just lift up on the boot in front of the handle:

Then flip it up and over to remove:

Pop this piece out, and the little metal bar underneath:


You might want to protect the handbrake with some tape as well since the console will probably rub on it while removing and reinstalling.
Then, move to the back seats, and push the front seats all the way forward. Pop the little plastic tabs out and remove the T30s underneath:


Then take a trim tool and start removing the rear HVAC panel:

Pull out the center HVAC plastic tube thing, and remove the two T30 screws at the bottom corners:


Then grab the back of the console and start lifting up. Be sure to disconnect the 12V (white connector) from underneath before removing the console.


Also be sure to remove the long black plastic A/C duct that runs from the front and between the front seats to the rear vents.
In order to get to the pin on the shifter, you need to first lift up on this plastic block thing, then remove the 4 10mm nuts on the corners:

Also, take out the little "trees" that hold the two small wire harnesses to the sides of the black plastic covering the shifter. Once everything is out of the way, you can lift the black plastic covering off and expose the shifter and the pin that you need to replace:

New vs old pins:

New pin installed. I had to use a small mallet to tap it in all the way before screwing it in:

New shifter bushings (black) vs stock:

I also installed a USB outlet in place of the 12v outlet. To wire it, I just took some spade connectors and plugged them into the stock connector that went to the 12v outlet:

I enlarged the hole for the 12v outlet a little and screwed in the USB outlet. I did have to cut out a bunch of plastic on the underside of the console to get everything to fit:

Installation is just the reverse of these instructions. I got the handbrake and shifter to fit first by lowering the front of the console into place, and then the rear. Make sure that the HVAC and front USB connectors are routed in place before you get everything set, and don't be like me and forget to put the A/C vent back in before setting the console in.
Anyways, hope that helped a bit. If you have any questions, let me know!