lokerola
Ready to race!
- Location
- Alexandria VA
This thread is to document the fixes to the rattles in my almost new 2017 GTI Autobahn.
This is a long post, so settle in with a coffee.
These have fixed 99% of the small rattles I had in my 2017 GTI.
Background: Within the first week of ownership 2 separate rattles appeared. The first was a major problem fixed under TSB by VW and the local bodyshop. I do not have the details or the TSB # yet, but I will post them here as soon as I get them, hopefully on Monday 11/21. The other minor rattles the dealership claimed they fixed, but they didn't. So I fixed them myself yesterday.
1. Passenger B Pillar
Whereassenger b pillar
What: General plastic rubbing, squeaking, possible loose clips rattling behind passenger B pillar
When: Over most roads, even smooth ones. But worse over any sort of rough road, potholes, etc.
How: Fixed with multiple methods; surgical tape and soft side of heavy duty velcro.
Outcome: Fixed
Tools: Small flat head screwdriver, torx T15 screw driver, surgical tape, velcro.
- I was pretty sure that the annoying rattles were coming from my passenger B pillar. I was going to take it back to the dealer, but decided to dive into it myself. I must say, I was quite happy how this turned out.
Detailed fix:
Step 1: Pull the passenger B Pillar off. Gently pop off the bottom of the b pillar trim piece. I didn't need to use a trim tool, just my hands. I gently got a grip and pulled the sides and bottoms of the b pillar to pop the bottom off. You could break the trim piece here, so go slowly. You could use a plastic trim removal tool to get a better grip on the trim piece before pulling it off. There are 2 metal clips on the bottom of the trim piece that snap into the trim piece behind it. Beware, the top is screwed on, so don't try and pull the whole thing off, just the bottom.
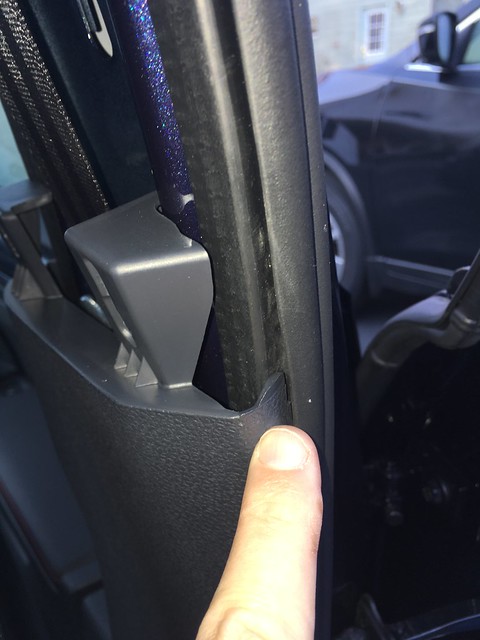
Step 2: Remove top of b pillar trim Use a small pick, or fathead screwdriver to gently pry off the Airbag cover trim piece on the top front of the b pillar trim. Be sure to the put the little Airbag trim piece somewhere where you won't lose it (I used a plastic baggie). It has small clips on it that attach it to the main b pillar trim piece. It's easy to pop off. Behind the Airbag clip you'll see a hole through the b pillar trim and inside is a T15 torx screw. It goes through the b pillar trim into the metal body of the car. I used a T15 screwdriver to remove it. ***BEWARE that the b pillar trim is hollow behind it and if you drop that screw down the hole, you'll lose the screw forever, or you'll be ripping half the car apart to get it back. BE CAREFUL. Once the screw is out, gently pull away and down to remove the b pillar trim. It will still be attached to the seatbelt, so just gently pull it away to expose the back of the trim and the metal of the b pillar.
Exposed b pillar:

Step 3: Poking around to find what is making the sound. I flicked my fingers on all the exposed plastic, trim, metal, seatbelt mechanism, etc to try and find what was rattling. On my car (yours may be different,) I found 2 main culprits, and a few other areas I decided to shore-up, just in case they were contributing to the sounds as well. The 2 main culprits were; the female trim pieces from the lower b pillar trim (still attached to the car, coming up from the bottom of the floorboards, that the upper b pillar trim you just removed snap into,) that were rattling against the metal behind them, and the edges of the lower b pillar trim piece being loose and rubbing against the doorframe. You'll notice here that none of the main culprits were the upper b pillar trim, but issues with the upper part of the lower trim.
Step 4A: Fix the lower trim rattle on the plastic nubbins. I applied small pieces of the soft side of heavy duty velcro I bought at Lowes. I cut strips of velcro and stuck it to the metal of the frame, in between the metal and the plastic nubbins from the lower trim (that the upper trim snaps into). I did this to both sides of the trim (both nubbins)
Velcro

One of the 2 offending nubbins.

Nubbin with velcro behind it, silencing the noise between the plastic nubbin and the metal frame:

Step 4B: Fix the lower trim rattle on the sides rubbing. This is where I broke out the surgical tape. I had ordered this is stuff off of Amazon about a year ago when I was chasing rattles in my 13 Accord. I learned this trick from a BMW site. People were putting this slick surgical tape between rubbing plastic trim parts to quite things down. It had worked for me in the past, so I decided to try it again here. Works great!
When you gently pulled the lower trim piece away from the car (without popping the clips) and worked it back and forth, the trim would squeak as it rubbed against the door frame. The frame in that area is a hard rubber, not metal or plastic, but the friction with the plastic on the lower trim piece would cause squeaking sounds.
Fixed by applying surgical tape to the lower b pillar trim, and the rubber part of the frame.
Surgical tape. The outer side of the tape is very slick/slippery.


I pulled the lower trim away to apply thin strips of the tape to the trim and rubber attached to the frame. It didn't stick as well to the rubber, so be careful applying the tape. Once the trim was pushed back on, it was all quiet and the squeaks were gone.
Offending lower trim:
Trim with tape applied to both the trim and rubber. I did this to both sides of the trim (the front seat side, and backseat side). I applied the tape with the lower trim pulled away as far as I could without actually popping the trim off the clips. I applied maybe 5 or 6" of tape down the trim. You'll need to rip thin pieces of the tape so it doesn't show when you snap everything back together.

So those were the 2 main offenders. Everything else I did was "just in case " and may have been overkill, but here's a list so you can see what worked and what didn't work.
Step 5: What I tried and didn't work. I thought I'd apply velcro to the actual seatbelt mechanism, and a few places on the back of the upper b pillar trim. They looked like they could rub at some point. When I tried to snap everything back together, it was too thick and the trim would not go together, so I removed all the extra velcro.
Step 6: More surgical tape. I did end up putting surgical tape in a few more places. On the front of the lower nubbins, over the metal clips on the lower b pillar trim, over the frame where the hole is for the upper T15 screw, and on the back of the upper b pillar trim where the T15 originates. These may or may not have helped with the sound, but having the tape over the crew hole allowed me to seat the screw a few threads in when attaching the trim back onto car. Remember, drop that screw and life will be shitty. I cut small holes in the tape with a razor blade to allow the screw in.
Lower nubbins with tape. I cut an opening with a razor blade to allow clips to fit.
Frame with tape over screw hole. Opening was cut for screw.

Upper b pillar trim with tape over back of hole. Opening was cut for screw. The trim is off and hanging upside down.
Here's the metal clip on the bottom of the upper b pillar trim, right before I added tape over the clip itself. As you can see I did add a few thin strips on both side of the clip as well. Make sure to slide the seatbelt adjuster up and down a few times before putting the trim back on. I had too much tape in a few places and had to pull tape and reapply thinner strips.

A couple of tips to button everything back up.
1. If you used too much tape or too much velcro, things might be too tight to go back together and you might have to remove tape or velcro. I did.
2. Get the T15 screw pre-started in the tape behind the hole. This helps prime the screw. DON'T LOSE THE DAMN SCREW. In fact, a magnetic T15 driver would be a great idea.
3. You have to really push the upper b pillar trim UP into the headliner first and hold it firmly while you get the crew started. You have to do the screw first so you can align the seatbelt adjuster.
4. After the screw is in comes the part that took the longest. Getting the seatbelt adjuster and seatbelt mechanism lined up. I got it work by lowering the seatbelt mechanism all the way down, then sliding the adjuster on the b pillar trim down, then aligning the trim release on the b pillar trim with the release mechanism on the seatbelt itself. This took me like 500 tries to get right. Pack your patience and eventually this will work.
5. Snap the clips from the upper b pillar trim into the lower b pillar trim nubbins. Test the seatbelt adjuster again.
2. Grab handle fix
Where:All 4 grab handles
What: Light clicking/clunking sound when handles bounce
When: Over potholes roads, when you flick with your finger
How: Soft side of heavy duty velcro.
Outcome: Fixed
Tools: Velcro.
I did this same fix on my 13 Accord. When you pull the grab handles down about 1/2" and release them, they clunk against the plastic trim behind them. I cut tiny squares of velcro and put them on the handles. Easy fix to quiet some possible noise.
I did this on both sides of all 4 handles.

3. Two rear removable trim pieces loose.
Where: Both plastic trim pieces in trunk. One on left, one on right.
What: Rattling when touched.
When: Any time they were touched.
How: Surgical tape.
Outcome: Fixed
Tools: Surgical tape.
Poking around the rest of the car led me to find these 2 little bastards. Open the hatch, lift the cardboard cover for the spare, and on each side of the trunk are 2 removable plastic trim pieces that block off the little cubbies on the left and right. They were very loose and easily could have been source of some rattles.
I pull them both out and applied surgical tape to the backs of the trim pieces (but not the trim inside the car where they attach to). I decided to apply tape to just the removable trim first and see if that worked, and it did. 100% better.
Offending trim on right (both left and right were rattling)

Tape on back of both left and right trim pieces

4. Loose stuff in cabin
Where: Sunglasses, glovebox, small cubby on drivers left side.
What: Crap rattling around
When: Any time there's stuff in the car.
How: 4" thick foam and double sided carpet tape.
Outcome: Fixed
Tools: 4" thick foam, double sided carpet tape, and just a little surgical tape.
OK, this is just me being anal retentive, but I hate stuff rattling around in my car. None of these fixes were problems with the car, but simply things I did to quiet more stuff down.
Step 1: Sunglass holder.
I cut up 2 pieces of foam and stuck them into the sunglass holder with double sided carpet tape. Now I have to push my glasses into the foam to put my glasses in the holder. 100% quieted the sunglasses down. I also put a few thin strips of the surgical tape on the inside of the sunglass holder. Not sure it did anything. I was sort of tape-crazy by this point.

Step 2. Glovebox foam holder
1 Cut a big chunk of foam into a wedge shape and stuck it to the glovebox with doublesided tape. I cut holes into the foam to put my easy pass, work tag, and misc stuff into as a holder. It sits on top of the owners manual and keeps it quiet as well. 100% works great. Nothing sliding around in the glovebox any more.


Step 4. Key fob holder in drivers cubby. I cut up more foam and made a little slit in it to put my key fob. Keys are now 100% quiet.

This is a long post, so settle in with a coffee.
These have fixed 99% of the small rattles I had in my 2017 GTI.
Background: Within the first week of ownership 2 separate rattles appeared. The first was a major problem fixed under TSB by VW and the local bodyshop. I do not have the details or the TSB # yet, but I will post them here as soon as I get them, hopefully on Monday 11/21. The other minor rattles the dealership claimed they fixed, but they didn't. So I fixed them myself yesterday.
1. Passenger B Pillar
Where
assenger b pillarWhat: General plastic rubbing, squeaking, possible loose clips rattling behind passenger B pillar
When: Over most roads, even smooth ones. But worse over any sort of rough road, potholes, etc.
How: Fixed with multiple methods; surgical tape and soft side of heavy duty velcro.
Outcome: Fixed
Tools: Small flat head screwdriver, torx T15 screw driver, surgical tape, velcro.
- I was pretty sure that the annoying rattles were coming from my passenger B pillar. I was going to take it back to the dealer, but decided to dive into it myself. I must say, I was quite happy how this turned out.
Detailed fix:
Step 1: Pull the passenger B Pillar off. Gently pop off the bottom of the b pillar trim piece. I didn't need to use a trim tool, just my hands. I gently got a grip and pulled the sides and bottoms of the b pillar to pop the bottom off. You could break the trim piece here, so go slowly. You could use a plastic trim removal tool to get a better grip on the trim piece before pulling it off. There are 2 metal clips on the bottom of the trim piece that snap into the trim piece behind it. Beware, the top is screwed on, so don't try and pull the whole thing off, just the bottom.
Step 2: Remove top of b pillar trim Use a small pick, or fathead screwdriver to gently pry off the Airbag cover trim piece on the top front of the b pillar trim. Be sure to the put the little Airbag trim piece somewhere where you won't lose it (I used a plastic baggie). It has small clips on it that attach it to the main b pillar trim piece. It's easy to pop off. Behind the Airbag clip you'll see a hole through the b pillar trim and inside is a T15 torx screw. It goes through the b pillar trim into the metal body of the car. I used a T15 screwdriver to remove it. ***BEWARE that the b pillar trim is hollow behind it and if you drop that screw down the hole, you'll lose the screw forever, or you'll be ripping half the car apart to get it back. BE CAREFUL. Once the screw is out, gently pull away and down to remove the b pillar trim. It will still be attached to the seatbelt, so just gently pull it away to expose the back of the trim and the metal of the b pillar.
Exposed b pillar:
Step 3: Poking around to find what is making the sound. I flicked my fingers on all the exposed plastic, trim, metal, seatbelt mechanism, etc to try and find what was rattling. On my car (yours may be different,) I found 2 main culprits, and a few other areas I decided to shore-up, just in case they were contributing to the sounds as well. The 2 main culprits were; the female trim pieces from the lower b pillar trim (still attached to the car, coming up from the bottom of the floorboards, that the upper b pillar trim you just removed snap into,) that were rattling against the metal behind them, and the edges of the lower b pillar trim piece being loose and rubbing against the doorframe. You'll notice here that none of the main culprits were the upper b pillar trim, but issues with the upper part of the lower trim.
Step 4A: Fix the lower trim rattle on the plastic nubbins. I applied small pieces of the soft side of heavy duty velcro I bought at Lowes. I cut strips of velcro and stuck it to the metal of the frame, in between the metal and the plastic nubbins from the lower trim (that the upper trim snaps into). I did this to both sides of the trim (both nubbins)
Velcro
One of the 2 offending nubbins.
Nubbin with velcro behind it, silencing the noise between the plastic nubbin and the metal frame:
Step 4B: Fix the lower trim rattle on the sides rubbing. This is where I broke out the surgical tape. I had ordered this is stuff off of Amazon about a year ago when I was chasing rattles in my 13 Accord. I learned this trick from a BMW site. People were putting this slick surgical tape between rubbing plastic trim parts to quite things down. It had worked for me in the past, so I decided to try it again here. Works great!
When you gently pulled the lower trim piece away from the car (without popping the clips) and worked it back and forth, the trim would squeak as it rubbed against the door frame. The frame in that area is a hard rubber, not metal or plastic, but the friction with the plastic on the lower trim piece would cause squeaking sounds.
Fixed by applying surgical tape to the lower b pillar trim, and the rubber part of the frame.
Surgical tape. The outer side of the tape is very slick/slippery.
I pulled the lower trim away to apply thin strips of the tape to the trim and rubber attached to the frame. It didn't stick as well to the rubber, so be careful applying the tape. Once the trim was pushed back on, it was all quiet and the squeaks were gone.
Offending lower trim:
Trim with tape applied to both the trim and rubber. I did this to both sides of the trim (the front seat side, and backseat side). I applied the tape with the lower trim pulled away as far as I could without actually popping the trim off the clips. I applied maybe 5 or 6" of tape down the trim. You'll need to rip thin pieces of the tape so it doesn't show when you snap everything back together.
So those were the 2 main offenders. Everything else I did was "just in case " and may have been overkill, but here's a list so you can see what worked and what didn't work.
Step 5: What I tried and didn't work. I thought I'd apply velcro to the actual seatbelt mechanism, and a few places on the back of the upper b pillar trim. They looked like they could rub at some point. When I tried to snap everything back together, it was too thick and the trim would not go together, so I removed all the extra velcro.
Step 6: More surgical tape. I did end up putting surgical tape in a few more places. On the front of the lower nubbins, over the metal clips on the lower b pillar trim, over the frame where the hole is for the upper T15 screw, and on the back of the upper b pillar trim where the T15 originates. These may or may not have helped with the sound, but having the tape over the crew hole allowed me to seat the screw a few threads in when attaching the trim back onto car. Remember, drop that screw and life will be shitty. I cut small holes in the tape with a razor blade to allow the screw in.
Lower nubbins with tape. I cut an opening with a razor blade to allow clips to fit.
Frame with tape over screw hole. Opening was cut for screw.
Upper b pillar trim with tape over back of hole. Opening was cut for screw. The trim is off and hanging upside down.
Here's the metal clip on the bottom of the upper b pillar trim, right before I added tape over the clip itself. As you can see I did add a few thin strips on both side of the clip as well. Make sure to slide the seatbelt adjuster up and down a few times before putting the trim back on. I had too much tape in a few places and had to pull tape and reapply thinner strips.
A couple of tips to button everything back up.
1. If you used too much tape or too much velcro, things might be too tight to go back together and you might have to remove tape or velcro. I did.
2. Get the T15 screw pre-started in the tape behind the hole. This helps prime the screw. DON'T LOSE THE DAMN SCREW. In fact, a magnetic T15 driver would be a great idea.
3. You have to really push the upper b pillar trim UP into the headliner first and hold it firmly while you get the crew started. You have to do the screw first so you can align the seatbelt adjuster.
4. After the screw is in comes the part that took the longest. Getting the seatbelt adjuster and seatbelt mechanism lined up. I got it work by lowering the seatbelt mechanism all the way down, then sliding the adjuster on the b pillar trim down, then aligning the trim release on the b pillar trim with the release mechanism on the seatbelt itself. This took me like 500 tries to get right. Pack your patience and eventually this will work.
5. Snap the clips from the upper b pillar trim into the lower b pillar trim nubbins. Test the seatbelt adjuster again.
2. Grab handle fix
Where:All 4 grab handles
What: Light clicking/clunking sound when handles bounce
When: Over potholes roads, when you flick with your finger
How: Soft side of heavy duty velcro.
Outcome: Fixed
Tools: Velcro.
I did this same fix on my 13 Accord. When you pull the grab handles down about 1/2" and release them, they clunk against the plastic trim behind them. I cut tiny squares of velcro and put them on the handles. Easy fix to quiet some possible noise.
I did this on both sides of all 4 handles.
3. Two rear removable trim pieces loose.
Where: Both plastic trim pieces in trunk. One on left, one on right.
What: Rattling when touched.
When: Any time they were touched.
How: Surgical tape.
Outcome: Fixed
Tools: Surgical tape.
Poking around the rest of the car led me to find these 2 little bastards. Open the hatch, lift the cardboard cover for the spare, and on each side of the trunk are 2 removable plastic trim pieces that block off the little cubbies on the left and right. They were very loose and easily could have been source of some rattles.
I pull them both out and applied surgical tape to the backs of the trim pieces (but not the trim inside the car where they attach to). I decided to apply tape to just the removable trim first and see if that worked, and it did. 100% better.
Offending trim on right (both left and right were rattling)
Tape on back of both left and right trim pieces
4. Loose stuff in cabin
Where: Sunglasses, glovebox, small cubby on drivers left side.
What: Crap rattling around
When: Any time there's stuff in the car.
How: 4" thick foam and double sided carpet tape.
Outcome: Fixed
Tools: 4" thick foam, double sided carpet tape, and just a little surgical tape.
OK, this is just me being anal retentive, but I hate stuff rattling around in my car. None of these fixes were problems with the car, but simply things I did to quiet more stuff down.
Step 1: Sunglass holder.
I cut up 2 pieces of foam and stuck them into the sunglass holder with double sided carpet tape. Now I have to push my glasses into the foam to put my glasses in the holder. 100% quieted the sunglasses down. I also put a few thin strips of the surgical tape on the inside of the sunglass holder. Not sure it did anything. I was sort of tape-crazy by this point.
Step 2. Glovebox foam holder
1 Cut a big chunk of foam into a wedge shape and stuck it to the glovebox with doublesided tape. I cut holes into the foam to put my easy pass, work tag, and misc stuff into as a holder. It sits on top of the owners manual and keeps it quiet as well. 100% works great. Nothing sliding around in the glovebox any more.
Step 4. Key fob holder in drivers cubby. I cut up more foam and made a little slit in it to put my key fob. Keys are now 100% quiet.