This may be the definitive install guide for stacking tire and sub. Not because I figured it all out, but because I read thought all of the proceeding posts and tried many of the different approaches suggested. After much trial an error I think this is the approach that works best. I tried to synthesize what I learned from these many post into one clear guide. I hope this helps. AGAIN ALL of these ideas are stolen from others, but I thought I would put it into one clear guide.
This approach puts the tire on the bottom and sub on the top and then moves and reuses the sub woofer feet. My lid rest perfectly level on top. You will need to order a longer plastic screw, if you want the second nut (optional) you will need to order the short screw (so you can get a second nut.) You will be repurposing the feet on your sub.
I think my sub sounds better on top than on the bottom - your mileage may vary.
Step 1. Replace short tire bold with long one you ordered (don't forget to move foam washer on short bolt to your new long bolt).
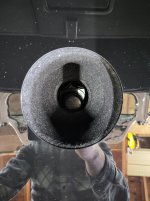
Step 2 (photo) Pull back the black padding in the wheel wheel. Find the valley so you can run you harness in the valley and under the wheel.
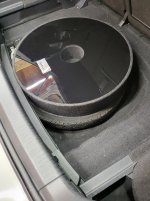
Step 3-4 (photo) The rim is going to go back in your car inverted, that is with the
label side down - the rim should form a bowl.
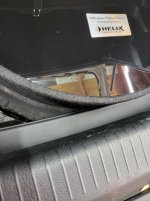
Pull harness through hole in rim. Use your nut (if you bought second nut). If you only have one save it for the end.
Step 5. (photo) Remove feet from bottom of sub. Replace existing holes with screws. I used some silver ones laying around in my garage. (If your OCD leaving the original holes unblocked and the subwoofer box sill be less efficient). M
easure 3 inches from the edge and reinstall the feet with original screws. Install the sub on top of your rem, notice how the moved feet now sit just inside the rim and stop it from sliding around all without raising the sub height.
NOTE: Prior to putting the connector back into the sub I coated the outside of the inner connector with a LIGHT AMOUT of Vaseline jelly it does not actually touch connectors). Dielectric grease would be an even better choice, I was out). The harness is now much easier to pull out in the event of a flat.
Step 6 (photo) use second screw to secure the sub.
If you're OCD you will place the label toward the rear of the car. I'm not THAT OCD.
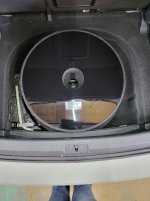
My top closed perfectly, the sub sounds great. I hope this helps.
View attachment 232415View attachment 232417View attachment 232419
View attachment 232418