golfdave
Autocross Champion
- Location
- Scotland (U.K.)
- Car(s)
- Mk7 Golf GT Estate
Disclaimer:- This info is for community usage. I am NOT affiliated to, or sponsored by, any company/individual to promote them or their products. Companies/individuals may NOT use my name, photos, or threads/technical guides, for financial or personal gain (fraudulent misrepresentation).
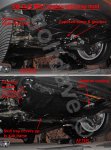
How to retro-fit skid trays, aerodynamic under trays, & stone guards to a MK7 Golf
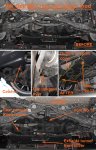
This guide is a “How to” retro-fit skid trays, aerodynamic under trays, & stone guards to a MK7 Golf. Otherwise what is generally known as a “Rough Road Package”.
The car used for this is a UK spec MK7 Golf Estate GT (Highline), 1.4lt 140PS petrol, with a manual gearbox, front wheel drive, -15mm OEM sports suspension & the multi-link rear suspension as per the “”Alltrack”, “GTI” & “R”. All the components listed & mods done will work as described on all versions of MK7 Golf Hatch & Estate (unless otherwise stated). You will notice that various car components appear to be covered in a yellowish coating. This is the Waxoyl treatment that I had previously done myself.
There has been a lot of speculation & discussion on this subject with people posting up part numbers & saying this will fit etc.. Some of the information given is correct, some of it is wrong. I am the first to thoroughly go through the VW parts list & actually fit all the correct pieces, & figuring out which future items to watch out for
http://www.golfmk7.com/forums/showthread.php?t=6185
The main reasons for doing these mods is to provide better “rough road” protection, e.g. from stones, & debris which has fallen off other vehicles. However they also help smooth the under body airflow with the benefit of better fuel consumption! Full aerodynamic under trays are used in “eco-vehicles”, supercars, F1 racing, etc.. In fact some of these mods you will find on other “Eco” versions of VAG vehicles!
At the time of writing this guide, the Golf 1.0TSI Bluemotion, GTE, GTD, & R Hatch, 1.0TSI Bluemotion, Alltrack, GTD, & R Estate have been released here in the UK for sale. These models usually have the “extra” trim pieces fitted to them, & I have looked at Etka for these cars also. Unfortunately I cannot find any trim pieces other than those listed here, & most are not fitted at the factory to these models either for UK spec cars!
We can also look for items from the factory “P” codes:-
P1SB: Engine protection grille
P1SK: Engine underside & stonechip guard
P1SL: Underbody stonechip protection.
All these “P” codes make up previous so called “Rough Road Packages”.
The E-Golf (all electric) hatch has different under trays (parts 5Q0 825 236P, 5QE 825 902B, 5QE 825 229B, 5QE 825 218C). But it would be unwise to use them as you will get too much heat soak into the cabin from the exhaust! Basically instead of two length ways covers between the front & rear wheels with a gap for the exhaust, the E-Golf has two width ways covers which totally cover the whole area up, as it has no exhaust! There is also a bigger rear cover under the axle/boot, but of course it has no exhaust which would also be covered up!
VW states on the e-Golf:-
Air drag reduced by 10 per cent. Volkswagen was able to lower the air drag of the Golf by developing very specific measures such as reducing the volume of cooling air (via a radiator shutter and partially closed-off radiator grille), new underbody panelling, rear body modifications with a rear spoiler and C-pillar air guides, and by developing new aerodynamic wheels (essentially closing off gaps, making the wheels flush with the car's exterior). Whereas on the standard Golf (1.6 TDI with 77 kW) air drag is 0.686 m², air drag was reduced to 0.615 m² on the e-Golf, which represents a 10 per cent improvement. Correspondingly, the cD value was lowered to 0.281.
Rolling resistance reduced by 10 per cent. Volkswagen was able to achieve another positive effect on energy consumption and range by optimising the tyres (205/55 R16 91 Q). Reducing the rolling resistance coefficient from 7.2 per 1,000 (Golf BlueMotion) to 6.5 per 1,000 for the e-Golf (likewise an improvement of 10 per cent) also improves the range.
Aerodynamics and rolling resistance | Volkswagen Newsroom (volkswagen-newsroom.com)
MK7 Golf Bluemotion (1.0lt petrol) = 0.27cd??
From other sources & quoted as being “the Golf TSI BlueMotion’s Cd value has been reduced to 0.28 (from 0.29 in the standard Golf), & “10% better in aero than standard Golf” therefore making standard Golf = 0.29cd. The 0.27cd cannot be the hatch version there was no aero difference, so must be the then “new” estate version. The 0.28cd could be the hatch just rounded down??
Manual, & 195/65/R15 wheels.
Sports suspension (-15mm).
Basic MK7 Golf body, bumpers, & lower grille.
Front upper grille has blanking panel in middle.
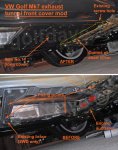
Engine bay has full length aero under tray from diesel engine cars.
Rear window gloss black fins.
The cd figures below are from the VW Erwin “Self Study guides”.
ID.3 = 0.267cd
Mk8 Golf = 0.275cd (depending on equipment)
MK7 Golf Bluemotion (1.2lt petrol) = 0.287cd.
Manual, & 195/65/R15 wheels.
Sports suspension (-10mm or -15mm).
Basic MK7 Golf body, bumpers, & lower grille.
Front upper grille has blanking panel in middle.
Engine bay has full length aero under tray from diesel engine cars.
Hatch roof spoiler?, rear window gloss black fins.
MK7 e-Golf (total electric) = 0.29cd.
DSG, & 205/55R15 wheels.
Standard ride height suspension.
Upper front grille is a solid blanked grille.
Unique smooth front bumper.
Totally flat under body from front bumper to rear axle as no exhaust!
Hatch roof spoiler?, rear window gloss black fins.
As standard in UK it came with bigger 205/55R16 wheels!
MK7 Golf GTE (petrol/hybrid) = 0.299cd.
DSG, & 205/55R16 wheels.
Sports suspension (-15mm).
GTE has open slat grille like the basic one.
Unique semi-smooth front bumper.
The GTE has the full length diesel engine bay undertray, but with more ventilation holes/slats cut into it.
Bigger rear roof spoiler & gloss black side fins from GTD/GTI.
As standard in UK it came with 225/40R18 wheels!
MK7 Golf GTD (2.0lt diesel) = 0.316cd.
Manual, & 225/45R17 wheels
Sports suspension (-15mm).
Honey comb upper grille.
Unique front bumper with honey comb lower grille & strakes across fog lights.
Full length engine bay under tray called “noise insulation” to quieten the diesel engine.
Bigger rear roof spoiler & gloss black side fins from GTE/GTI
As standard in UK it came with 225/40R18 wheels!
MK7 Golf GTI (2.0lt petrol) = 0.318cd.
Manual, & 225/45R17 wheels
Sports suspension (-15mm).
Honey comb upper grille.
Unique front bumper with honey comb lower grille & strakes across fog lights.
The “half” length engine bay under tray.
Bigger rear roof spoiler & gloss black side fins from GTD/GTE
As standard in UK it came with 225/40R18 wheels!
These figures prove that the wider wheels, fully open honeycomb grilles & exposed fog light grille “strakes” create lots of drag!
So removing the “half under tray & fitting a “full length” diesel under tray removes 0.002cd of drag (GTi-GTD)
Removing 225/45R17 wheels & fitting 205/55R16 wheels removes almost 0.017cd of drag (GTD-GTE) (some has to be the difference in grilles/bumpers, but tyre width is the biggest factor)
There is strong possibility that the first figures has the Variant/Estate as 0.01cd less drag than the Hatch version (trim spec for trim spec), which follows basic aerodynamics.
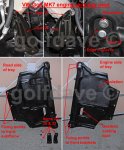
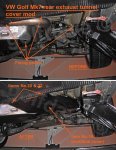
Besides the e-Golf which has its own unique undertrays, none of the above models has the front exhaust tunnel tray, the rear exhaust tunnel tray, or the rear axle tray fitted!!
Basically fitting wider tyres, mudflaps, the Audi TT brake cooling air guides, & the rear lower wishbone stones guards, will all ADD to the drag, by increasing the frontal x-sectional area & disrupting air flow. However they are important & functional, & the adverse effects of these items is countered by the positive effects of the other aero mods!
By fitting all these items in the Guides below, I have added a minimum conservative estimate of 0.82m2 (8.8ft2) of flat under trays to my car! This has made the car quieter, more stable at high speed & whilst cornering, & will have improved fuel consumption. However because I have been doing this whilst the car is running in I cannot say exactly much the fuel consumption has improved by!
This “How-to” guide has been split into six parts, one for each different part/area.
Webpage done comparing the Mk5 Golf -vs Mk8 Golf & further improvements basically to the rear
Volkswagen Golf Aerodynamics - How to cut emissions even further (airshaper.com)
Front lower grill cover, designed for diesels to keep them warm in the winter months & only for the basic front bumper..
Winter cover VOLKSWAGEN Golf VII 2012-2016 (bottom) HEKO (e-heko.com)
How to retro-fit skid trays, aerodynamic under trays, & stone guards to a MK7 Golf
This guide is a “How to” retro-fit skid trays, aerodynamic under trays, & stone guards to a MK7 Golf. Otherwise what is generally known as a “Rough Road Package”.
The car used for this is a UK spec MK7 Golf Estate GT (Highline), 1.4lt 140PS petrol, with a manual gearbox, front wheel drive, -15mm OEM sports suspension & the multi-link rear suspension as per the “”Alltrack”, “GTI” & “R”. All the components listed & mods done will work as described on all versions of MK7 Golf Hatch & Estate (unless otherwise stated). You will notice that various car components appear to be covered in a yellowish coating. This is the Waxoyl treatment that I had previously done myself.
There has been a lot of speculation & discussion on this subject with people posting up part numbers & saying this will fit etc.. Some of the information given is correct, some of it is wrong. I am the first to thoroughly go through the VW parts list & actually fit all the correct pieces, & figuring out which future items to watch out for
http://www.golfmk7.com/forums/showthread.php?t=6185
The main reasons for doing these mods is to provide better “rough road” protection, e.g. from stones, & debris which has fallen off other vehicles. However they also help smooth the under body airflow with the benefit of better fuel consumption! Full aerodynamic under trays are used in “eco-vehicles”, supercars, F1 racing, etc.. In fact some of these mods you will find on other “Eco” versions of VAG vehicles!
At the time of writing this guide, the Golf 1.0TSI Bluemotion, GTE, GTD, & R Hatch, 1.0TSI Bluemotion, Alltrack, GTD, & R Estate have been released here in the UK for sale. These models usually have the “extra” trim pieces fitted to them, & I have looked at Etka for these cars also. Unfortunately I cannot find any trim pieces other than those listed here, & most are not fitted at the factory to these models either for UK spec cars!
We can also look for items from the factory “P” codes:-
P1SB: Engine protection grille
P1SK: Engine underside & stonechip guard
P1SL: Underbody stonechip protection.
All these “P” codes make up previous so called “Rough Road Packages”.
The E-Golf (all electric) hatch has different under trays (parts 5Q0 825 236P, 5QE 825 902B, 5QE 825 229B, 5QE 825 218C). But it would be unwise to use them as you will get too much heat soak into the cabin from the exhaust! Basically instead of two length ways covers between the front & rear wheels with a gap for the exhaust, the E-Golf has two width ways covers which totally cover the whole area up, as it has no exhaust! There is also a bigger rear cover under the axle/boot, but of course it has no exhaust which would also be covered up!
VW states on the e-Golf:-
Air drag reduced by 10 per cent. Volkswagen was able to lower the air drag of the Golf by developing very specific measures such as reducing the volume of cooling air (via a radiator shutter and partially closed-off radiator grille), new underbody panelling, rear body modifications with a rear spoiler and C-pillar air guides, and by developing new aerodynamic wheels (essentially closing off gaps, making the wheels flush with the car's exterior). Whereas on the standard Golf (1.6 TDI with 77 kW) air drag is 0.686 m², air drag was reduced to 0.615 m² on the e-Golf, which represents a 10 per cent improvement. Correspondingly, the cD value was lowered to 0.281.
Rolling resistance reduced by 10 per cent. Volkswagen was able to achieve another positive effect on energy consumption and range by optimising the tyres (205/55 R16 91 Q). Reducing the rolling resistance coefficient from 7.2 per 1,000 (Golf BlueMotion) to 6.5 per 1,000 for the e-Golf (likewise an improvement of 10 per cent) also improves the range.
Aerodynamics and rolling resistance | Volkswagen Newsroom (volkswagen-newsroom.com)
MK7 Golf Bluemotion (1.0lt petrol) = 0.27cd??
From other sources & quoted as being “the Golf TSI BlueMotion’s Cd value has been reduced to 0.28 (from 0.29 in the standard Golf), & “10% better in aero than standard Golf” therefore making standard Golf = 0.29cd. The 0.27cd cannot be the hatch version there was no aero difference, so must be the then “new” estate version. The 0.28cd could be the hatch just rounded down??
Manual, & 195/65/R15 wheels.
Sports suspension (-15mm).
Basic MK7 Golf body, bumpers, & lower grille.
Front upper grille has blanking panel in middle.
Engine bay has full length aero under tray from diesel engine cars.
Rear window gloss black fins.
The cd figures below are from the VW Erwin “Self Study guides”.
ID.3 = 0.267cd
Mk8 Golf = 0.275cd (depending on equipment)
MK7 Golf Bluemotion (1.2lt petrol) = 0.287cd.
Manual, & 195/65/R15 wheels.
Sports suspension (-10mm or -15mm).
Basic MK7 Golf body, bumpers, & lower grille.
Front upper grille has blanking panel in middle.
Engine bay has full length aero under tray from diesel engine cars.
Hatch roof spoiler?, rear window gloss black fins.
MK7 e-Golf (total electric) = 0.29cd.
DSG, & 205/55R15 wheels.
Standard ride height suspension.
Upper front grille is a solid blanked grille.
Unique smooth front bumper.
Totally flat under body from front bumper to rear axle as no exhaust!
Hatch roof spoiler?, rear window gloss black fins.
As standard in UK it came with bigger 205/55R16 wheels!
MK7 Golf GTE (petrol/hybrid) = 0.299cd.
DSG, & 205/55R16 wheels.
Sports suspension (-15mm).
GTE has open slat grille like the basic one.
Unique semi-smooth front bumper.
The GTE has the full length diesel engine bay undertray, but with more ventilation holes/slats cut into it.
Bigger rear roof spoiler & gloss black side fins from GTD/GTI.
As standard in UK it came with 225/40R18 wheels!
MK7 Golf GTD (2.0lt diesel) = 0.316cd.
Manual, & 225/45R17 wheels
Sports suspension (-15mm).
Honey comb upper grille.
Unique front bumper with honey comb lower grille & strakes across fog lights.
Full length engine bay under tray called “noise insulation” to quieten the diesel engine.
Bigger rear roof spoiler & gloss black side fins from GTE/GTI
As standard in UK it came with 225/40R18 wheels!
MK7 Golf GTI (2.0lt petrol) = 0.318cd.
Manual, & 225/45R17 wheels
Sports suspension (-15mm).
Honey comb upper grille.
Unique front bumper with honey comb lower grille & strakes across fog lights.
The “half” length engine bay under tray.
Bigger rear roof spoiler & gloss black side fins from GTD/GTE
As standard in UK it came with 225/40R18 wheels!
These figures prove that the wider wheels, fully open honeycomb grilles & exposed fog light grille “strakes” create lots of drag!
So removing the “half under tray & fitting a “full length” diesel under tray removes 0.002cd of drag (GTi-GTD)
Removing 225/45R17 wheels & fitting 205/55R16 wheels removes almost 0.017cd of drag (GTD-GTE) (some has to be the difference in grilles/bumpers, but tyre width is the biggest factor)
There is strong possibility that the first figures has the Variant/Estate as 0.01cd less drag than the Hatch version (trim spec for trim spec), which follows basic aerodynamics.
Besides the e-Golf which has its own unique undertrays, none of the above models has the front exhaust tunnel tray, the rear exhaust tunnel tray, or the rear axle tray fitted!!
Basically fitting wider tyres, mudflaps, the Audi TT brake cooling air guides, & the rear lower wishbone stones guards, will all ADD to the drag, by increasing the frontal x-sectional area & disrupting air flow. However they are important & functional, & the adverse effects of these items is countered by the positive effects of the other aero mods!
By fitting all these items in the Guides below, I have added a minimum conservative estimate of 0.82m2 (8.8ft2) of flat under trays to my car! This has made the car quieter, more stable at high speed & whilst cornering, & will have improved fuel consumption. However because I have been doing this whilst the car is running in I cannot say exactly much the fuel consumption has improved by!
This “How-to” guide has been split into six parts, one for each different part/area.
Webpage done comparing the Mk5 Golf -vs Mk8 Golf & further improvements basically to the rear
Volkswagen Golf Aerodynamics - How to cut emissions even further (airshaper.com)
Front lower grill cover, designed for diesels to keep them warm in the winter months & only for the basic front bumper..
Winter cover VOLKSWAGEN Golf VII 2012-2016 (bottom) HEKO (e-heko.com)
Last edited: