GOLFMK8
GOLFMK7
GOLFMK6
GOLFMKV

Bäsemödel: 1.8 TSi Project

Bäsemödel

Go Kart Champion
Location
Lancaster PA
Hey folks!

First off, Im super thankful for this forum! It has been a tremendous help as I have learned about this car and making it my own! Appreciate all the insight and advice!

So in October of 2015, my Volvo S60 reached 233k and had too many issues to justify spending the money to repair them. Plus it had left my wife and i stranded a few times; she was getting tired of that.

We started looking for cars. I had always loved the mk6 gti and we had friends who spoke highly of their VWs so thats were we started looking. Ended up at Sutliff VW in Harrisburg and, thanks to their great sales staff, got a great deal on a 15 1.8 TSI S. I would have loved to go with a GTI or with an SE model for the sunroof and heated seats but this car was too good of a deal and it was what we were able to afford. It was previously a rental but was in fantastic shape with no issues.


Got it home and immediately wrote up plans for mods! Since all my hobbies are expensive, its been a little slow going on the mods but I've been thankful to get things done here and there with the help of friends!

First up was monster mats, euro switch with auto function and interior LEDs from DeAutoKey. Then reverse lights, brake lights, door warning and footwell lights.

Then I picked an LP grille and Helix R style headlights with HIDs from OPD; huge improvement in form and function!

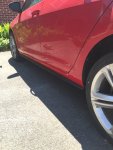
After that, it was wheels! Got a set of 18x8 mallory wheels from a guy on Vortex. They could use some refinishing but they are good daily driver wheels.

Picked up a OBDEleven and went to town on coding! It took a bit to get the hang of but its been a great investment.

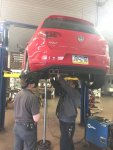
Picked up some VWR springs from a member here in the winter but was waiting till spring to install. So they should hopefully be on as soon as I decide if I want to try to tackle it or if I want a shop to do it.

Doing a custom exhaust soon as well as a lip and GTI skirts when I can find them. I'd like to do tint, folding mirrors, front fogs and performance based things once the warranty is up.

Been a very fun car to drive!! Looking forward to more fun to come! Apologies for the pics being out of order...
 

Attachments

  • img_0956_23687909655_o.jpg
    img_0956_23687909655_o.jpg
    511.8 KB · Views: 5,130
  • 2016-03-12 11.45.37.jpg
    2016-03-12 11.45.37.jpg
    609 KB · Views: 5,572
  • img_0945-22807-pm_23654975166_o.jpg
    img_0945-22807-pm_23654975166_o.jpg
    439.2 KB · Views: 5,139
  • img_0948_23598565391_o.jpg
    img_0948_23598565391_o.jpg
    517.7 KB · Views: 5,086
  • 2015-09-23 08.50.47 HDR-2.jpg
    2015-09-23 08.50.47 HDR-2.jpg
    438.4 KB · Views: 5,091
  • 2015-09-23 08.51.03.jpg
    2015-09-23 08.51.03.jpg
    452.1 KB · Views: 5,020
  • 2015-09-22 19.32.48.jpg
    2015-09-22 19.32.48.jpg
    316.8 KB · Views: 4,949
  • img_0950-22807-pm_23052886384_o.jpg
    img_0950-22807-pm_23052886384_o.jpg
    369.6 KB · Views: 5,116

Bäsemödel

Go Kart Champion
Location
Lancaster PA
Also, i need to a proper do a photo shoot :D

here are the coding tweaks I've done; feel free to ask about any!

Completed

Black Ice Temp change – 2deg Cel/1deg Cel
Gauge Sweep
Fuel Refill Quantity
DRL brightness to 80
Folding mirrors coding (In prep for install)
Synchronous mirror adjustment
Passenger mirror dip on reverse
Rear fog light
Coming Home Lighting
Footwell lighting
Comfort windows – Raise/Lower with Keyfob
Brake function to inner tails
Rear DRLs
Door Warning Lights
Urban Joke Turn Signals
Hazards on heavy braking
DRL control in MIB
Front/rear wiper teardrop


Yet to do
Key fob useable when in ignition
Hatch Pop
 
Last edited:

Tatanko

Ready to race!
Location
Pennsylvania
Hello and welcome from a fellow PA enthusiast! :cool:

I'm still fairly new to this community myself, and I'm wondering about a few of the VCDS tweaks you've listed:

here are the coding tweaks I've done; feel free to ask about any!

Urban Joke Turn Signals
Front/rear wiper teardrop

I don't think I understand what these two mean or what they do. Could you explain?
 

Bäsemödel

Go Kart Champion
Location
Lancaster PA
Hello and welcome from a fellow PA enthusiast! :cool:

I'm still fairly new to this community myself, and I'm wondering about a few of the VCDS tweaks you've listed:


I don't think I understand what these two mean or what they do. Could you explain?

Hey man! Here is the link for the turn signal mod:
http://www.golfmk7.com/forums/showthread.php?t=15055

Just some unique ways to make the turn signals respond.

The teardrop element makes the wipers launch a few seconds after their final launch when the washer fluid cycle is triggered. Catches any final spots that may have lingered.

Hope that helps!
 

Bäsemödel

Go Kart Champion
Location
Lancaster PA
So yesterday I got one of the items checked off the list!

I got footwell lights working!

I have done a good deal of research on this mod and came to the understanding that due to the fact that I have an S model car with no sunroof, heated seats or fogs that my BCM was the low line model and thus couldnt support footwell lights. But it works properly and the "light setting" has all the controls to adjust things properly!

I purchased LEDs from DeAutoKey and this kit from Boldsport:

http://bit.ly/21429sR

It comes as a loom for running lights to the front right and left corners and well as the rear under the seats.

After figuring out how the cable was supposed to run, I started removing trim and running wires under the carpet to their necessary locations. After I actually figured out how they were supposed to run :D I did it over again and got things all situated. I installed the lenses in the rear of the seats with a little persuasion and filing of the lens so they would fit. The fronts where much easier to install. I made sure to use small zip ties to control the cable path but also to create strain relief points so that when I move the seats forward or backward, the cable wont be stressed.

I grounded the cable to the ground group under the drivers door sill plate and plugged the positive line into C72 on the BCM. This was a fairly simple process. After removing the trim around the hood release, the sill plate and the small door that covers the end of the dash, I had all the access I needed to remove plug C, the closest plug to you, from the BCM. Push down on the plug housing and flip the lock lever down to release the clip. Ran the wire to the correct pin, re-did the zip tie and cleaned up the cable path.

Not sure if its best practice or not but I did not unhook the battery before removing the C block from the BCM. I have noticed no issues and its been a few days.

Video on removing hood release:
http://bit.ly/1rqb3Vr

Here was the coding I added:

Channel
(1)-Leuchte30FR LC72-
FROM:///TO:
Lasttyp 30////Not active///36 - LED Kleinleistung
Fehlerort mittleres Byte DTC-DFCC 30///0///2
Lichtfunktion A 30///not active///Footwell light
Dimmwert AB 30///0///100

Second Part:
Controller 09 - Central Electronics
16 - Security Access - enter 31347
10 - Adaptations

Go to
(8)-Interior light; light configuration-Fussraumbeleuchtung
Change value from ‘not installed’ to ‘installed’
(This puts the footwell light % setting in the infotainment system)

If you are wondering why the fronts are incandescent and not LED, that is because they havent arrived yet. I was originally planning on only running the wiring for the fronts but decided to go all out. The rear lenses where much harder to put in than the fronts so I elected to put them in the rear. When the other two arrive they will go in the front.

Overall, I'm very happy with the end result! Thrilled that it worked and that I didn't have to tie them into the overhead lights or something like that.

Feel free to ask any questions!
 

Attachments

  • IMG_5822.jpg
    IMG_5822.jpg
    65.4 KB · Views: 5,107
  • IMG_5820.jpg
    IMG_5820.jpg
    43.6 KB · Views: 5,144
  • IMG_5821.jpg
    IMG_5821.jpg
    66.2 KB · Views: 6,124
Last edited:

Bäsemödel

Go Kart Champion
Location
Lancaster PA
Exhaust done today! Went to a local place that does great work and comes highly reviewed from others in the area. Used a magnaflow 11226. I was hoping to have a 14226 but thats all they had in stock at the time.

Install was great. I elected to stick with the 2.25" pipe rather than going up to a 2.5" since I dont plan on doing any major performance overhauls (maybe a tune someday). Unfortunately they could only crush bend the pipes but it still came out good and I think effects on power, if any, will be very small. We were able to reuse one mandrel bent section which was nice.

Went with a 3" dual exit tip in the factory position.

I'm happy with the sound but, as with anything, it will take some time to get used to more noise. Also, Im very interested to see if it passes the wife test :D
 

Attachments

  • IMG_5878.jpg
    IMG_5878.jpg
    67.5 KB · Views: 4,619
  • IMG_5873.jpg
    IMG_5873.jpg
    61.3 KB · Views: 4,620
  • IMG_5870.jpg
    IMG_5870.jpg
    56.2 KB · Views: 4,604

Bäsemödel

Go Kart Champion
Location
Lancaster PA
lower it! ;)

Two weekends from now! Going to a friends race shop and doing it ourselves. Also bought the GTI skirts. You don't still have the lip do you? I'm debating between buying a lip and tint or tires at the moment. The current tires are ice skates in the rain.
 

Bäsemödel

Go Kart Champion
Location
Lancaster PA
Did some more wiring work today. Ran a wire from my euro switch to pin A29 on the BCM to allow control of the rear fog light. Didnt work. The rear fog light is properly coded and in the output test it works. I thought maybe my piggyback auto sensor causing a problem and sure enough, when I plugged the switch harness right into the switch, bypassing the sensor, the rear fog worked. So now I have to figure that out... Anyone come across as similar issue?
 

Bäsemödel

Go Kart Champion
Location
Lancaster PA
Rear fog Started working without a problem today! With the piggyback installed! Sweet!
 

Bäsemödel

Go Kart Champion
Location
Lancaster PA
I enjoy reading your posts.

I am curious why didn't you choose center exit muffler? My next step would be this on my tsi.

https://deutscheautoparts.com/make-.../performance/center-exhaust-mk7-golf-18t.html

Cost really. Custom exhaust using the factory path and the original valance was way less expensive than buying a new valance. It's certainly not out of the question to do it someday though as it does look awesome. I'd only need a new valance and to reroute the last section of pipe.
 

Bäsemödel

Go Kart Champion
Location
Lancaster PA
GTI skirts

So today's big project was to install these GTI skirts!

I ordered them from ebay: http://www.ebay.com/itm/172135084034?_trksid=p2057872.m2749.l2649&ssPageName=STRK:MEBIDX:IT

They came from californian but were made in taiwan. The quality is probably 7/10. They're nice construction and only one small tab broke while I was opening them up.

They arrived clipped together with the hardware in a separate bag. I unclicked them and did a test fit. I took some pictures of the GTI skirts to see where they landed on the car and used that as my reference.

Installation was a 4/10 in difficulty.

Because I'm fairly OCD, i wanted to get things lined up perfect. I had a roll of gaffer tape so I used that as a straight edge and also used a silver sharpie to mark where I wanted to drill the pilot holes for the screws. I also made small dots on the receiver of the skirt to show where the heads of the screws would land. If you dont do this, you'll likely end up with the skirts installed too far back or forward. I taped the receiver up on the car and dotted out where I wanted the screws to land.

The tape on the car also served to prevent tear-out when drilling the hole. There are 12 holes to drill plus one self tapping screw in the center. I didnt drill a pilot for that one.

Once I made the marks, I drilled and 1/8th in pilot hole. First one was scary! No going back! Left side took a bit longer as I did that one first. Second side took half the time. If you set up a straight edge of some kind to get yourself a guide line you'll be much better off.

Once the screws are in, you can slide the receiving side on to the heads of the screws. I tightened them down once everything was in place. Once the receivers were installed, I clicked in the skirt itself.

Fitment was 7/10. I'm happy with the look they add and for $100 I think the fitment is pretty good. A lot depends on how you mocked it up and drilled the screws. If your rockers are perfect and have no dings or bulges you'll be in good shape. Mine had a small one on the front passenger side which prevented the receiver from sitting completely flush. Only noticeable if youre on the hunt for it.

Overhall, happy with how it came out! Interested to see how they will hold up!
 

Attachments

  • 1.jpg
    1.jpg
    223 KB · Views: 5,237
  • 2.jpg
    2.jpg
    60.6 KB · Views: 5,236
  • 3.jpg
    3.jpg
    56.6 KB · Views: 5,030
  • IMG_5971.jpg
    IMG_5971.jpg
    74.9 KB · Views: 5,189
  • IMG_5975.jpg
    IMG_5975.jpg
    134 KB · Views: 5,151
Last edited:
Top