inc55
Go Kart Champion
- Location
- Chandler, AZ
This DIY guide is for information purposes only and I take no responsibility for any damages that might occur.
Hey guys, I wanted to put together a little DIY for the golf r auto dimming rear-view mirror for anyone interested in having this feature.
Step 1: Order the mirror from Aliexpress. Seller Landsounds technology. Part number 7N0 857 511 L 9B9 or search for mk7 golf r rear view mirror. Price is $135.
Step 2: Order the wire harness for $29.99 from same seller. Search for "Volkswagen VW Golf mk7 7 AUTO Dimming rear view mirror Rain sensor cable harness". Cables will come with the rain sensing harness as well which you will have to unloom if you already have a rain sensor installed. Everything arrived in 2 weeks to NYC.
Step 3: Remove the overhead lighting plate by placing a trim tool between the space where your sunglasses holder and overhead light switches are and release the first cover (the red areas in the picture). Then you place the trim tool between the the yellow areas in the picture and release the whole overhead light unit.

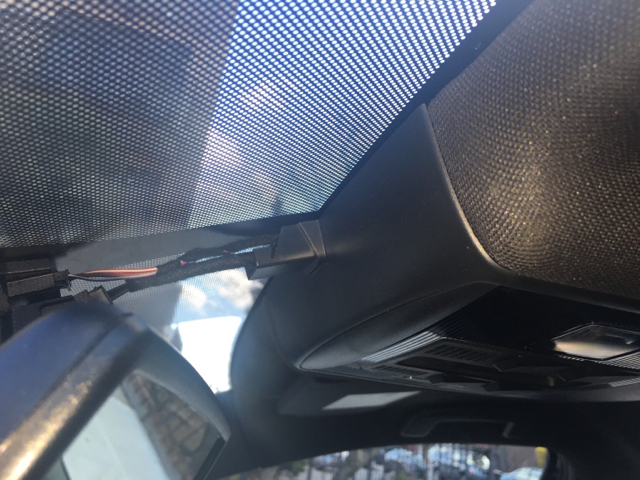
Step 4: T-tap. Get the smallest RED t-taps and tap the red/blue wire from the main blue connector. You press the t-tap in until in snaps shut. Take the other piece of the t-tap and connect it to the yellow/black wire from the rear view harness you bought. First cut the wire to the desired length, then strip it, then slide in the 1/4" exposed wire into the rubber t-tap hold and crimp it down.


Step 5: Ground the ground cable. The ground cable loop from the harness is also attached to the rain sensor and will need to be cut and taped off. Remove the nut from the roof that you will see in the pictures below and attach the ground loop and tighten. Nothing needed to be sanded in my car. Bare metal was exposed.


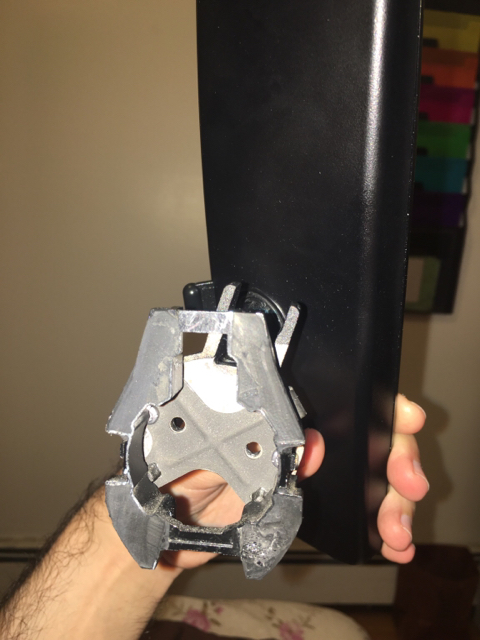
Step 6: Remove covers from existing non-dimming rear view mirror. You will need to remove the long cover first, then the smaller one. It's ok if you break them, they only cost about $5 from VW Parts Vortex. 5G0 857 593A is the part number for the long cover. 5G0 858 548 is the smaller cover. I will provide pictures of the covers and how to connect together. You will need to play around and pop them off.


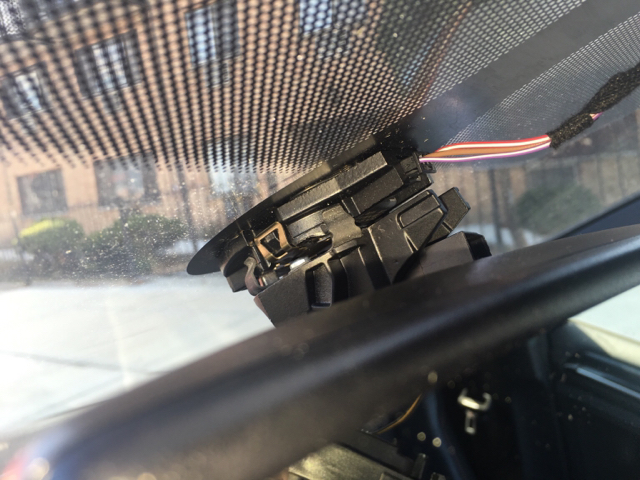
Step 7: Remove existing mirror from the windshield. Ok, this might be a bit difficult but the guy who changed my windshield was able to take off and put on the new mirror in under 1 minute. You need to get a good grip on the base (not the metal part attached to the windshield) and rotate to the left until it releases. Then you align the new mirror in that same 10:00 o-clock position and turn right. DO NOT apply force towards the windshield or it will break.


Step 8: Reapply the covers starting with the long flat piece which attaches to the overhead area near the glass and then reapply the long cover. It might seem light it wont fit but the long cover should snap into place without much effort to the big flat cover. Now comes the tricky part. You will need to reapply the small cover. It will slide up but will need to snap into place on the metal of the 4 metal claws area. It requires force to snap into place which I did not want to apply so I figured out a better way. If you spread the small cover outward, the plastic that needs to snap into place now requires less force to get there.
Some notes. The harness comes with 2 other wires. 1 that goes into the BCM and one that goes into that same blue connected where the t-tap is. I didn't want to tap into the fuse box and run a wire to that area, nor did I want to deal with the BCM so I cut and taped off that wire. I tried to install the wire into the blue connector but It wouldn't go in all the way. Maybe you will have better luck. The BCM wire pretty much doesn't dim the mirror when your car is in reverse and the blue connector wire doesn't dim the rear view mirror while the interior dome lights are on. I would live without both of these features so I cut those wires and taped them and made my life a lot easier.
The blue/red connector is indeed a switched 12v power source. I confirmed this with a multimeter. This install is not very difficult. If you cannot remove the rearview mirror I suggest going to a shop that installed windshields and have them do it like I did. He didn't even charge me anything.

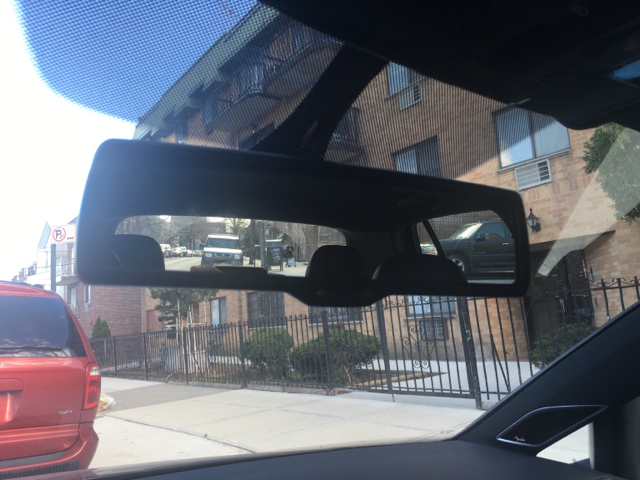


Hey guys, I wanted to put together a little DIY for the golf r auto dimming rear-view mirror for anyone interested in having this feature.
Step 1: Order the mirror from Aliexpress. Seller Landsounds technology. Part number 7N0 857 511 L 9B9 or search for mk7 golf r rear view mirror. Price is $135.
Step 2: Order the wire harness for $29.99 from same seller. Search for "Volkswagen VW Golf mk7 7 AUTO Dimming rear view mirror Rain sensor cable harness". Cables will come with the rain sensing harness as well which you will have to unloom if you already have a rain sensor installed. Everything arrived in 2 weeks to NYC.
Step 3: Remove the overhead lighting plate by placing a trim tool between the space where your sunglasses holder and overhead light switches are and release the first cover (the red areas in the picture). Then you place the trim tool between the the yellow areas in the picture and release the whole overhead light unit.
Step 4: T-tap. Get the smallest RED t-taps and tap the red/blue wire from the main blue connector. You press the t-tap in until in snaps shut. Take the other piece of the t-tap and connect it to the yellow/black wire from the rear view harness you bought. First cut the wire to the desired length, then strip it, then slide in the 1/4" exposed wire into the rubber t-tap hold and crimp it down.
Step 5: Ground the ground cable. The ground cable loop from the harness is also attached to the rain sensor and will need to be cut and taped off. Remove the nut from the roof that you will see in the pictures below and attach the ground loop and tighten. Nothing needed to be sanded in my car. Bare metal was exposed.
Step 6: Remove covers from existing non-dimming rear view mirror. You will need to remove the long cover first, then the smaller one. It's ok if you break them, they only cost about $5 from VW Parts Vortex. 5G0 857 593A is the part number for the long cover. 5G0 858 548 is the smaller cover. I will provide pictures of the covers and how to connect together. You will need to play around and pop them off.
Step 7: Remove existing mirror from the windshield. Ok, this might be a bit difficult but the guy who changed my windshield was able to take off and put on the new mirror in under 1 minute. You need to get a good grip on the base (not the metal part attached to the windshield) and rotate to the left until it releases. Then you align the new mirror in that same 10:00 o-clock position and turn right. DO NOT apply force towards the windshield or it will break.
Step 8: Reapply the covers starting with the long flat piece which attaches to the overhead area near the glass and then reapply the long cover. It might seem light it wont fit but the long cover should snap into place without much effort to the big flat cover. Now comes the tricky part. You will need to reapply the small cover. It will slide up but will need to snap into place on the metal of the 4 metal claws area. It requires force to snap into place which I did not want to apply so I figured out a better way. If you spread the small cover outward, the plastic that needs to snap into place now requires less force to get there.
Some notes. The harness comes with 2 other wires. 1 that goes into the BCM and one that goes into that same blue connected where the t-tap is. I didn't want to tap into the fuse box and run a wire to that area, nor did I want to deal with the BCM so I cut and taped off that wire. I tried to install the wire into the blue connector but It wouldn't go in all the way. Maybe you will have better luck. The BCM wire pretty much doesn't dim the mirror when your car is in reverse and the blue connector wire doesn't dim the rear view mirror while the interior dome lights are on. I would live without both of these features so I cut those wires and taped them and made my life a lot easier.
The blue/red connector is indeed a switched 12v power source. I confirmed this with a multimeter. This install is not very difficult. If you cannot remove the rearview mirror I suggest going to a shop that installed windshields and have them do it like I did. He didn't even charge me anything.
Last edited:
")