phobos512
Ready to race!
- Location
- High Desert, California, USA
Posting this here for the benefit of people who don't go over to the other main site.
Ok first off, here are a bunch of reference links. These were all helpful to me so I'm including them here. Also, I make no warranty that this won't screw your car up, it's not my fault, yadda yadda yadda.
Shifter Product Page: http://www.dieselgeek.com/6_Speed_VW_Short_Shifter_p/ss-sigma6.htm
Shifter Install Guide: http://www.dieselgeek.com/v/install_guides/sigmasixinstall.pdf
How to remove the airbox: http://www.youtube.com/watch?v=cKc_J9FJHnM&t=0m50s
How to remove the stock shifter (not specific to the MK7): http://youtu.be/hhqEHHvgFBE
How to install the Sigma 6 (not specific to the MK7): http://youtu.be/ZlO5Lb-Bk5o
How to pop out the shifter surround: http://youtu.be/l7NjB1XKiis
Ok, the major steps are (1) remove airbox; (2) remove stock shifter; (3) install Sigma 6 shifter; (4) adjust shifter; and (5) reinstall of airbox.


(1) Remove Airbox
For this step you'll need a set of spring clamp pliers, channel locks, etc. In the engine bay find your airbox. It's a big black box on the driver's side toward the front (US market). It will have a pipe exiting it from the rear toward the rear with a large light grey spring clamp on it. Compress the two tabs of the spring clamp together using your pliers and move the clamp back along the corrugated (ridged) portion of the air intake hose. Slowly release the pliers so that spring clamp is resting on the corrugated portion of the hose (note: if you do not put the clamp here the spring clamp will expand significantly and your pliers may not be big enough when you go to reinstall at the end - I had to go buy new pliers).
Now, locate the vacuum hose attached to the airbox (it is toward the front passenger side of the airbox). Using l a fair amount of force work the hose off the airbox nipple. It's not held on in any way other than natural tension in the hose but it's on there pretty good. Be careful not to tear the hose. Now we'll remove the airbox. There are two rubber isolators with which the airbox mounts to the vehicle - one toward the back and one on the driver's side. Gently work the airbox off the back isolator mount by rocking the airbox up and toward the front of the car; then, do the same for the driver's side mount. The airbox will now be free and can be lifted out of the engine bay and set aside.


(2) Remove Stock Shifter
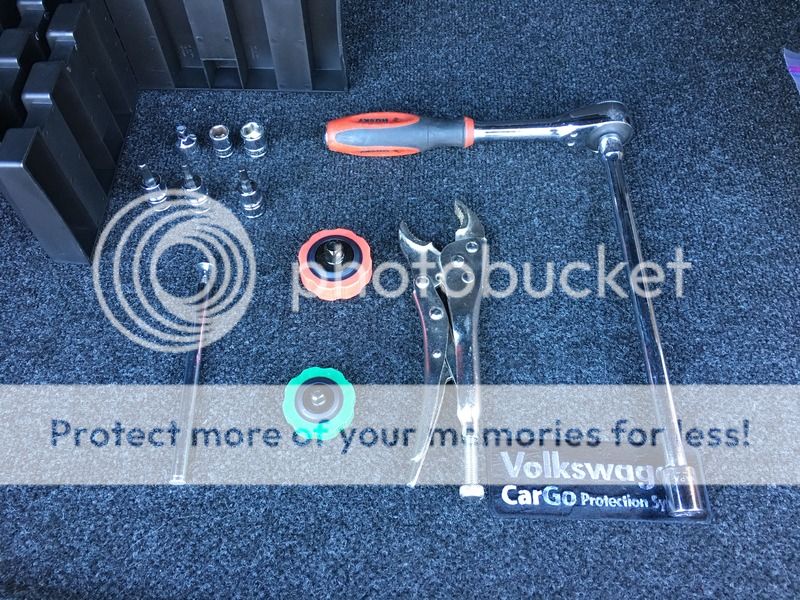
For this section you'll need a ratchet (or breaker bar), a 12" or longer extension for your ratchet, and a 13mm socket (use a short rather than deep one and you can reuse it in step 3 below). Rubber gloves are helpful here also as a number of the stock parts are lubricated.
First, release the cable ends on both the front to back and side to side cables. Fir these you'll pull the end forward to compress the spring and then twist toward the engine. The springs will then stay compressed. Then, remove the 13mm nut in the center of the stock shifter bracket. It will not be reused for the Sigma 6 shifter so just set it aside with the rest of the stock parts you'll be removing as we continue.
Now, remove the white clip on the end of the side to side bracket pin. It has a central pin that goes through the bracket pin, and the sides clip onto the bottom. So, you'll want to basically spread the ends apart and then lift the clip upwards, off the pin. My clip broke unfortunately, but it's another part that doesn't get reused. Now remove the side to side bracket - remove the cable from the side to side bracket cable end by sliding it rearward, then rotate the cable end forward. With cable end facing forward you'll be able to work the side to side bracket out toward the driver's side and rearward.
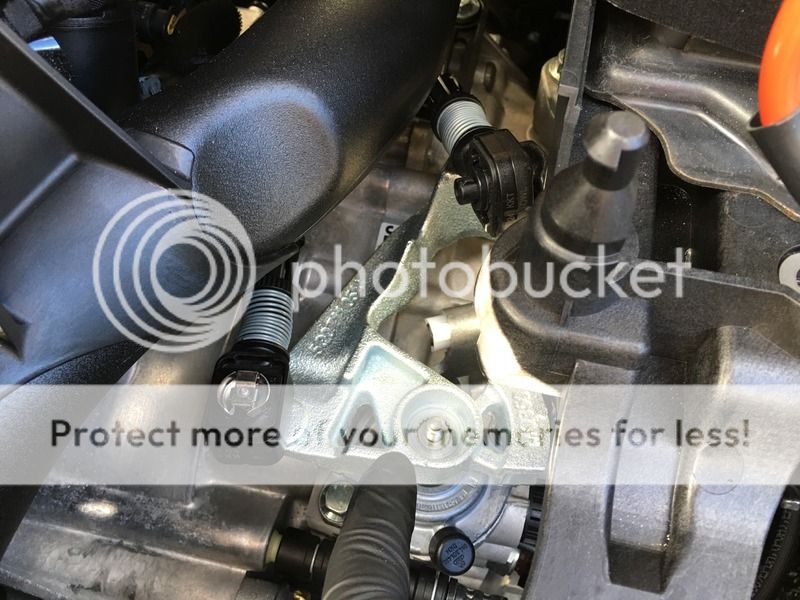
Next, remove the front to back bracket. Twist the bracket around until you find neutral - you'll know when you find it because the bracket will be able to freely move up and down. Grip the bracket and press it down, then lift it up. Use some force when you do this but don't try to be He-Man. It'll take a couple cycles to lift it off. Once it's free, set it aside with your other stock parts and wave them goodbye.


(3) Install Sigma 6 Shifter
You'll need the same ratchet (not the breaker bar though), extension and 13mm socket. You'll also need a 6mm hex head socket (an Allen wrench but in socket form).
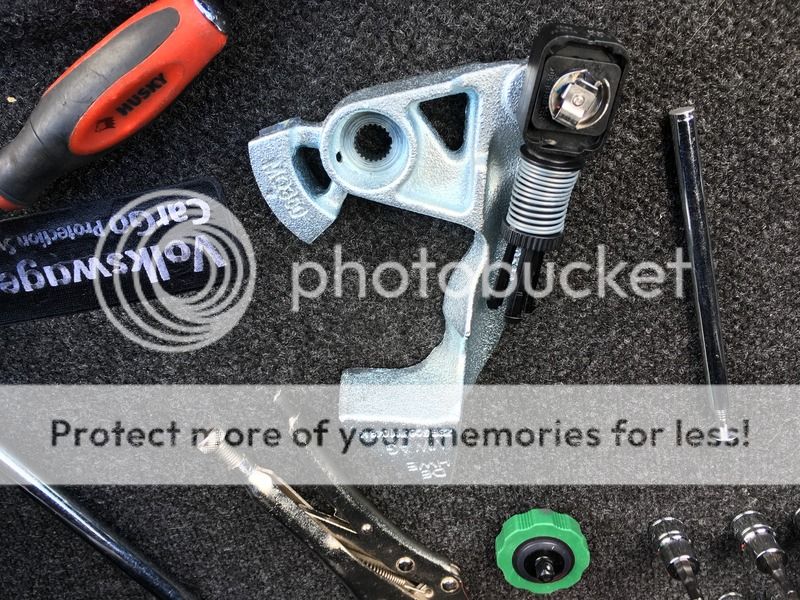
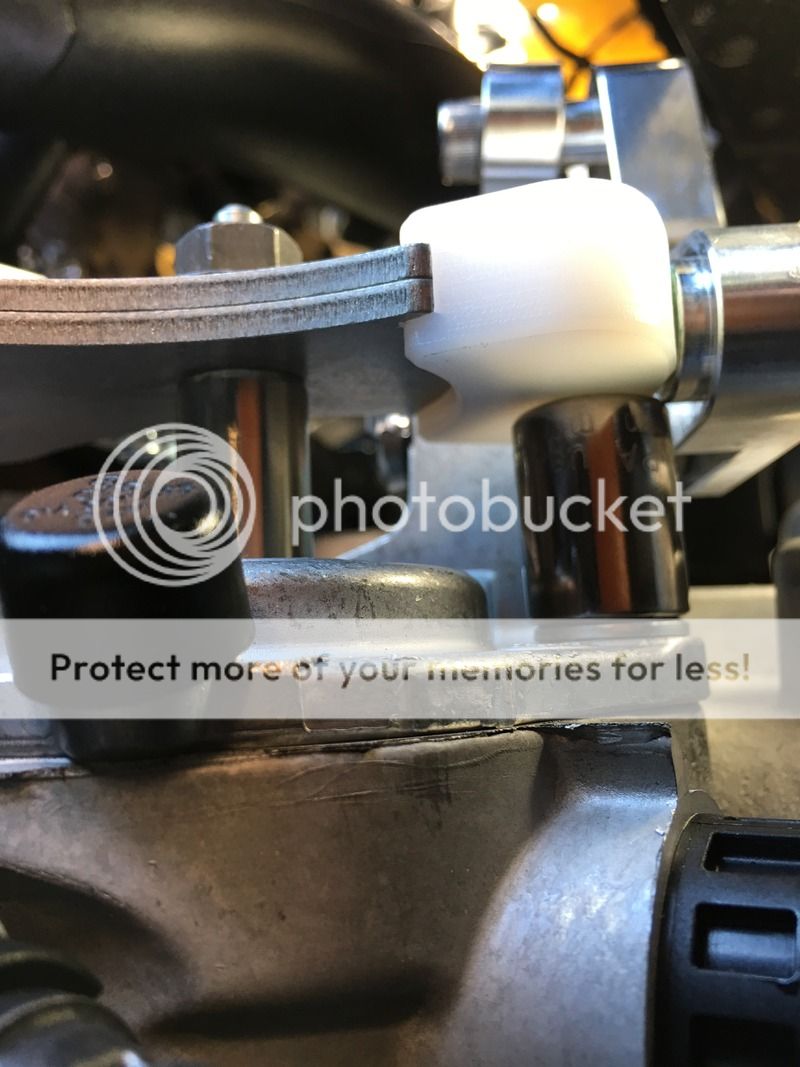
First, on the new side to side bracket, remove the metal spring clip on the end and remove the first plastic bushing. Leave the second plastic busing on the new bracket. Place the plastic bushing you took off into the hole on the mount on the transmission, in the side of the hole facing the passenger side.
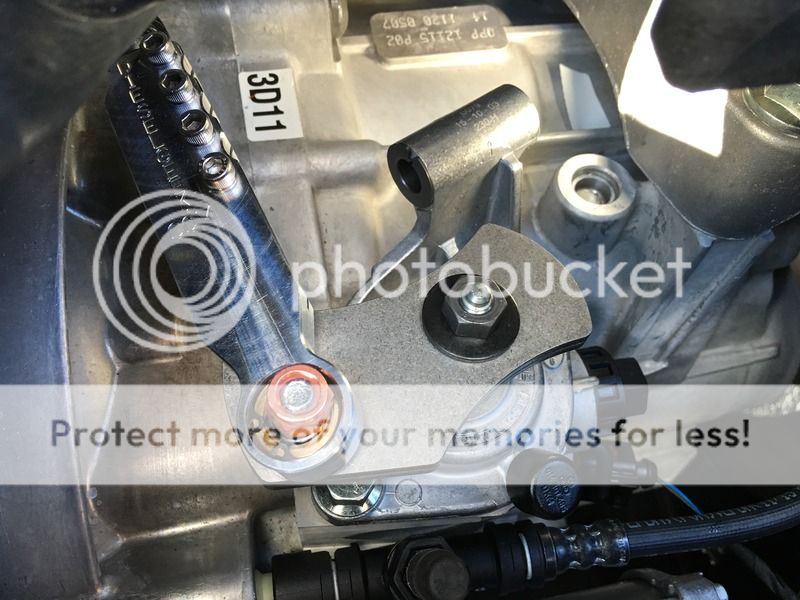
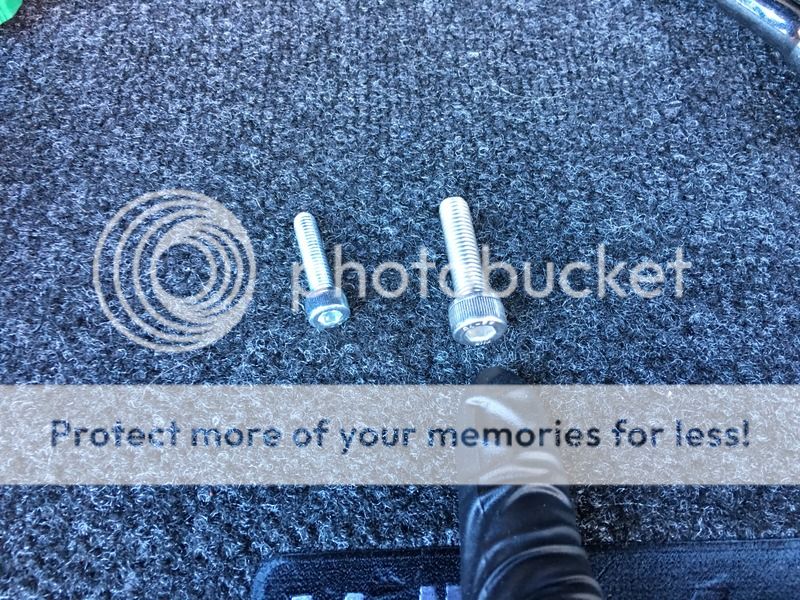
Next, install the new front to back bracket and cable end. Slide the cable into the cable end and then place the bracket onto the selector shaft sticking up from the transmission. It is splined and there is one spot that is two splines together. Line that spot up with the mark on your new front to back bracket as you press the bracket on. It will require firm pressure - make certain the splines and keyway are lined up before you apply pressure or you can damage the selector shaft. It's on then the splines are even with the top of the bracket. Thread on the new black 13mm nut/washer provided in the kit by hand until hand tight, then ratchet it on. The requirement is 25 Newton-meters which is about 19 lb-ft - I did it hand tight then a little further. Do NOT over tighten as you can snap the selector shaft stud right off and then you'll be in a world of hurt.
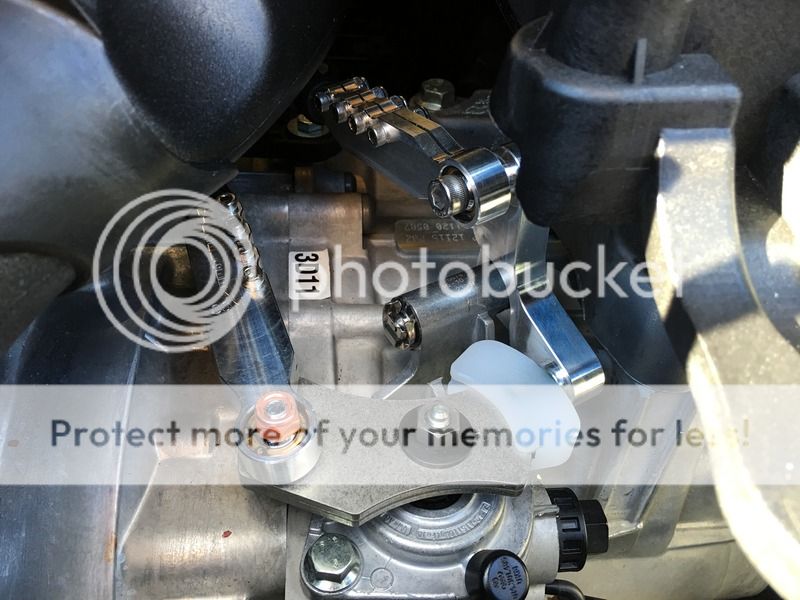
Now the side to side bracket. Slip the pin on the new side to side bracket into the mount (where you earlier placed half the plastic bushing) from the rear driver's side. While you are slipping the pin into the mount align the plastic slider with the end of the front to back bracket. You'll know you've got it right when the end of the pin comes through the mount. Place the metal clip you removed earlier onto the end of the pin just like it was at the start of this step. Place the cable end onto the cable and line it up with the hole at the top of the side to side bracket. Take the larger bolt that was included in the kit and thread it by hand through the cable end into the bracket. Once it is finger tight, lift up the whole bracket assembly and place your 13mm short socket on the bolt head underneath the plastic slider. Tighten the bolt firmly using the 6mm hex socket. This is another place to be careful because you're threading a steel bolt into an aluminum bracket. There's Loctite in the hole so there's no reason to go crazy tightening it. Once it's tight, remove the 13mm socket from under the bracket assembly.


(4) Adjust Shifter
A very small ratchet that has lots of teeth that takes magnetic drivers is useful here. I found one of these at the checkout counter in at Advance Auto Parts. A 4mm hex socket or bit (depending on your ratchet) is required. You'll also need a 3/8" box end wrench. A shorty is better than a full length and a hex will work better than a 12-pt. finally you'll need the pin included in the kit.
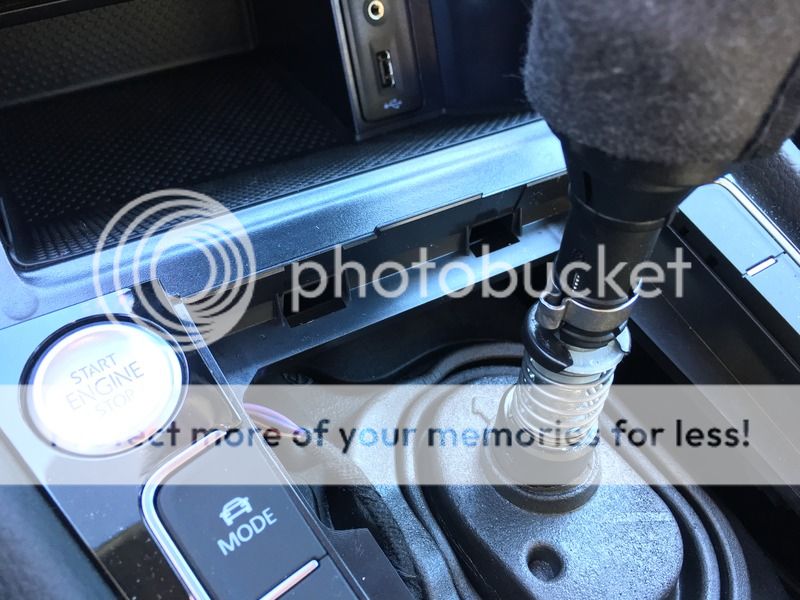
First the transmission needs to be locked in the home position and the shifter pinned. Below the bracket at the front side of the transmission there's a small black lever which is used to lock the transmission. Press down slightly on the shifter brackets and while doing so turn the lever upward and push gently into the transmission (toward the passenger side). The lever will rotate to be pointing through the grill area. When it's in the right spot the shifter bracket will be fixed in place (mine when locked moved about a mm, maybe less). Then, move inside the car. Open the cubby in front of the shifter to give yourself room. Then, press into the shifter boot at the front left and right sides respectively. You'll be able to feel two clips. Push in on the ends of the clips and lift the boot upward and toward the rear of the car, which will release it. Pull the boot up over the shift knob but don't remove it. Now you'll see the sound absorber. On older Golfs this could just be lifted out of the way but on MK7 it's very large and when I tried to pull on it, it tore. I don't know if there's a "right" way to do this but I'll say at the end I noticed no difference. I'm an enthusiast - I can handle a little noise. With the sound absorber out of the way you'll see the hole in the white plastic bracket and the loop at the base of the shifter shaft. Line the two up and place the pin through the shifter through the loop and into the white plastic piece. The shifter will then be fixed in place.
Starting with the side to side bracket, tighten the rearmost bolt using the ratchet, 4mm socket/bit and and 3/8" wrench. Then, tighten the second bolt. Leave the front two bolts loose for now. Move to the front to back bracket and cable end and do the same, though here you don't need to pull on the cable; just make sure it's seated in the cable end fully. (Note: on prior generations there was a necessity to remove slack from the cable by preloading it back toward the firewall; this is no longer specifically necessary on the MK7; see here)
Now, rotate the locking lever back down into the unlocked position, and remove the pin from the shifter. Run the transmission through the gears and make sure you have them all. Adjust as necessary, repinning and relocking if you need to. Then, tighten the remaining two bolts on each cable end. Replace the sound absorber and shifter boot. Make sure one more time that the shifter is operating properly as from here it's just reassembly.


(5) Reinstall Airbox
Grab your airbox from wherever you set it earlier and tip it back into place from the front to the back. Make sure the front part of the airbox lines up properly with the snorkel at the front of the engine bay. Insert the isolators onto the pins at the front and side of the airbox and rock it back and forth to settle it into place. Reattach the airbox hose and place the spring clamp back on the end of the hose over the end of the airbox. Make sure the spring clamp falls into position and isn't sitting on a high ridge. Finally, reattach the vacuum hose by pressing it back onto the nipple on the airbox lid.
Then, time for a test drive. Enjoy!
Ok first off, here are a bunch of reference links. These were all helpful to me so I'm including them here. Also, I make no warranty that this won't screw your car up, it's not my fault, yadda yadda yadda.
Shifter Product Page: http://www.dieselgeek.com/6_Speed_VW_Short_Shifter_p/ss-sigma6.htm
Shifter Install Guide: http://www.dieselgeek.com/v/install_guides/sigmasixinstall.pdf
How to remove the airbox: http://www.youtube.com/watch?v=cKc_J9FJHnM&t=0m50s
How to remove the stock shifter (not specific to the MK7): http://youtu.be/hhqEHHvgFBE
How to install the Sigma 6 (not specific to the MK7): http://youtu.be/ZlO5Lb-Bk5o
How to pop out the shifter surround: http://youtu.be/l7NjB1XKiis
Ok, the major steps are (1) remove airbox; (2) remove stock shifter; (3) install Sigma 6 shifter; (4) adjust shifter; and (5) reinstall of airbox.
(1) Remove Airbox
For this step you'll need a set of spring clamp pliers, channel locks, etc. In the engine bay find your airbox. It's a big black box on the driver's side toward the front (US market). It will have a pipe exiting it from the rear toward the rear with a large light grey spring clamp on it. Compress the two tabs of the spring clamp together using your pliers and move the clamp back along the corrugated (ridged) portion of the air intake hose. Slowly release the pliers so that spring clamp is resting on the corrugated portion of the hose (note: if you do not put the clamp here the spring clamp will expand significantly and your pliers may not be big enough when you go to reinstall at the end - I had to go buy new pliers).
Now, locate the vacuum hose attached to the airbox (it is toward the front passenger side of the airbox). Using l a fair amount of force work the hose off the airbox nipple. It's not held on in any way other than natural tension in the hose but it's on there pretty good. Be careful not to tear the hose. Now we'll remove the airbox. There are two rubber isolators with which the airbox mounts to the vehicle - one toward the back and one on the driver's side. Gently work the airbox off the back isolator mount by rocking the airbox up and toward the front of the car; then, do the same for the driver's side mount. The airbox will now be free and can be lifted out of the engine bay and set aside.
(2) Remove Stock Shifter
For this section you'll need a ratchet (or breaker bar), a 12" or longer extension for your ratchet, and a 13mm socket (use a short rather than deep one and you can reuse it in step 3 below). Rubber gloves are helpful here also as a number of the stock parts are lubricated.
First, release the cable ends on both the front to back and side to side cables. Fir these you'll pull the end forward to compress the spring and then twist toward the engine. The springs will then stay compressed. Then, remove the 13mm nut in the center of the stock shifter bracket. It will not be reused for the Sigma 6 shifter so just set it aside with the rest of the stock parts you'll be removing as we continue.
Now, remove the white clip on the end of the side to side bracket pin. It has a central pin that goes through the bracket pin, and the sides clip onto the bottom. So, you'll want to basically spread the ends apart and then lift the clip upwards, off the pin. My clip broke unfortunately, but it's another part that doesn't get reused. Now remove the side to side bracket - remove the cable from the side to side bracket cable end by sliding it rearward, then rotate the cable end forward. With cable end facing forward you'll be able to work the side to side bracket out toward the driver's side and rearward.
Next, remove the front to back bracket. Twist the bracket around until you find neutral - you'll know when you find it because the bracket will be able to freely move up and down. Grip the bracket and press it down, then lift it up. Use some force when you do this but don't try to be He-Man. It'll take a couple cycles to lift it off. Once it's free, set it aside with your other stock parts and wave them goodbye.
(3) Install Sigma 6 Shifter
You'll need the same ratchet (not the breaker bar though), extension and 13mm socket. You'll also need a 6mm hex head socket (an Allen wrench but in socket form).
First, on the new side to side bracket, remove the metal spring clip on the end and remove the first plastic bushing. Leave the second plastic busing on the new bracket. Place the plastic bushing you took off into the hole on the mount on the transmission, in the side of the hole facing the passenger side.
Next, install the new front to back bracket and cable end. Slide the cable into the cable end and then place the bracket onto the selector shaft sticking up from the transmission. It is splined and there is one spot that is two splines together. Line that spot up with the mark on your new front to back bracket as you press the bracket on. It will require firm pressure - make certain the splines and keyway are lined up before you apply pressure or you can damage the selector shaft. It's on then the splines are even with the top of the bracket. Thread on the new black 13mm nut/washer provided in the kit by hand until hand tight, then ratchet it on. The requirement is 25 Newton-meters which is about 19 lb-ft - I did it hand tight then a little further. Do NOT over tighten as you can snap the selector shaft stud right off and then you'll be in a world of hurt.
Now the side to side bracket. Slip the pin on the new side to side bracket into the mount (where you earlier placed half the plastic bushing) from the rear driver's side. While you are slipping the pin into the mount align the plastic slider with the end of the front to back bracket. You'll know you've got it right when the end of the pin comes through the mount. Place the metal clip you removed earlier onto the end of the pin just like it was at the start of this step. Place the cable end onto the cable and line it up with the hole at the top of the side to side bracket. Take the larger bolt that was included in the kit and thread it by hand through the cable end into the bracket. Once it is finger tight, lift up the whole bracket assembly and place your 13mm short socket on the bolt head underneath the plastic slider. Tighten the bolt firmly using the 6mm hex socket. This is another place to be careful because you're threading a steel bolt into an aluminum bracket. There's Loctite in the hole so there's no reason to go crazy tightening it. Once it's tight, remove the 13mm socket from under the bracket assembly.
(4) Adjust Shifter
A very small ratchet that has lots of teeth that takes magnetic drivers is useful here. I found one of these at the checkout counter in at Advance Auto Parts. A 4mm hex socket or bit (depending on your ratchet) is required. You'll also need a 3/8" box end wrench. A shorty is better than a full length and a hex will work better than a 12-pt. finally you'll need the pin included in the kit.
First the transmission needs to be locked in the home position and the shifter pinned. Below the bracket at the front side of the transmission there's a small black lever which is used to lock the transmission. Press down slightly on the shifter brackets and while doing so turn the lever upward and push gently into the transmission (toward the passenger side). The lever will rotate to be pointing through the grill area. When it's in the right spot the shifter bracket will be fixed in place (mine when locked moved about a mm, maybe less). Then, move inside the car. Open the cubby in front of the shifter to give yourself room. Then, press into the shifter boot at the front left and right sides respectively. You'll be able to feel two clips. Push in on the ends of the clips and lift the boot upward and toward the rear of the car, which will release it. Pull the boot up over the shift knob but don't remove it. Now you'll see the sound absorber. On older Golfs this could just be lifted out of the way but on MK7 it's very large and when I tried to pull on it, it tore. I don't know if there's a "right" way to do this but I'll say at the end I noticed no difference. I'm an enthusiast - I can handle a little noise. With the sound absorber out of the way you'll see the hole in the white plastic bracket and the loop at the base of the shifter shaft. Line the two up and place the pin through the shifter through the loop and into the white plastic piece. The shifter will then be fixed in place.
Starting with the side to side bracket, tighten the rearmost bolt using the ratchet, 4mm socket/bit and and 3/8" wrench. Then, tighten the second bolt. Leave the front two bolts loose for now. Move to the front to back bracket and cable end and do the same, though here you don't need to pull on the cable; just make sure it's seated in the cable end fully. (Note: on prior generations there was a necessity to remove slack from the cable by preloading it back toward the firewall; this is no longer specifically necessary on the MK7; see here)
Now, rotate the locking lever back down into the unlocked position, and remove the pin from the shifter. Run the transmission through the gears and make sure you have them all. Adjust as necessary, repinning and relocking if you need to. Then, tighten the remaining two bolts on each cable end. Replace the sound absorber and shifter boot. Make sure one more time that the shifter is operating properly as from here it's just reassembly.
(5) Reinstall Airbox
Grab your airbox from wherever you set it earlier and tip it back into place from the front to the back. Make sure the front part of the airbox lines up properly with the snorkel at the front of the engine bay. Insert the isolators onto the pins at the front and side of the airbox and rock it back and forth to settle it into place. Reattach the airbox hose and place the spring clamp back on the end of the hose over the end of the airbox. Make sure the spring clamp falls into position and isn't sitting on a high ridge. Finally, reattach the vacuum hose by pressing it back onto the nipple on the airbox lid.
Then, time for a test drive. Enjoy!
Last edited: