SomethingNew71
TDI Pro
- Location
- NC
- Car(s)
- 2009 JSW TDI
UPDATE JUNE 2017:
I have seen this guide a few places on other sites for other cars but when installing mine I couldn't find a good one for the GTI/Golf. This should be the same on any MK7 Golf variant but don't hold me to that!! I have also updated this with some new links to a Dash Cam that works a ton better than the one I had before as well as some updated links.
Step 1 - Supplies:
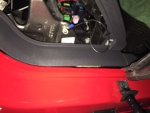
Step 2 - Open up your car
Use a Nylon Pry tool or something soft top pop this open.
Closed:

Open(Ignore the already installed wires I took these pictures after I was done):

Pull your Drawer out by moderately squeezing together and pulling out.

Step 3 - Wire it up:
I chose this fuse slot for the dash cam since its only on when the key is set to accessory. So this means the dash cam powers on with the car. And turns off when it turns off. I have no idea what this fuse is for because at the time I can't find a diagram of the internal fuse box. End of the day though this circuit wont cause any problems because the add-a-circuit retains an original fuse and the your dash cam will get its own specific fuse.

Cut the clamps off the cigarette adapter and wire the hot lead into the add a circuit. Feed that line towards the fuse box. Then wire the ground end directly to the bolt in the second picture which is a really nice ground nearby.


Take the original 10-fuse out and put it in one slot of the add-a-circuit and then add an additional 10-fuse to the second slot which is for your dash cam. You can then plug the add a fuse into the fuse slot pointed out above.


After you do that you can plug in your dash cam to the whole wiring contraption. I reccomend wrapping this with some electrical tape to make sure it doesn't come loose.

Step 4: Conceal the wires
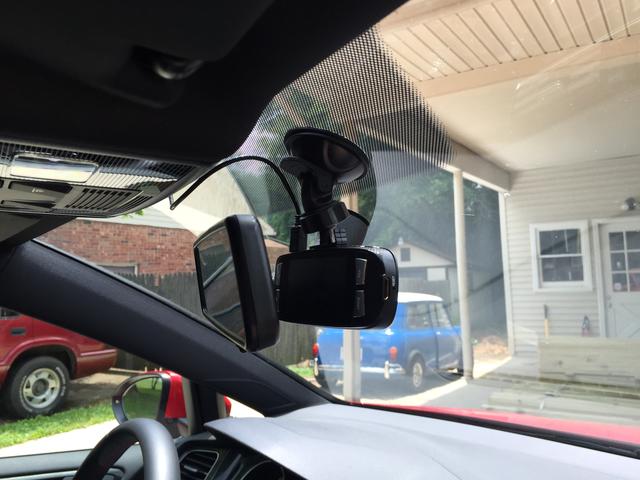
I ran my wires up the A-pillar of the car stuff it into the edge of the headliner using 3M tape and then plugged into the dash cam. I found that was the easiest way to do this but it still takes a little time. I chose to put my camera right behind my rear view mirror since that hides it really well. If you aren't looking for it you won't see it from the outside of the car.


Step 5 - Test the Camera:
I vote to test the camera before buttoning everything back up on the car to make sure it powers properly. Would hate to close it all up just to find out it doesn't have power. After that position the camera and make sure you like the view. Close everything back up and you're done!!
Enjoy all the fun events you get video of driving. Like this guy near our train tracks in Charlotte. Don't do anything stupid!
https://www.youtube.com/watch?v=fJ1TCGrD8Cs
I have seen this guide a few places on other sites for other cars but when installing mine I couldn't find a good one for the GTI/Golf. This should be the same on any MK7 Golf variant but don't hold me to that!! I have also updated this with some new links to a Dash Cam that works a ton better than the one I had before as well as some updated links.
Step 1 - Supplies:
- Rexing V1P Dash Cam(Better Camera now the pictures still show old one) - http://amzn.to/2txwlpa but any cigarette lighter powered cam will work.
- Add-A-Circuit - http://amzn.to/2sp8U0U with smaller blades for our fuse box. This allows us to tap into an existing fuse in a clean safe way.
- Hard Wire Kit - http://amzn.to/2txM3jY Clean way to hard wire to a fuse output
Step 2 - Open up your car
Use a Nylon Pry tool or something soft top pop this open.
Closed:
Open(Ignore the already installed wires I took these pictures after I was done):
Pull your Drawer out by moderately squeezing together and pulling out.
Step 3 - Wire it up:
I chose this fuse slot for the dash cam since its only on when the key is set to accessory. So this means the dash cam powers on with the car. And turns off when it turns off. I have no idea what this fuse is for because at the time I can't find a diagram of the internal fuse box. End of the day though this circuit wont cause any problems because the add-a-circuit retains an original fuse and the your dash cam will get its own specific fuse.
Cut the clamps off the cigarette adapter and wire the hot lead into the add a circuit. Feed that line towards the fuse box. Then wire the ground end directly to the bolt in the second picture which is a really nice ground nearby.
Take the original 10-fuse out and put it in one slot of the add-a-circuit and then add an additional 10-fuse to the second slot which is for your dash cam. You can then plug the add a fuse into the fuse slot pointed out above.
After you do that you can plug in your dash cam to the whole wiring contraption. I reccomend wrapping this with some electrical tape to make sure it doesn't come loose.
Step 4: Conceal the wires
I ran my wires up the A-pillar of the car stuff it into the edge of the headliner using 3M tape and then plugged into the dash cam. I found that was the easiest way to do this but it still takes a little time. I chose to put my camera right behind my rear view mirror since that hides it really well. If you aren't looking for it you won't see it from the outside of the car.
Step 5 - Test the Camera:
I vote to test the camera before buttoning everything back up on the car to make sure it powers properly. Would hate to close it all up just to find out it doesn't have power. After that position the camera and make sure you like the view. Close everything back up and you're done!!
Enjoy all the fun events you get video of driving. Like this guy near our train tracks in Charlotte. Don't do anything stupid!
https://www.youtube.com/watch?v=fJ1TCGrD8Cs
Last edited: