GOLFMK8
GOLFMK7
GOLFMK6
GOLFMKV

nicholam77's PP GTI thread

Jedimk7

Drag Race Newbie
Car and garage look great! [emoji41][emoji106]

Sent via Pide Piper compression app
 

nicholam77

Go Kart Champion
Location
Minneapolis
Awesome journal.


Tire rack looks good. Love mine.
I have Tirerack bags.
Good work on car clean up.


Car and garage look great! [emoji41][emoji106]

Sent via Pide Piper compression app


Thanks guys!


Despite lack of mods lately I do have a few things on the horizon.

Got an ECS stainless clutch line for Xmas which I’m planning on swapping out my KMD tuning one for to delete the clutch accumulator valve.

Also got a BFI GS2 shift knob, and ordered their leather boot to go with it. Hope to install it in the coming weeks. Was iffy on it at first but after seeing it in person it looks and feels better than the OEM shifter in every way.


Also have a Dinan Sport piggyback module on the way. I know it’s weak sauce compared to pretty much anything else, but got it on sale for cheap and feel like it will be a good way to test the waters and ability of my stock clutch to hold some extra torque.

Other things I’ve been mulling over for the future are an upgraded dogbone (like the roc euro one perhaps) as I’ve been getting some extra vibrations when engaging 1st gear from a stop). Not sure if my 034 insert has settled and not doing its job as well anymore or what but some others have said this could smooth it out a bit. And maybe motor/trans mounts or a front splitter. A relatively subtle one like Maxton v1 or Dutch parts co.
 

nicholam77

Go Kart Champion
Location
Minneapolis
BFI Shift Knob + Boot Install

Installed the Black Forest Industries GS2 Air Leather shift knob and their custom mk7 shift boot yesterday.

There are a lot of images below. Please don't quote the whole post, thanks!

Install was not that hard if you take your time. Linking the DAP video because I found it useful:

https://www.youtube.com/watch?v=cZW9USlw3Co

Kinda long, but the basics are pop the two clips at the front of the shifter trim (highlighted blue in my pics), and then 6 retaining clips that hold the silver trim to the black plastic ring the shift boot adheres to (highlighted green):


Then just peel the old boot off (it's stuck on the black plastic ring with adhesive). I used a heat gun on low to help with this and it came off pretty easy with no tearing of the original boot. Just go slow.

BFI includes some adhesive tape to attach the new boot to the black plastic ring. Unfortunately they do not supply enough! I had to double up some masking tape to fill in the gaps.

Once the new boot is stuck to the black plastic ring, pop the whole thing back into the silver trim via the 6 retaining clips. Easier said than done, as while the BFI boot is custom made for the mk7 application, fitment isn't perfect around the bottom and getting it in with no bunching of the material requires some patience. I used some small pick tools to help me adjust it, going one corner at a time.

On to the knob. Here is a quick comparison with the stock knob. They are about the same size and height:


However, while I do really like the design of the stock knob, the BFI one feels MUCH much nicer. Heavier, the perforated leather feels great, and the fit and finish of the metal is excellent. It is an expensive, but quality piece.

Here are a few pics of the setup installed:


The boot is a definite upgrade from the stock boot, as well. The leather is thicker and much smoother than the fake leather of the stock boot. The stitching is essentially the same size and color on the BFI boot, so it matches the interior perfectly. And best of all it is properly sized for their shift knob so there is no bunching where the knob meets the boot. Nice and clean.


Overall, I like:

- Materials are great and it looks excellent
- Makes a nice difference in shifting. Feels more precise, notchy, and substantial

Dislike

- Expensive for the knob and boot combo
- Not enough adhesive tape included. Paul mentioned in DAP video, too. Throw in an extra roll!
- Sits too low. Combined with the S3 short shifter the throws are too short for me. In the middle of winter with cold transmission even with the extra weight there is not enough leverage. I have there height adapter on order to correct this. But instead of an accessory it should be an option as to which height you want. An extra $30 just because it's an mk7 doesn't make sense when they could have a simple drop-down menu choice on their website
 

nicholam77

Go Kart Champion
Location
Minneapolis
DinanTronics Sport Module

So... I grabbed one of these when they were on sale around the Holidays from Mod Bargains for ~$170.

It's a piggyback module from Dinan for VW/Audi 1.8T and 2.0T applications. Power gains are pretty modest compared to pretty much everything out there. For me with the 2.0 liter engine, it's ~20 hp and ~30 lb/ft according to Dinan:


That's in the most aggressive setting with good gas. More on that later.

For those who don't care to read the full post below, TL;DR -- I can feel the extra power and I believe it's worth the price.


The unit is small and only has two connections, both of which intercept pressure sensors. One is located on the intake charge pipe on the underside of the car, and the other is on the intake manifold on top of the engine. The one on top is easily accessible by removing the engine cover and is pictured in the green square below:


The one underneath the car requires jacking the car up and removing the underbody tray. This is not hard and makes accessing it MUCH easier. I believe this is the same plug as the infamous "Plug D" that JB1/4 users always seem to have trouble with. Some claim you can access it reaching in from the top, but save yourself some time and frustration and just jack the car up.


In the sensor pictured above you can release the plug by inserting a small, flat blade screwdriver in the hole on top of the plug, while simultaneously pulling them apart. Easier said than done as the plugs can be stuck together and brittle in the cold. I broke a tab on mine.

Once installed, turn on the car but don't start the engine. A red light on the module should light up. Then you can connect with the Dinan app on your phone via Bluetooth. There are a few Dinan apps out there -- the one you want for this is the "D-Sport" app. This is what it looks like on iOS:


In the app you can set the "mode" of the unit. There are 5 different modes to choose from with different amounts of boost applied:

Valet: -6.2 PSI (won't be using this!)

Stock: 0 PSI (or in other words unit is not active / passthrough mode)

Sport: 2.0 PSI

Sport+: 3.0 PSI

Race: 4.0 PSI

The unit ships in Sport+ so a smartphone and the app is needed to change it to anything other. I put mine directly into Race mode. :D


Haven't had the opportunity to test it thoroughly due to temperature and weather conditions, but in the few pulls I have been able to do I have been satisfied. The extra power is noticeable. I am running it on 93 octane gas. Most noticeable over 3k RPM and it builds nicely and smoothly. Car definitely feels quicker. It's not life-changing the way I can only imagine a full tune is, but it's just enough to make the car feel exciting to me again. At least for now.

Things I like:

- economical at $170 on sale
- easy to install
- includes free app and bluetooth built in
- good flexibility in choice of modes and stock passthrough option
- power increase is noticeable, but modest for those concerned about clutch wear or blowing turbos
- piggyback so warranty intact
- Dinan has been around a long time and is a generally well-respected company (it seems??)

Things I don't link:

- Nothing to complain about so far!

So why didn't I just get a JB1/4? Or a tune?

JB1 seems outdated, and JB4, while I'm sure a better product and more configurable, is also more expensive and makes a lot more power. I actually don't want to push the boundaries of adding power because I don't want to pay for a new clutch right now. Sure, a JB4 could be de-tuned to similar values as the Dinan, but then what's the point? This Dinan unit certainly won't be for everyone, but I do think it has value as a way to discretely add a *little* bit more excitement and fun to an already great car, for a good price.
 
Last edited:

Jarbear

Ready to race!
Location
SF Bay Area
JB1 seems outdated, and JB4, while I'm sure a better product and more configurable, is also more expensive and makes a lot more power. I actually don't want to push the boundaries of adding power because I don't want to pay for a new clutch right now. Sure, a JB4 could be de-tuned to similar values as the Dinan, but then what's the point? This Dinan unit certainly won't be for everyone, but I do think it has value as a way to discretely add a *little* bit more excitement and fun to an already great car, for a good price.

Nice car my friend!! Questions: Have you experienced any clutch slip after installing? Is it a noticeable difference in power?
 

nicholam77

Go Kart Champion
Location
Minneapolis
Nice car my friend!! Questions: Have you experienced any clutch slip after installing? Is it a noticeable difference in power?

Thanks!

No clutch slip yet. Even in cold winter weather. But to be honest I don't wail on it very often, especially in winter because road conditions are often bad. And 99% of my driving is commuting and errands around town.

But yes there is a noticeable difference in power. Others have compared the Dinan Race Mode to a JB1 (I've never had a JB unit so I can't comment). It's not as apparent in the lower RPMs. But once you crack 3K RPM boost builds harder and for longer. Meaning 30-80mph pulls or overtaking at highway speeds is properly quick. 3rd and 4th gear are probably the sweet spot.

I do wish it had more of an effect on the lower end, but that's the clutch-roasting end anyways. And I've always felt this car is bogged down off the line for us 6MT users by the gearing.

I'd say if you're looking for a relatively safe solution that's still a noticeable power bump, it's tough to beat for the price especially if you can find it on sale.
 

Jarbear

Ready to race!
Location
SF Bay Area
Thanks!

No clutch slip yet. Even in cold winter weather. But to be honest I don't wail on it very often, especially in winter because road conditions are often bad. And 99% of my driving is commuting and errands around town.

But yes there is a noticeable difference in power. Others have compared the Dinan Race Mode to a JB1 (I've never had a JB unit so I can't comment). It's not as apparent in the lower RPMs. But once you crack 3K RPM boost builds harder and for longer. Meaning 30-80mph pulls or overtaking at highway speeds is properly quick. 3rd and 4th gear are probably the sweet spot.

I do wish it had more of an effect on the lower end, but that's the clutch-roasting end anyways. And I've always felt this car is bogged down off the line for us 6MT users by the gearing.

I'd say if you're looking for a relatively safe solution that's still a noticeable power bump, it's tough to beat for the price especially if you can find it on sale.

Thanks! That's exactly what I wanted to hear. Also, I just now noticed you said there was a noticeable difference in your previous post.. oops :rolleyes:
 

nicholam77

Go Kart Champion
Location
Minneapolis
Back to summer mode:


Now the car needs a good wash and detail! :eek:

Hope to install an ECS stainless steel clutch line in the near future.
 

nicholam77

Go Kart Champion
Location
Minneapolis
Hello build thread, it's been awhile.

*Please don't quote this whole post, as it's rather long, thanks!* :D

A few weeks ago I installed engine and trans mounts. It was a fairly straightforward process but I do have some comments, comparisons, and pics for those interested.

ECS already has an excellent set of installation videos, and I'm sure there are others out there, so I'm not really going to bother with a DIY.

Engine Mount:
https://www.youtube.com/watch?v=VxBIZnrT0UU

Transmission Mount: https://www.youtube.com/watch?v=q0BsxLWMd2A&t=452s

What I can offer is my experience with two different transmission mounts, the ECS and the CTS, for what it's worth.

TL;DR - I started with a CTS engine mount and ECS transmission mount combo, NVH was a lot, so I switched to CTS on both sides and now all is good.

For those looking to do this install themselves, it's pretty easy. If you're lowered at all you'll probably need to get the car on jack stands (all 4 corners, but I only had to go to the bottom setting on each stand) to get enough clearance to slide a floor jack under the front bumper. Do one mount at a time, and support that side (either engine or trans) with the jack and a block of wood. On the engine side you can use the oil pan -- just put the wood over by the edge where it's strongest and not the center. On the trans side, just find a good flat area where the wood is balanced. The engine and trans do not need to be lifted, just supported. The goal is for them NOT to move has you do each replacement, so that's why I raised all four corners of the car so it's level.


Engine side only requires unclipping the coolant reservoir to gain access, and is a quick job:


Transmission side you have to remove more stuff (intake, battery, battery tray, ECU, ECU bracket, and unclip wire channel), but it's still easy to do and most of it is just 10mm bolts.

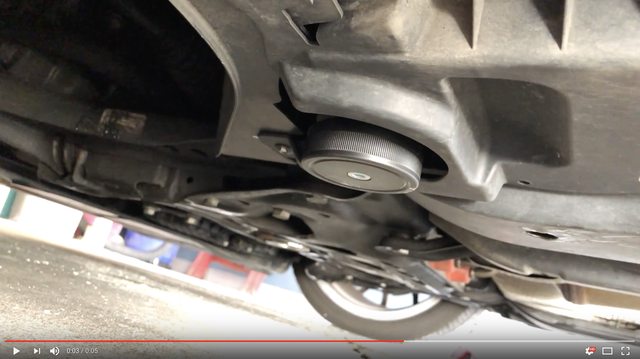
Here's what it looks like when you get in there:


The biggest struggle with the trans side is the wire channel that goes over the 4 body-side fasteners. You have to work around it and it's very awkward.


Some tools that will make you're life easier are a small ratchet for tight spaces, and a larger one if you have it for more leverage, a breaker bar, universal swivel, and a decent sized extension. I wouldn't start this job without those.


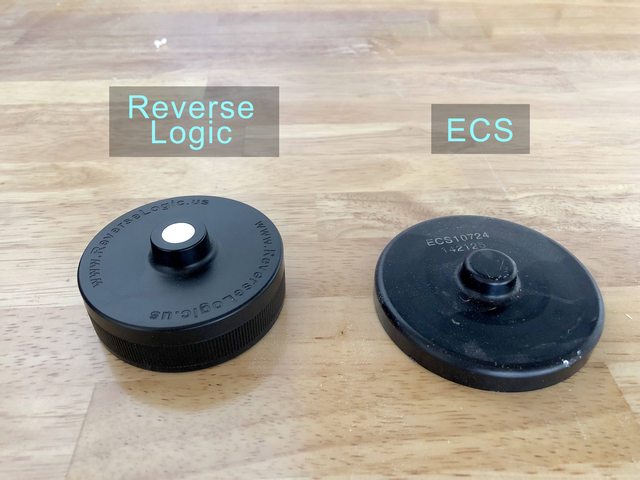
On to the comparisons. Below you can see the ECS mount, the CTS mount, and the stock mount:


Immediately you'll notice the ECS is it's own new design, while the CTS reuses the stock components with the exception of the stiffer rubber bushing. Another important note here -- the ECS bushing is poly, not rubber.

Taking a closer look at the backsides, you'll see that the OEM and CTS mounts have some locating pins to help center the mount on the body side, and the ECS does not.


You can also see that two of the body-side holes on the ECS mount are oval shaped, and two are circular, whereas on the CTS and OEM mounts, all the holes are circles.

What this amounts to is the CTS and OEM mounts are guaranteed to be aligned correctly with the body because of the locating pins, and the ECS is not, because it has no pins and there will be "play" for two of the fasteners. I'll get to my experiences with each more below, but I'm pretty sure this caused problems for me. ECS has detailed instructions on aligning their mounts, which include taking some measurements between parts of the mount and the body, which I tried to carefully follow but there could be a chance it was slightly misaligned.

The reason I say this is the NVH with the ECS mount was incredible. Rear view mirror shaking so much I couldn't see anything in it at low RPMs, steering wheel and pedal vibrations, and I could hear everything in the cabin. There were some nice motor sounds for sure, although they were quite loud, but on top of that I could hear the gears constantly spinning and clicking, the pressure plate actuation, every clunk of the shift linkage was transmitted to the cabin. Even at idle with windows closed. I liked the idea of a little rawness, and was expecting some increased NVH with stiffer mounts, but this was way too much for my tastes. One of the reasons I like German cars is because they feel substantial and quality and refined. This was not refined, especially for a daily driver.

Now, this isn't me saying the ECS mount is a bad part. In fact it seems well made, and it looks cool as well. They claim low-NVH and I think it's billed as a "stage 1" mount so I was surprised at how much there was. This is why I am partially attributing it to misalignment. I also think the ECS solution might be better with their parts all around (transmission and engine sides, and maybe even dogbone). I'm guessing that having poly on one side and rubber on the other could have also been a mismatch and amplified the vibrations.

Some of you might be wondering why I didn't just try and re-align the ECS part if I thought that was the issue. Well... the bolts to secure it are one-time-use-torque-to-yield, and at $25 a set plus waiting for shipping I didn't want to go through the install process and cost multiple times to get it right, especially since I use my car every day. And the NVH was so bad (to me) that I didn't want to risk prolonging a solve. So I cut my losses and just went for the CTS. And I'm very happy I did. It's near perfect.

I'll write a proper review of the CTS mounts in another post, but if you're considering motor and trans mounts, and the ECS mount in particular, I'll just leave it with two things:

1. You should probably go with the same manufacturer for both sides, and poly-poly or rubber-rubber. They probably design their products to be used together and I don't think mixing brands was a good idea.

2. Be extra sure the mounts are perfectly aligned, especially if you get the ECS model where there are are more variables.


nicholam77

Go Kart Champion
Location
Minneapolis
Rolled over 20k miles recently and did my 4th oil change this weekend, again with LiquiMoly.


While changing the oil I had a chance to try out a new "tool" I learned of on Vortex, the Reverse Logic Jack Pad. It fits into the OEM Audi/VW Jack Snubber pieces and provides a round base for your floor jack to contact. ECS makes a "jack pad adapter" piece out of aluminum that does the same thing more or less, but there are a few key differences that make the Reverse Logic unit much better in my opinion.


First, the Reverse Logic product has a magnet in the tip, so when you insert into the jack snubber, it doesn't fall out due to gravity. With a lowered car there isn't much room to fit a floor jack under or see what you're doing. With the ECS piece you have to hold it in place while you position and pump a heavy floor jack with the other hand while laying on the garage floor. Kinda frustrating. Since the Reverse Logic unit doesn't fall out it's much easier to place the floor jack.


Secondly, the Reverse Logic unit is taller and slimmer. This matters because if you installed the OEM cover pieces in the front with the rubber snubber pieces, the snubbers are recessed from the trim. The extra height on the Reverse logic piece helps it clear. Alternatively you could just install the whole trim kit as intended in the front but I didn't know about the extra bits at the time.

Click below thumbnail for VIDEO


Thought it might help someone who uses a floor jack with the jack pad system.
 

tknj99

Ready to race!
Location
Central VA
Lookin good! I had VWR springs on my previous MK6.. how do you like the VWR's on the MK7.. did they help out much in the handling department?
I have an RSB already which helped quite a bit but want to round out the handling as much as possible without dropping the car much.. thanks
 
Top